Technology
- Obscure Polish company quietly launches massive 122.88TB PCIe 5.0 immersion cooled SSD — and no one noticed this world's first except us
- LG's Micro RGB Evo TV Promises Better Color at CES 2026
- LG reveals Micro RGB evo TV with bold claims of perfect color
- Netflix dropped Google Cast — now Apple TV for Android just brought it back
- Is that your grandad's transistor radio? No, it's a 4-SSD NAS with two 2.5Gb LAN ports, 12GB RAM, and a cracking name — the orange-colored Youyeetoo NestDisk

Custom Search
News
- Trump designates street fentanyl as WMD, escalating militarization of drug war
- Ford pulls the plug on the all-electric F-150 Lightning pickup truck
- Ford pulls the plug on the F-150 Lightning electric pickup truck
- Australia announces strict new gun laws. Here's how it can act so swiftly
- Executions nearly double in 2025 due to dramatic rise in Florida
TechRadar Reviews
Reviews
- I tested Leica's divisive M EV1 — it's easier to the eye, but loses some of that rangefinder soul
- Idea Spectrum Realtime Landscaping Pro 2025 review
- Amadeus review: classical music is Bach and better than ever in Sky's retelling of a tumultuous composer rivalry
- I tested Ring’s new outdoor camera in my garden and was blown away by the picture quality (and high price tag)
- The Bosch Tassimo Finesse Friendly is a super affordable coffee maker, but beware – there's a catch that means it could cost you in the long run
New forum topics
I’ve watched all of My Life with the Walter Boys season 2, and this harmless teen romance is still a total mess
As you can probably tell from my star rating, I'm completely split on My Life with the Walter Boys season 2. I've been around the block with this type of cozy TV show before – I'm a self-proclaimed Virgin River expert, Emily in Paris is my guilty pleasure, and I've even been sucked into watching Prime Video's The Summer I Turned Pretty season 3 this year. But if I think about these type of cozy dramas in a broader capacity, My Life with the Walter Boys season 2 would be flour if it was a spice.
Let me explain. Our core concept is a very simple one: privileged New York teen Jackie Howard (Nikki Rodriguez) moves to a ranch in rural Colorado to live with her mother's best friend, Katherine Walter (Sarah Rafferty), and her large family after a family tragedy. Based on the book series of the same name, we then follow the ups and downs of Jackie's new life as she settles in, dissecting all the complicated relationships forged along the way. It should be a recipe for Netflix success, but there's something missing here.
The Rotten Tomatoes score for My Life with the Walter Boys season 1 should give you an idea about its existing division. Critics like myself have absolutely slammed it, while 'normies' (that's a compliment, I promise) largely enjoy it, even though the fan score is still lower than rival shows. Why? I think the answer is because its quality across the board isn't up to muster, and that's also the case in season 2.
My Life with the Walter Boys season 2 does the job, but that's not exactly positiveI don't wish to be a massive negative Nelly here. I completely believe TV shows like My Life with the Walter Boys season 2 serve a purpose, and their easy-going spirit and ethos is exactly what we need to tune out an increasingly difficult world. I typically use my mum as a gauge for the genre – if she watches a show without ironing at the same time, binges more than 2 episodes in one go and remembers its name, the show is a hit with its core demographic. Season 2 ticked all of these boxes, and she's already foaming at the mouth (metaphorically, sorry mum) for the green lit season 3.
In short, this means the people actively seeking out the mess that comes with trashy teen romance are getting exactly what they signed up for. But if you don't fit the bill, or you've had enough of the Netflix series hitting the same beats over and over again, season 2 doesn't do much to win you around. Jackie has inevitably arrived back in Colorado after returning to New York at the end of season 1, and her relationship issues have picked up right there they left off.
It goes without saying that romance and family remain at the core of My Life with the Walter Boys season 2, but this time, Jackie is almost acting like Belly (Lola Tung) in The Summer I Turned Pretty. Given how chaotic season 3 of the Prime Video show is going, that's a huge insult. The parallels between the two shows are now closer than ever (you can see this from the trailer above), but rest assured that Jackie isn't quite as bad... yet.
A knock-off The Summer I Turned Pretty isn't what we need this monthJackie Howard (Nikki Rodriguez) in My Life with the Walter Boys. (Image credit: Netflix)Now we've got my main grievances out of the way, let's dig a little deeper into the show's craft. Compared to rival shows, My Life with the Walter Boys season 2 looks slightly cheaper, which is probably a major part of why season 3 was renewed so early on. That wouldn't be an issue if the performances and execution of the storylines weren't so poorly done, at points feeling more like a high schooler's documentary film than a production on one of the best streaming services in the world.
We feel like we're going around in circles when it comes to Jackie's relationship with Alex (Ashby Gentry) and Cole (Noah LaLonde), with Danny (Connor Stanhope) and Erin's (Alisha Newton) only make our heads spin even further. We've even got a separate triangle going thanks to Zach (Carson MacCormac), Skylar (Jaylan Evans) and Nathan (Corey Fogelmanis), and that's all before we even get to George's (Marc Blucas) future plans for the ranch.
It does feel as though you need to study up before diving into season 2, and it can feel mind-boggling to keep up with all the changes, which simultaneously move incredibly slowly and like time is flashing past you at the speed of light. But by the time we get to the final few episodes, you know exactly what's going to happen. Without giving it away, My Life with the Walter Boys season 2 ends on a cataclysmic cliffhanger, but I could tell exactly what was going to happen about two episodes earlier. Still, it's a major shock to see it unfold, and will hopefully shift season 3 in a better direction. I'm sorry, Melanie Halsall, but a better direction is something that My Life with the Walter Boys sorely needs.
You might also like- Netflix cancels what could’ve been the next Virgin River even though the series had more views than Ransom Canyon
- 3 Body Problem season 2 is underway as star reveals first days of filming: ‘The stuff they've got planned out is pretty epic’
- Netflix’s new streaming recommendation tool is about to make my astrology-obsessed friends unbearable
Categories: Reviews
I tested some of the cheapest noise cancelling earbuds and now I’ll never spend more than $40
JLab Go Pods ANC: Two-minute review
I’ll admit that it was with reticence that I agreed to test earbuds clearly angling for the title of ‘cheapest ANC buds’ but let me dispel any similar cynicism you may have: the JLab Go Pods ANC are, for their price, excellent.
Perhaps I shouldn’t be surprised, because these new cheap earbuds come from esteemed affordable audio brand JLab, which has a lot of experience with affordable audio options. But anyone who’s tried to save a buck by buying lower-cost tech knows that you can’t take anything for granted, even with legacy brands.
Let’s first address the selling point in the headline: are these the best noise-cancelling earbuds on the market? No, but if you add 'cheap' to that question, quite possibly. They are cheap, they do have noise cancellation, and they certainly are earbuds. Plus, they’re really good at what they do, and so I can give them a tick there. But are they the cheapest buds with ANC?
I was expecting to be able to find plenty of cheap Amazon rivals with ANC, but I was wrong; one or two ANC-toting options from unnamed brands sit at the same price as the JLabs here, but there’s not much on offer for less that also has ANC. So from the right angle, the Go Pods ANC tick that box too.
What same-price rivals probably don’t offer is decent audio quality. For budget earbuds these sound really good, with (depending on how you set up the equalizer) crystal-clear treble, hearty mids or scooping bass, and a broad soundstage that you don’t often get in buds twice the price.
The ANC itself also works well, plastering over background sounds with little tact but with heart. That said, the transparency mode is a nightmare which will cause you to hear every little thing going on around you with frightening accuracy.
Like all good earbuds, the JLabs are also nice and lightweight, so you can wear them for ages without getting earache. Similar can be said of the tiny plastic carry case, which completely disappears into a trouser pocket.
I can’t pretend that these earbuds are perfect, and they do have a few things which annoyed me during testing. For one, JLab has replaced a charging port with a charging cable, so you plug the case into something, rather than plugging something into the case, to power it up. Good in theory, but functionally I found it less useful than the standard option which every other company uses, of simply letting you plug a cable into the case.
The in-box ear tips also didn’t offer much in the way of grip, so when I walked or ran in the buds they had a habit of falling out pretty quickly. This is a problem you can solve with the added expense of third-party eartips (or using ones you have left over from your last earbuds).
But even as earbud shortcomings go those aren’t the biggest I’ve ever faced, or even a huge issue at all in the case of the first one. Know this: these are fantastic-value earbuds.
JLab Go Pods ANC review: Price and release date(Image credit: Future)- Released in summer 2025
- Costs $36.99 / £29.99 (roughly AU$60)
The JLab Go Pods ANC were announced in May 2025 and put on sale in the months after. It took them barely any time to go on offer, but more on that in a moment.
The default retail price for these buds is $36.99 / £29.99 (roughly AU$60), so they’re some of the most affordable noise cancelling earbuds you can find, and the few alternatives I can find at this price tag almost all come from unknown brands on Amazon.
I say ‘default price’ because only a few months after release, the Go Pods ANC can easily be found for a discount. In the US I found them for $29.99 and in the UK they’re at £24.99, making these super-cheap buds even cheaper. And that’s before Black Friday.
JLab Go Pods ANC review: SpecsDrivers
10mm
Active noise cancellation
Yes
Battery life (ANC off)
7.5 hours (buds) 26 hours (case)
Weight
4.2g (buds) 27.6g (case)
Connectivity
Bluetooth 5.4
Waterproofing
IP55
JLab Go Pods ANC review: Features(Image credit: Future)- Battery life of just 5 hours with ANC on
- Good ANC but iffy transparency
- JLab app brings a few useful extras
During my testing time, I didn’t once have any kind of connection issue with the JLab Go Pods ANC, so you don’t need to worry about them having an unreliable Bluetooth link.
The buds have some extra features via the JLab app, though it’s mostly just some customization and tweaks rather than anything truly novel.
It took my while to get my head around the Noise Control Modes tool, which lists ANC on, off and Be Aware mode, but with toggles by all of them, so it’s easy to turn two or all three of them on at the same time… right? That’s what I thought, until I realized that toggling these selects whether you can switch to them via the buds via touch controls. The real way to switch ANC modes is to physically select the mode you want, not toggle its slider.
Another option via the app is an equalizer, which comes with three unnamed presets and a custom mode. It’s a 10-band equalizer so it’s pretty advanced, and audiophiles will be able to get a lot of depth in how they customize their tunes.
(Image credit: Future)Running down its list, the app also lets you set a max volume limit for safety, change what touch controls do, switch between a Music Mode and Movie Mode (which seems to increase the sound spread but decrease quality) and… set up a workout interval timer? That’s not exactly a standard headphone feature but it might prove useful to a few people.
The battery life of the Go Pods sits at 7.5 hours, according to JLab – that’s with ANC turned off and, from my testing, you’re looking at about 7.5 hours with it turned off which isn’t exactly a competitive figure. The company puts the extended play time offered by the charging case at 26 hours.
One final thing we probably need to touch on is the ANC itself – is it any good in these cheap buds? Surprisingly, it really is. It hushes your surroundings pretty substantially, and while it obviously doesn’t reach the heights of rivals in the market – a light background hum always got through, and sharper noises weren’t dimmed as much – it’s a lot better than JLab could have got away with for the money.
I wasn’t as impressed, though, with Be Aware mode (JLab’s take on Transparency). While using it I was too aware – not only did it not cancel noise, it seemed to amplify every little thing that occurred around me in a jarring experience overall.
- Features score: 4/5
- Both buds and case are super lightweight
- Case has a built-in charging cable
- Ear tips don't offer much grip
The JLab Go Pods ANC have one small design difference that sets them apart from the vast majority of other samey wireless earbuds, and it’s built into the case.
The buds’ charging case is a 4.52 x 6 x 2.61cm pebble which opens lengthwise along the side; it’s made of plastic so it only weighs 27.6g (for context, most buds I test have cases double that weight). This is all to say that it’s quite small and very light.
While most charging cases are nondescript save for perhaps a logo and a USB-C charging port, JLab does away with the latter and replaces it with its own USB-C cable; you can plug this into a port to easily power up the buds.
In theory I get why JLab would use this instead of a simple port: it means you can power it up via your phone or laptop without needing an extra cable. In practice though I found it annoying, as it meant I couldn’t use the standard USB-C charger I bring for my other gadgets. I couldn’t power up the case from my phone if I was also charging said phone, and I couldn’t plug it into wall outlets on public transport or adaptors at my home (all of which use standard USB).
Onto the buds: these weigh 4.2g each so they continue the Go Pods style of being lighter than the competition. They’re stem-style buds, consisting of a large body, tips angled slightly downwards and a flat stem bearing JLab’s logo.
(Image credit: Future)There are touch controls on each of said logos, which worked reasonably well although there were a few mis-touches when I was readjusting the buds or times when one press would be picked up as two. Also the default controls are a little odd so I’d recommend jumping into the app to customize them yourself.
I really appreciate low-weight buds like the Go Pods as they were easy to use for long periods of time without feeling any ache or wear. That was only the case if I was sitting still though.
The in-box eartips seem to offer so little friction that they may as well be made out of WD40: as soon as I went for a walk, or heaven forbid a run, the earbuds began slipping from my ears (yes, I tried all three options included in the box). Even putting in or removing the buds normally, you can feel how little they’re inclined to stay in the ear – not great for active people.
While the case doesn’t have any official protection, the buds have an IP55. This means they’re mostly protected against dust ingress and can withstand low-press jets of water (including rain and sweat) but aren’t suitable for swimming.
The JLab Go Pods ANC come in three color versions: black, lilac and green, and as you can tell I tested the former.
- Design score: 3.5/5
- Single 10mm driver
- Can handle regimented bass and clear treble
- High max volume
I’m going to wager that your expectations for the JLab Go Pods ANC’s audio chops probably match what mine were going into the testing: you see the price and shudder at the thought of those cheap buds you bought on Amazon once and know what to expect. But banish the thought.
The JLab Go Pods ANC actually sound pretty good; I’m not sure I’d pick them over something like the Samsung Galaxy Buds 3 Pro but for the price, they’re surprisingly capable.
By default (that is, with the JLab Signature equalizer mode), music sounds bright with defined treble and mids, and a laudable breadth of soundstage so you can hear different passages and harmonies in the music surrounding you.
There’s clearly a little distortion crackling away when too many different instruments are playing at once, or when the hi-hat gets going, but only in mixes that can trouble much pricer buds too.
I’ll admit that I largely listened with some heavy equalizer tweaks, but I was surprised by how much bass the Go Pods were capable of when asked. There’s scope for hearty, scooping bass with the right song and right EQ set-up. But even without this set-up, lower-register lines felt well-defined.
The buds’ max volume is really high – higher than you’d ever normally need, unless you accidentally held down the ‘volume up’ button on your phone like me – and doesn’t distort as much at louder settings as many other buds do.
- Sound quality: 4/5
The JLab Go Pods ANC are basically the cheapest noise-cancelling earbuds that are actually worth buying.
Because of their feature set and audio quality, these aren’t just ‘good for the price’; they’re good full stop. JLab didn’t need to offer them for such a low price but in doing so, it’s made them a fearsome value proposition.
- Value: 4.5/5
Attributes
Notes
Rating
Features
The ANC is good, as is the general feature set, though the battery life is poor.
4/5
Design
The buds are lovely and lightweight, but the eartips don't stick well and I'd have preferred a charging port.
3.5/5
Sound quality
For the price, the JLabs sound really good: cheap and cheerful.
4/5
Value
These offer fantastic value for money given how cheap they are.
4.5/5
Buy them if…You're on a (low) budget
If you've set yourself a budget for earbuds and it isn't a big one, then there are going to be very few alternatives to the Go Pods ANC.
You want noise cancellation
Noise cancellation is a feature which is common on expensive earbuds but not so much on cheap ones. That's not the case with the JLabs though.
You want to charge from your phone
The charging case's cable attachment lets you power up your buds from your phone, great if you rarely have access to a power point.View Deal
You're not willing to provide your own eartips
I didn't rate the in-box ear tips, so I'd recommend the buds mostly to people who would be willing to buy their own (or, more likely, have leftovers from your last buds).
You need a long-lasting battery
If you're listening with noise cancellation, you're only getting five hours of listening time, which isn't a competitive figure.
JLab Go Pods ANC
JLab Go Pop ANC
Earfun Air 2
JBL Wave Beam
Drivers
10mm
10mm
10mm
8mm
Active noise cancellation
Yes
Yes
No
No
Battery life
7.5 hours (buds); 26 hours (case)
7 hours (buds); 24 hours (case)
9 hours (earbuds), 40 hours (total)
8 hours (buds) 24 hours (case)
Weight
4.2g (buds) 27.6g (case)
4.1g (buds); 22g (case)
4.5g (buds) 45g (case)
8.8g (buds) 39.5g (case)
Connectivity
Bluetooth 5.4
Bluetooth 5.4
Bluetooth 5.3
Bluetooth 5.2
Waterproofing
IP55
IP55
IPX7
IP54
JLab Go Pop ANC
Forgive the incredibly similar name. These buds cost just less than, or the same as, the Pods depending on where you live, and have a similar feature set with the design being the biggest difference.
See our full JLab Go Pop ANC review
Earfun Air 2
These buds have a similar design to the JBLs but miss noise cancellation. They're cheap, but not quite as affordable as the Go Pods.
See our full Earfun Air 2 review
JBL Wave Beam
Another low-cost option that has a similar stem-toting design is the JBL Wave Beam. This has a smaller driver and no noise cancellation but it won't break the bank and has a fairly good battery life.View Deal
How I tested the JLab Go Pods ANC- Tested for four weeks
- Tested at home, in the office, working out and on walks
I tested the JLab Go Pods ANC for about four weeks, which is longer than the standard TechRadar testing process, but is a testament to their audio chops.
I used the buds while they were connected to my Android phone, mainly for Spotify but also for streaming movies, games and listening to voice notes. I used them while at home, at the gym, on runs and on walks around my neighborhood.
I've been testing gadgets for TechRadar for over five years now and in that time have used other JLab products as well as some of their biggest competitions.
- First reviewed in August 2025
Categories: Reviews
I tested an air purifier that can follow you around with clean air, and that's just one of its special tricks
Dreame AirPursue PM20: two-minute review
The Dreame AirPursue PM20 is an air purifier with a whole load of tricks up its sleeve. The USP is the 'Follow' mode, whereby the large, cup-shaped head will swivel to follow you wherever you go in a room, blasting purified air in your direction. In practice, it's very impressive to watch. There's also 'AI Purify' – an Auto mode by another name – whereby the AirPursue will monitor for five specific pollutants and adjust settings to clear them when they're detected.
Aside from these and two more special modes, and a variety of manual control options, the appliance can also heat or cool the air as required. So it's positioned to rival not only the best air purifiers on the market, but the best fans, too. Not bad for the brand's first ever purifier.
When it comes to air purifiers, I'm often left wondering how I'm meant to know if they're actually doing anything. Not so with the AirPursue PM20, which offers real time pollutant readings within the Dreame companion app, so you can watch at any moment as it cleans the air in your living room or bedroom. It's able to sense and remove 14 different pollutants (although that doesn't include CO2), and gives each one a rating so you can tell how good or bad the air quality is.
All that functionality comes at a bit of a price, and replacement filters aren't especially cheap either (deals are appearing already, and I think it's decent value for what you're getting). While the design is sleek and modern, there's no getting around the fact it's really rather large, although Dreame has helpfully added wheels to make it easy to maneuver from one room to another,
The PM20 is geared towards use in medium or large rooms, with a CADR to match (400 m³/h). If you have a smaller space you'd be better off with the PM10 sister model, which has a has a CADR of 300 m³/h.
Keep reading to see how well the Dreame AirPursue PM20 cleaned the air in my historic home and gave me more peace of mind.
(Image credit: Future)Dreame AirPursue PM20 review: price & availability- List price: US$999.99
- Launch date: June 2025
- Availability: US and Canada
The AirPursue PM20 is Dreame's first ever air purifier, and launched in June 2025. It's available to buy direct from Dreame or via Amazon in the US and Canada, with a list price of $999.99. (The smaller AirPursue PM10 costs $899.99 at list price.)
You can take that list price with a pinch of salt, because at time of writing this review the PM20 had only been out a month and was already attracting significant discounts on Amazon (it dropped to $769.99 during the Prime Day Sale). Even with that discount it's still a premium purchase, though.
The only additional cost associated with this air purifier are the replacements for the carbon filter and the high efficiency composite filter, which are $59.99 and $99.99 respectively. They have to be replaced between 6 and 24 months, depending on how hard they're put to work.
Considering that this air purifier has multiple modes, speeds, heating capabilities, app and voice integration, and AI settings, I'd say the price tag is reasonable. In fact, I've seen more expensive air purifiers that have fewer features. However, it's still a decent investment, so if you're on a tighter budget there are plenty more affordable options about.
- Value for money score: 4 out of 5
CADR:
400 m³/h
Size:
14.9 x 14.9 x 33.4 in
Control:
Buttons, remote, app, voice control
Filters:
HEPA-13, carbon
Modes:
1-10, AI Purify (Auto), Pet Purify, Comfort, Cooling, Heating (77-104F)
Contaminants detected:
PM1, PM2.5, PM10, HCHO, TVOC
Other readings:
Overall air quality status, temperature, humidity
Oscillation:
45, 90, 180 degrees, or 'AI follow'
Timer:
12 hours
Heating:
78-104F
Dreame AirPursue PM20 review: design- Large air purifier that can also operate as a fan or heater
- Smart capabilities, AI detection, and app integration
- Provides specific information about pollutant levels
The Dreame AirPursue PM20 arrived assembled, allowing me to plug it in and immediately start purifying the air within my home. The only setup required of me was connecting the air purifier to the Dreame app and tap a button in the app to authorize the voice command function.
In terms of appearance, the Dreame AirPursue PM20 reminds me of a mini R2-D2, with its bulbous head, cylindrical body, and the wheels placed on the bottom. I was so glad for the wheels as I could move the air purifier around the house without having to pick it up – as I may have mentioned, it's not small. In the air purifier world, it also bears a striking resemblance to the Dyson Big+Quiet.
(Image credit: Future)The head has a small, square LCD screen that displays air pollution levels via colored graphs. Buttons on the head allow you to turn the purifier on and off and cycle through information on the LCD screen like air pollutant, temperature, and humidity readings, and the filter life.
Inside, the PM20 is outfitted with two filters. First, a high efficiency composite filter (HEPA-13 grade) which removes indoor pollen, dust mites, haze, bacteria, viruses, and other fine materials, and which must be replaced every 16-24 months (the app notifies you). Second, a carbon filter, which is used to remove indoor kitchen fumes, pet odor, TVOC, formaldehyde and other harmful gases. The replacement time for the carbon filter is every 6-12 months.
There more going on with this air purifier's design that can't be seen. It's outfitted with dual-flow modulation technology, which means the air flows in and out of the head and the body. It can apparently project air forward up to 10 meters.
The airflow fan speed can be adjusted between 1 and 10 and the wind direction can be set on 45, 90, or 180 degrees. You can also utilize various special modes:
- AI follow – directs pure air at whoever is in the room
- AI purify / Auto – monitors for 5 pollutants and switches on when detected
- Pet purify – enhanced airflow specifically geared towards pet hair and odors
- Comfort – quiet, long-range air projection
- Cooling
- Heating – set between 78 and 104 degrees Fahrenheit
The most exciting of those is AI follow, where the purifier head will follow you as you move within a room. If there is more than one person in the room, the purifier will toggle between the two people's positions.
Because I tested the AirPursue in the summer, I usually used the Cooling mode, but I was also pleased to learn it would earn its space in winter by doubling up as a heater. I found Comfort mode was a great option when sleeping at night because it lowered the fan speed so the noise wasn't bothersome.
(Image credit: Future)Speaking of which, noise-wise, the air purifier is not that loud. On the lowest fan speed, it has a dB rating of 54. I measured the highest speed at 67 dB.
With the remote, you can adjust the direction of the fan, change the fan speed, turn on the heating function, and choose between the different modes. I preferred managing the settings in the app or with voice commands.
- Design score: 5 out of 5
- Detects and clears pollutants quickly
- Can cool or heats spaces while purifying them
- App makes it easy to control purifier and monitor pollutants
My house was built over 100 years ago, and as a historic building it produces a lot of dust and allergens. Not to mention, it was probably updated at various times when pollutants weren't necessarily monitored or regulated. As someone who has asthma and allergies, I'm always looking for ways to make my home – where I work, sleep, and live – healthier. After testing the Dreame AirPursue PM20, I feel a lot more confident and comfortable breathing in my own house.
To speak plainly, I love the Dreame AirPursue PM20. It was easy to move it between rooms with the wheels. Once I connected it to the app, I dove in. I was glad to discover that the air quality of my house is better than I thought. I gleaned this information from the overall air quality score. However, thanks to the Dreame sensors, I was able to see the exact levels of harmful pollutants – PM1, PM2.5, PM10, HCHO, and TVOC – present in my home.
I didn't know what these pollutants meant, but the app provided definitions of each one. For instance, I learned that HCHO is a “common indoor pollutant, the release period of formaldehyde from furniture, paint, and adhesives lasting for years". Not only that, but the Dreame app tracked the pollutant reading and provided a value range for each pollutant, and then labelled the reading as either excellent, good, moderate, or poor. I was able to track the pollutant readings at any moment and even by days and weeks within the app.
Click to enlarge (Image credit: Dreame / Future)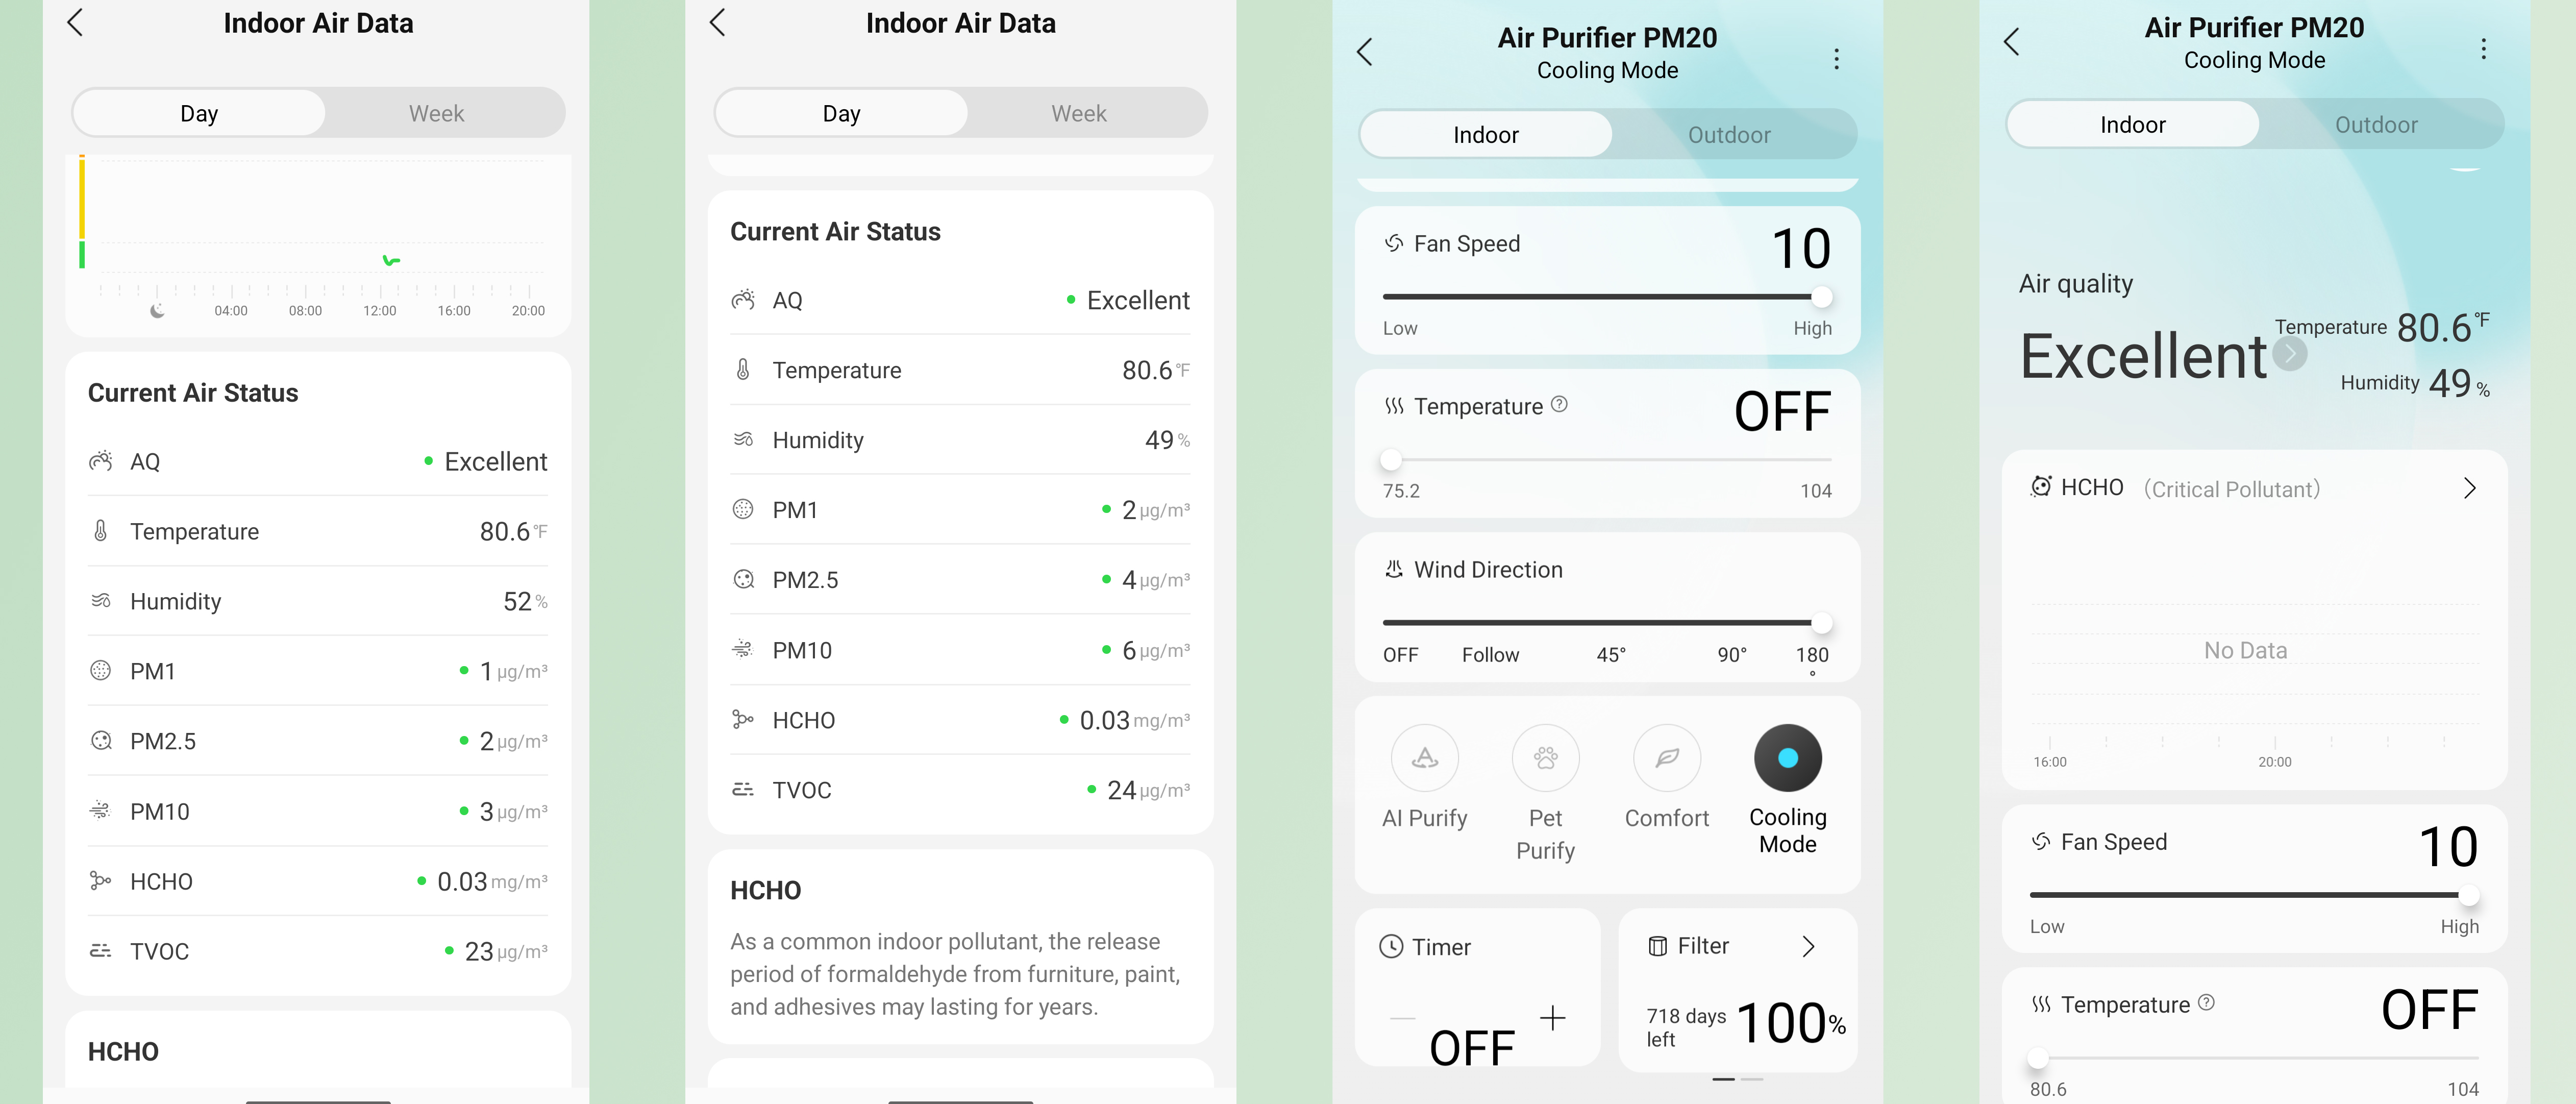
To see how well the Dreame AirPursue PM20 detects pollutants and clears them, I ran a test with dry shampoo. I began by screenshotting the readings (prior to spraying the dry shampoo) to gain an air quality baseline. Then I sprayed dry shampoo about two feet in front of the air purifier. Within the app, I saw the air purifier recognize the pollutants from the dry shampoo within about 10 seconds.
From there, I monitored the air purifier, noting the initial increase in pollutant readings. The purifier cleaned the room within about 11 minutes. The TVOC reading was the only pollutant that didn't quite reach the original reading after 11 minutes (it was 2 points higher). In fact, the TVOC reading fluctuated over the next few hours within one to two points of the original reading. At least it remained well within the 'excellent' air quality range.
(Image credit: Future)Most of the time, I set the Dreame AirPursue PM20 on a fan speed of 10, and the wind direction at 180 degrees. Sometimes, I used the AI Follow feature which means the head of the purifier followed me around the room, literally purifying the air around me. This feature was cool to see in action, and reliably well on test.
I don't have pets, so I didn't need the Pet Purify mode, but I know that it could be helpful for those who do share their home with four-legged friends, especially in removing odors (the purifier cleared kitchen odors within my house in minutes). The Comfort mode was great to use at night; it was quieter than my ceiling fan.
Like a few Dyson fans, the Dreame AirPursue can also be used as a fan or heater. Because I was testing in Texas in July, I mostly used the Cooling more, but the Heating option will be ultra-helpful in winter (it lets you adjust the temperature between 78 and 104 degrees Fahrenheit. The 12-hour timer was nice, but for the most part, I turned the purifier on and off at my own will.
(Image credit: Future)I didn't have any issues with this air purifier. The only thing to keep in mind is that when the fan speed is set to 10 (or the highest speed), you must raise your voice and move near the air purifier to use the voice command. That wasn't a big deal to me, because I usually used the app on my phone to adjust the settings as I always forgot the voice commands and would have to look them up in the app anyways (helpfully, Dreame lists the voice commands here for reference).
Overall, I think the Dreame AirPursue PM20 does what it says it will do and brought me a lot more peace of mind. I feel better knowing that I'm breathing cleaner air in my home day or night.
- Performance score: 4.5 out of 5
Attribute
Notes
Rating
Value
A premium air purifier occasionally discounted but well priced considering the control and features. Filters represent and ongoing cost.
4/5
Design
Large but stylish. Can operate as a fan or heater as well as a purifier. Manual control or a selection of special modes – including one where the pure air follows you around. Easy to read, real-time pollution readings. Control via app, voice or remote.
5/5
Performance
Detects and cleans pollutants efficiently. The app makes it easy to monitor pollutants, understand how clean your air is, and adjust the settings.
4.5/5
Buy it if...You want to monitor and understand the air quality in your home
The Dreame AirPursue PM20 senses 14 different pollutants, and you can watch it clean in real time by monitoring the pollutant readings in the app. This also offers in-depth explanations and notes where the readings fall within the safe and unsafe ranges.
You want an air purifier that heats or cools in different directions
Air purifiers emit bursts of air. Dreame capitalized on this feature by adding some cooling and heating features to the PM20. Adjust the fan speed between 1-10 or let your air purifier push out heated air (between 78-104 degrees) in the winter. You can even adjust the direction of the airflow between 45-180 degrees or set the purifier to follow you as you move in the room.
You want multiple control options
Control the Dreame AirPursue PM20 with a button, voice command, app, or remote. Or simply set it on AI purify and let the purifier automatically adjust the settings to keep your home clean.
Don't buy it if...You just want something simple
The Dreame AirPursue PM20 has plenty of tricks up its sleeve, but if you don't fancy all those special features then there are plenty of cheaper, still effective purifiers to choose from.
You live in an apartment or small space
The Dreame AirPursue PM20 is geared towards use in bigger spaces (although it does have a sibling model for smaller rooms). Standing at nearly 3 feet tall and over a foot wide, it's also too large to tuck out of the way.
You want a purifier that reads and scrubs CO2
The one thing that the Dreame AirPursue PM20 can't do is read CO₂ levels. Some air purifiers can sense CO₂ and even scrub it, though you'll likely pay more for them.
How I tested the Dreame AirPursue PM20I used the Dreame AirPursue PM20 for a few weeks in July in my 105-year-old home in Texas. I used the purifier in various rooms to get a variety of readings, as well as testing each of the windspeed settings and special modes. To get a more objective view of how efficiently it cleared air, I also sprayed dry shampoo a few feet from the purifier to see how quickly the purifier detected it and cleared it from the room.
Read more about how we test
- First reviewed July 2025
Categories: Reviews
After a week reviewing the Pixel 10 Pro XL, I wouldn't give it up for all the iPhones in the world
Google Pixel 10 Pro XL: Two-minute review
The Google Pixel 10 Pro XL is the Pixel phone to buy this year. The Pixel 10 Pro can match the Pro XL on the most important features, but the benefits of the larger display, along with a couple of features that are simply better on the XL device, make the Pixel 10 Pro XL my favorite of the new Pixel family, and the phone I would recommend first, but not last.
I feel confident recommending the Pixel 10 Pro XL above the rest – and above any other Android phone you can buy right now – because I spent the last year using the Pixel 9 Pro as my primary work phone. That means I know exactly why the Pixel is a great phone for being productive, but I also know that I wish I’d had a bigger screen than the 9 Pro's. The Pro XL will be my primary device this year, for sure.
If you haven’t checked out a Pixel phone in a while, you really should head to a store and get your hands on one. The latest Pixel 10 Pro XL is polished and well-built, with a refined look and gorgeous materials and color combinations. It’s a much nicer-looking phone than the latest iPhone 16 Pro Max, and it delivers on a number of features Apple hasn’t been able to match.
Google’s AI features are the most advanced on any smartphone, and often the most unobtrusive. The newest AI features, like Magic Cue and the live translation, don’t feel pushy or overblown, and they don’t produce embarrassing or useless results. Google is pushing AI into the background as a silent helper, where it should be.
Of course, all of the new Pixel 10 series phones have Google’s advanced new AI features, like the live translator that not only converts your language into another tongue, it also speaks with a voice that sounds remarkably like yours. That may sound alarming from a privacy viewpoint, but Google says this processing happens on the Pixel 10 Pro XL, and not on a distant cloud computer, so your conversations – and your voice – should be safe.
So what makes the Pixel 10 Pro XL so special, the best of the Pixel 10 bunch? First of all, Google’s Pixel displays – so-called Super Actua displays – are among the best you’ll see on any smartphone. These screens are bright and colorful and very sharp. When the screen is this good, I want as much screen as I can get, so I prefer having the larger XL display. At 6.8 inches, it’s 0.5 inches bigger diagonally than the Pixel 10's display, and that equals 13 square centimeters of extra screen space.
The Pixel 10 Pro XL also has the largest battery of all the new Pixel phones, and that equates to the longest battery life, both in my real-world testing and in our Future Labs battery rundown tests. It wasn’t a massive difference – the Pixel 10 Pro XL only lasted an hour longer than the Pixel 10. Still, every bit helps.
The Pixel 10 Pro XL also charges faster than any other Pixel 10 device, whether you’re charging wirelessly or with a USB-C cord. If you have a 45W charger, the Pixel 10 Pro XL can charge that fast, compared to the 30W charging on the other two Pixel 10 phones. The Pixel 10 Pro XL can also use faster wireless charging. Again, it’s not a huge difference, but every bit yada yada yada.
The biggest benefit for me is the combination of Google’s winning Super Actua display with the Pixel 10 Pro XL cameras. If I’m taking serious photos, I want the biggest viewfinder possible to get the right shot. The extra screen space on the Pro XL phone felt like a big advantage, and if photography is important to you, I’d recommend the Pro XL phone first. The Pixel 10 Pro has the exact same camera specs, but having the bigger Pro XL display helped me take better shots.
Are there other benefits to the Pro XL? Well… not really. It isn’t any faster than the Pixel 10 Pro… or even than the Pixel 10. In our benchmark tests, the extra RAM in the Pro models didn’t seem to make much difference. Pixel phones still disappoint if you only care about the numbers.
I don’t rely on benchmarks, though, and the Pixel 10 Pro XL was satisfying and quick in almost every task. There was some lag on the camera, but most other features – including the latest AI helpers – ran smoothly with no delays.
Google has another winner with the Pixel 10 Pro XL – and the whole Pixel 10 family. Between the premium design, the excellent software, and the advanced AI features, this is a phone that iPhone fans should seriously consider, and Galaxy owners should envy. I’ll be keeping this phone close by – snapped to my MagSafe charging stand – until an even better Pixel comes along.
Google Pixel 10 Pro XL review: Price & availability(Image credit: Philip Berne / Future)- Starts at $1,199 / £1,199 / AU $1,999 for 256GB of storage and 16GB RAM
- Costs more than last year, but starts with more storage than the rest
I remember the days when a new phone would cost the same but come with more storage and RAM than last year's model because component costs had decreased. This year’s Pixel 10 Pro XL is more expensive than before, and it comes with 256GB of storage, but I’m not awarding Google any medals for giving the phone enough space. This phone should be cheaper.
To be fair, 256GB of storage is the right amount, unless you play a ton of games or you shoot video with your phone at high-resolution. There’s a 1TB model available, but only serious enthusiasts need apply – and you know who you are.
The color options this year are a bit drab. I like the Moonstone color and the Jade, but they aren’t very exciting. My review unit is the Porcelain white, which looks classy but a bit bland. Google also sent along a silicone case with magnets built in that matches the hone perfectly. If you want the 1TB storage option, it’s only available in the black Obsidian.
Google Pixel 10 Pro XL pricingStorage
US Price
UK Price
AU Price
256GB
$1,199
£1,199
AU $1,999
512GB
$1,319
£1,319
AU $2,199
1TB
$1,549
£1,549
AU $2,549
- Value score: 4 / 5
The Google Pixel 10 Pro XL has nearly the same spec sheet as the Pixel 10 Pro, with a few key differences. The display is larger, with more pixels (no pun intended), but it isn’t quite as sharp. You won’t notice, though, and both displays use LTPO tech for the best always-on display with low power drain.
There’s a bigger battery in the Pixel 10 Pro XL as well, and that meant longer battery life in my tests. I also found the 45W charging made a difference, with the Pixel 10 Pro XL charging faster than the other Pixel 10 phones.
Google Pixel 10 Pro specificationsDimensions:
162.8 x 76.6 x 8.5mm
Weight:
232g
Display:
6.8-inch Actua display
Resolution:
1344 x 2992 pixels
Refresh rate:
1-120Hz
Peak brightness:
3,300 nits
Chipset:
Google Tensor G5
RAM:
16GB
Storage:
256GB / 512GB / 1TB
OS:
Android 16
Main cameras
50MP wide; 48MP ultra-wide; 48MP telephoto (5x zoom)
Selfie camera:
42MP
Battery:
5,200mAh
Charging:
45W wired; 25W Qi2 wireless (magnetic)
Colors:
Obsidian, Porcelain, Jade, Moonstone
Google Pixel 10 Pro XL review: Design(Image credit: Philip Berne / Future)- Sleek and solid, with great materials and matching color options
- Mostly the same as last year’s model, which is fine with me
The Google Pixel 10 Pro XL is the Pixel 10 Pro all blown up. It doesn’t add any extra buttons or physical details; the two phones look identical, just at a different scale. That’s a good thing because the Pixel 10 Pro is a great-looking phone, and it keeps the same exact design as the Pixel 9 Pro that was my favorite phone of last year. If it ain’t broke, don’t fix it.
I like the Pixel 10 Pro XL design even more than the latest iPhone 16 Pro Max. It feels just as refined as Apple’s phone, with fewer unnecessary buttons to get in the way. Does anyone actually use the Camera Control? I know I don’t. To be fair, I don’t use the temperature sensor on the back of the Pixel 10 Pro XL, but I can ignore that easier than a button.
The color options are a bit 'professional' and bland, but closer inspections shows more attention to detail than I would have expected from Google. The Jade color of my Pro review sample, for instance, was matched with a light gold frame that looks barely gilded. It’s a gorgeous match.
The speaker grilles on the bottom of the phone are new, and color-matched to the frame you choose. It’s a nice touch that most people won’t ever notice.
I have no complaints about the Pixel 10 Pro XL design, except that I’d like to see more interesting color options. Google at least matches its phones perfectly with its silicone case colors, and like the Pixel 10 phones, the latest cases have magnets inside that secure a very strong connection to any Pixelsnap (or MagSafe) accessories you might buy.
- Design score: 5 / 5
- One of the absolute best smartphone displays
- Super-sharp and very bright in all situations
Wow… I was expecting to be pleased with the Pixel 10 Pro XL’s display, but this phone somehow looks even better than I anticipated. Google’s Super Actua displays are among the best you’ll find on any smartphone. For the past few years, Google’s new Pixel displays have been dominant, topped only by Samsung’s best Ultra screen, and this year hasn’t been disappointing at all.
The Pixel 10 Pro XL is a joy to use in any situation. It’s great in outdoor light, even for shooting photos or reading my social feeds. It’s perfect for navigating in the car or on the street. It’s a great phone for reading in the dark late at night, or as a bedside lamp with the Pixelsnap screen savers.
In fact, I like this display so much that I think it justifies paying more to have more of it. The Pro XL is the Pixel to buy not just because it has a bigger screen, but because the screen is so enjoyable that I want to have as much of it as possible.
Whether I’m watching videos, taking photos, or playing games, the Pixel 10 Pro XL display is my favorite on any smartphone I own.
- Display score: 5 / 5
- Material 3 Expressive looks fantastic and adapts nicely to themes
- AI features are most useful when you barely notice them
The Google Pixel 10 Pro XL highlights Google’s clean and well-designed interface. I love the Material 3 Expressive interface design, as Google calls its Pixel version of Android. It’s friendly without feeling cartoonish, and it packs plenty of useful widgets and tools that are easy to manage and don’t hog my attention.
With so much screen space, it was a joy to create AI wallpapers and populate my home screen with Google’s slick widgets. I let the phone set all of my icon and widget colors to match my wallpaper, creating a unified theme, and the phone darkened the colors as the day went on, finally flipping to dark mode after sunset.
That’s the best of Pixel – a well-designed interface filled with just enough useful features to make the phone a tool you always want in your pocket. The Pixel 10 Pro XL will definitely remain my primary work phone after this review is published. It gives me simple customizations and shortcuts that remove the clutter of apps from my home screen and surface just the information I need. I wish iOS was better at this.
The Pixel 10 Pro XL also has some of the most useful AI features you’ll find on a phone, and I’m a big fan of Google’s call-screening tools. I can let Google AI answer when an unknown number calls, and it will give me a text transcript of whatever my caller says. Then I can decide whether to answer the call or not. This feature is only available on Pro Pixel models, and it’s worth the upgrade if you take a lot of calls.
There are plenty of new AI features as well, and I’ve talked in depth about the new Magic Cue in my Pixel 10 and Pixel 10 Pro reviews. I think it could be an important addition to Android in the long run, but it still doesn’t work consistently. It offers useful links and buttons to info as you need it, and it doesn’t get in the way or seem pushy, like other AI features, so I have high hopes for it.
Otherwise, there are many smaller improvements that I’ve found scattered throughout the interface and which bring Google’s experience closer to the holistic, thoughtful design I expect from iOS more than Android.
Apple lets you make a contact card for yourself that will accompany your phone number when you share your details. Google lets you make the contact card for your contacts, instead of making them do the work. That seems like a better solution, since not everybody owns an iPhone, and Apple’s contact cards don’t work across platforms.
Even Google’s Daily Hub is more useful than other attempts I’ve seen. Samsung, Motorola, and now Google all offer a home page for your personal information, gathered and summarized by AI. On my Galaxy S25 Ultra, the Now Brief page has been useless at best, and oddly flippant at worst. On the Pixel 10 Pro XL, the Daily Hub offers more useful information, links I actually enjoy, and easy access to more information.
There are still some odd and off-putting AI features, usually generative AI tools. The Recorder app for some odd reason offers to generate a musical background for your recordings; I don’t really need a pop-metal soundtrack for my business interviews, thanks. Still, it’s easy to ignore these oddities, and Google mostly doesn’t shove its AI in your face.
- Software score: 5 / 5
- The best Pixel to buy for photography
- Excellent low-light photos and unique AI zoom capabilities
The Pixel 10 Pro XL and the Pixel 10 Pro have identical camera lenses and sensors, but I’m calling the Pro XL the better camera phone because of the larger display and longer battery life. Both of those attributes are features that camera buyers look for, and they make a difference when shooting with the Pixels.
The photos I got from the Pixel 10 Pro XL were fantastic, perhaps the best I’ve seen on any camera phone (and I compile the Best Camera Phones list for TechRadar). I’ll need to test the cameras in more situations, and head-to-head against more competitors, but in my week with the Pro XL it took pics that matched or beat my iPhone 16 Pro Max in most conditions.
The Pixel 10 Pro XL took photos with very accurate colors and plenty of detail at every focal range. For night photography, it was no contest. The Pro XL took pics that looked like I had a professional flashgun attached, while the iPhone shots looked much darker and lacked focus.
You can see plenty of AI help in the photos, but usually the results don’t look fake or off-putting. It’s a trade-off. I took a picture of a snowy egret from far away with my iPhone and the Pixel 10 Pro XL. The iPhone photo was grainy and fuzzy, but you could see the bird’s reflection rippling in the water. The Pixel created a smoother, more recognizable image, but the AI removed the ripples from the end result.
The only downside to Pixel photography is Google’s Camera app. It’s a nightmare. It’s hard to use, with settings that seem to conflict with each other. Adjust one setting, like changing from 12MP to 50MP resolution, and a handful of other settings suddenly go dark without warning.
I also tested the new Camera Coach feature, and you can read more about it in my Pixel 10 review. I think it helps more on the base-model phone, while the Pro XL Pixel takes photos that are good enough that you may not want an AI coach to get in the way.
- Camera score: 5 / 5
- Tensor G5 performance lags all but the cheapest bargain phones
- Camera stalls after taking a high-res photo
The Pixel 10 Pro XL’s performance is the phone’s only real letdown, and even though it didn’t make a difference most of the time, at key moments the phone struggled to keep up. The gap between Pixel performance and the rest of the smartphone world isn’t shrinking – it’s getting bigger and uglier every year.
The Pixel 10 Pro XL had no trouble navigating the Android menus and launching apps as quick as can be, but not every feature was so smooth. I had trouble in the Camera app, especially when I changed to the higher 50MP resolution. The camera sometimes stalled after I hit the shutter button, and made me wait for a few moments until I could snap my next shot.
That’s a huge disappointment, and I don’t know any other phone outside cheap bargain options that fails to perform basic tasks this manifestly. I can press the shutter button on my OnePlus 13 as fast as my finger can fly and it never misses a beat – likely thanks to the Qualcomm Snapdragon 8 Elite chipset inside.
Qualcomm has a superior platform this year, and phone makers who don’t use the latest Elite option are being left behind in more ways than one (see my battery complaints below). I no longer think the Tensor G5 is good enough for the Pixel 10 Pro XL. It isn’t. It can’t keep up with the latest Android software and features, and it’s time for Google to rethink its platform strategy.
- Performance score: 3 / 5
- Mediocre battery life – is the Tensor G5 to blame?
- Magnetic chargers make up the shortfall
The Pixel 10 Pro XL has the best battery life of any Pixel 10 phone so far (we haven’t tested the Pixel 10 Pro Fold yet), but that isn’t saying much. The Pro XL lasted through a full day with little trouble, but I was still nervous when the battery hit single digits before bed time, which was often.
I alleviated my stress with the MagSafe chargers I have littered throughout my house and office space. Like the Pixelsnap charger, MagSafe is convenient for fast charging when I have 15 minutes to let my phone sit on a stand. A couple of those charge breaks every day made sure I had enough battery to last as long as I needed.
This mediocre battery life is especially disappointing because I’ve seen massive gains in the rest of the Android world. Phone makers like Samsung and OnePlus – using the Qualcomm Snapdragon 8 Elite platform – are offering new phones that get hours more battery life than last year’s models.
The Pixel 10 Pro XL lasted 15 minutes longer in our Future Labs battery tests than last year’s Pixel 9 Pro XL. That’s pathetic.
The Samsung Galaxy S25 Ultra achieved two hours more battery life than the Galaxy S24 Ultra, even though it uses a battery that's the same size, thanks to the newer Snapdragon 8 Elite chipset. If Google can’t offer similar improvements year over year, it’s time to change platforms or it will be time to stop recommending the Pixel.
- Battery score: 3 / 5
Value
The most expensive Pixel, but also the best. The bigger display, longer battery life, faster charging and larger storage capacity justify the higher price tag.
4/5
Design
Mostly unchanged from the Pixel 9 Pro XL, and that’s a good thing. This is one of the most refined and polished phones you’ll see, and it’s even more durable than before.
4/5
Display
You won’t see a better display on a smartphone than the Pixel 10 Pro XL’s Super Actua screen. It’s incredibly bright and perfectly sharp, even in bright sunshine.
5/5
Software
The latest Pixel interface is one of Google’s best, and it makes the Pixel appealing and easy to use. New AI features can be useful, but if you hate them they won’t bother you much.
5/5
Cameras
Image quality is excellent, especially night photography, which is easily the best you’ll find on any smartphone. This might be the best camera phone you can buy. Camera Coach is a fun feature, but is it replacing real experts? Best editing tools, now helped by useful AI instructions.
5/5
Performance
Frankly unacceptable performance from such an expensive phone. It can’t even run the Camera app properly, and benchmarks are lower than any phone that isn’t cheap. Google needs to take this seriously, or next year won’t be so fun.
3/5
Battery
Battery life suffers under the yoke of the Tensor G5 chipset. While Qualcomm-powered phones see massive battery gains, the Pixel 10 Pro XL can’t last longer than last year’s phone, and even with its faster charging it doesn’t charge as fast as the competition. Get magnetic chargers to keep your phone topped up – you’ll thank me for it.
3/5
Buy it if...You want the best Pixel phone yet
The Pixel 10 Pro XL is the Pixel to buy this year. The screen is fantastic, and everything is improved by the larger size and enhanced capabilities.View Deal
You take a lot of photos at night The Pixel 10 Pro XL is one of the best camera phones, but it really shines at night. Low-light photos were mind-boggling in clarity and color.View Deal
You're switching from an iPhone and have a bunch of magnets
I’m an unabashed fan of magnetic charging, so I welcome the Pixel 10 Pro XL to my household filled with charging stands and accessories galore.View Deal
You need a gaming powerhouse to win
The Pixel 10 Pro XL should be great for gaming, thanks to its incredible display, but performance is a letdown, especially for gamers.View Deal
You want a phone that lasts all day, and you hate magnets
Battery life on the Pixel 10 Pro XL could be better, and my MagSafe chargers saved the day. If you won’t be charging periodically, get a phone that lasts longer.View Deal
You want great cameras but wear tight pants
The Pixel 10 Pro has the same amazing cameras as the Pixel 10 Pro XL, so you don’t need to buy a big phone to get the same capabilities.View Deal
Apple iPhone 16 Pro Max
The biggest iPhone gives you all of Apple’s great iOS 26 features on a big display, making it easier to share, shoot videos, and play games with iPhone friends.
Read our in-depth Apple iPhone 16 Pro Max reviewView Deal
Samsung Galaxy S25 Ultra
It’s a bit more expensive, but the S25 Ultra is jam-packed with features, including the S Pen stylus and a fourth camera lens for more zoom options. It’s also super-fast.
Read our in-depth Samsung Galaxy S25 Ultra reviewView Deal
Google Pixel 10 Pro XL
Apple iPhone 16 Pro Max
Samsung Galaxy S25 Ultra
Price
$1,199 / £1,199 / AU $1,999
$1,199 / £1,199 / AU $2,149
$1,249 / £1,249 / AU $2,349
Display
6.8-inch Super Actua display
6.9-inch Super Retina display
6.9-inch Dynamic AMOLED 2X display
Processor
Google Tensor G5
Apple A18 Pro
Qualcomm Snapdragon 8 Elite for Galaxy
Battery Results (HH:MM:SS)
14:20:57
17:35:30
18:35:39
How I tested the Google Pixel 10 Pro XLI tested the Google Pixel 10 Pro XL for a week, alongside the Pixel 10 and Pixel 10 Pro. I used the Pixel 10 Pro XL as a work phone with my high-security work accounts. I loaded the phone with more than a hundred apps, and multiple Google accounts.
I used the Pixel 10 Pro XL as a camera, testing every camera feature. I used AI features to ask questions and generate sample images. I connected Magic Cue to all of my personal Google account information, and I fed the Pixel 10 Pro XL a regular diet of screenshots of my personal dealings for the Screenshots app.
I connected the Pixel 10 Pro XL to my Pixel Watch 3, my Pixel Buds Pro, and many other Bluetooth headsets and devices. I used Android Auto in my Kia and my friends’ Acura and Subaru cars, and connected to Bluetooth in an older BMW.
I've been testing phones for more than 20 years, since the days of BlackBerry and Palm OS smartphones and Samsung flip phones. I have tested hundreds of devices myself, and our Future Labs experts have tested hundreds more. I even did a brief stint as the internal phone reviewer for Samsung Mobile, testing products before launch in order to predict review scores and reception.
Future Labs tests phones using a mix of third-party benchmark software and proprietary, real-world tests. We use Geekbench, CrossMark, JetStream, WebXPRT and Mobile XPRT, and 3DMark for performance testing. We test a phone's performance on video editing tasks using Adobe Premiere Rush. We also measure display color output and brightness.
For battery testing, we have proprietary rundown tests that are the same for every phone, which we use to determine how long it takes for the battery to run down.
First reviewed August 2025
Categories: Reviews
Darren Aronofsky’s Caught Stealing turns Austin Butler’s cat-sitting gig into a chaotic crime caper that’s a white-knuckle ride
Caught Stealing is a nostalgic slice of '90s New York City life that comes out swinging. Set in the Lower East Side of Manhattan, Darren Aronofsky’s new movie captures the nostalgic atmosphere of the time in this cat-and-mouse crime caper chase.
Austin Butler (Elvis; Eddington) plays Henry Thompson, a former baseball player turned bartender with a drinking habit, who insists on being called Hank. Tormented by a car accident that ended his promising sports career, the San Francisco Giants fan has been lifted straight from the pages of Charlie Huston’s novels that the movie is based on.
Hank gets caught up in a case of mistaken identity when his neighbor Russ, played by Matt Smith (The Crown; Doctor Who) – who looks like a punk-rocker that just stepped out of Camden in London (mohawk, studded leather jacket, piercings – the full uniform's here) – asks him to look after his Maine Coon cat named Bud (who you might recognize from Pet Sematary), setting in motion a chaotic chase with a growing group of eclectic goons across underpasses, subways and basements through East Village.
Caught Stealing is a chaotic crime caper crashing into the summer box office (Image credit: Columbia Pictures; Protozoa Pictures)You wouldn’t expect that cat-care could get you killed, but that’s exactly the catalyst that drives the next 107 minutes of the white-knuckle drama. The bone-splitting violence splattered throughout does not hold back, letting you hear every crunch and snap against the backdrop of a soundtrack composed by Rob Simonsen (The Whale; Deadpool & Wolverine).
What starts with Russian mafia, played by Yuri Kolokolnikov (Tenet; The White Lotus) and Nikita Kukushkin (Attraction), beating up Hank (Kukushkin's mobster has a signature headbutt move) quickly snowballs as more players become involved to look for a mysterious key that they all believe Hank is hiding.
This hunt has got the attention of not just the Russian mobsters but a Puerto Rican gangster, played by Benito Martínez Ocasio aka Bad Bunny (Bullet Train; Happy Gilmore 2), and two extremely ruthless Orthodox Jewish brothers.
These last two might be the most threatening characters of the movie, but who also happen to have the most comedic lines. That's largely down to menacing performances from Liev Schreiber (Spotlight; X-Men Origins: Wolverine) and Vincent D'Onofrio (Full Metal Jacket; Men in Black) that make for a humorous contrast when you find them slurping soup or refusing to drive during Shabbat.
Liev Schreiber and Vincent D'Onofrio provide some of the best laughs in the film (Image credit: Columbia Pictures; Protozoa Pictures)There may not be any baseball in this film (apart from the brief opening scene) but funnily enough, it's the more violent scenes where it really comes out as we watch Hank sprinting past pedestrians like he's on a home run and swinging a baseball bat at his assailants as if he's a deadly batter.
The sport offers a bridge between the violence and Hank's soft nature. After all, Hank's not a fighter – a fact we're reminded of throughout by police detective Roman, played by Regina King (If Beale Street Could Talk; Ray), as well as by his relationships with people (and creatures) around him, from his mother to the homeless man on the street outside of his apartment that he helps out.
Zoë Kravitz’s (The Batman; Blink Twice) Yvonne, Hank’s girlfriend, is a welcome respite from all the violence, breaking up the gut punches and shootouts with a softer charm that shares the heart of the film with the weight of a drink driving accident from when Hank was younger.
Bad Bunny joins Russian mobsters played by Yuri Kolokolnikov and Nikita Kukushkin. (Image credit: Columbia Pictures; Protozoa Pictures)The biggest highlight of the movie is the nostalgic set created by production designer Mark Friedberg (Joker; Noah) that immerses the characters in the gritty streets of East Village in 1998 during its transformation into the trendy art scene it is today. This is complemented by a soundtrack that includes '90s hits such as Bitch by Meredith Brooks and Wandering Star by Portishead.
However, unlike the secrets of Bud’s litter tray, Caught Stealing isn’t too mysterious, relying on action movie ideas you've seen many times before. From the reluctant hero to the classic revenge storyline, it goes exactly where your brain naturally expect it to go based on the familiar elements – despite it coming from an interesting an unpredictable filmmaker in Darren Aronofsky.
It also lacks the intensity that his movies are known for, and can feel disjointed at times as it transitions from scene to scene, sometimes brushing over key moments. For instance, a lingering shot of a chameleon seems like it could be a reference to Hank's resourcefulness, but this idea isn't hinted at again, making it feel like a stray musing rather than an interesting theme.
Caught Stealing is not a deep psychological character study like Aronofsky's The Whale or Black Swan, it's an action-packed adventure centered around a self-destructive protagonist that's trying to turn the corner.
Indeed, the sunny grasses of California where Hank is originally from are in real contrast to the grimy streets of the Lower East Side, where he now finds himself, is not the subtle backstory that we're used to seeing from the filmmaker. They say stealing third base is a high risk, low reward play in baseball; unfortunately, I think that phrase captures the end result of Aronofsky's push into a new genre.
You might also like
Categories: Reviews
Kirby and The Forgotten Land’s Star-Crossed World expansion is a Nintendo Switch 2 upgrade that’s well worth the money
It’s fair to say that Nintendo’s slate of Nintendo Switch 2 Editions has been a mixed bag, both in terms of what the company offers in each, how much it’s charging, and how the reception has been.
Review informationPlatform reviewed: Nintendo Switch 2
Available on: Nintendo Switch 2
Release date: August 18, 2025
The Switch's Zelda titles getting a frame rate and resolution boost for a few bucks each was very welcome but many were left decidedly out of the party mood when it came to Super Mario Party Jamboree’s Jamboree TV add-on.
In many ways, that makes the hilariously titled Kirby and the Forgotten Land - Nintendo Switch 2 Edition + Star-Crossed World an outlier, and not just because it’s got possibly the longest name on the platform.
It meshes a modest visual improvement with additional content that’s easy to recommend, and takes a fantastic platformer to new heights, not unlike its protagonist floating on the breeze. It’s not perfect, but it’s still a great stand-in as the wait for a new open-world Mario game goes on.
Rescue mission(Image credit: Nintendo)It sounds odd, but I’ve always likened Kirby and the Forgotten Land to the early Astro Bot games, before Sony’s cute mascot went and became a platforming megastar. Its levels feel diorama-like - they’re 3D, but with minimal camera panning, and you’re tasked with searching in every nook and cranny to find a Waddle Dee.
Best bit(Image credit: Nintendo)The best part of Star-Crossed World is how it expands on areas from the base game in surprising new ways, with one highlight being a new ‘train track’ style area that begins at ground level before climbing ever higher, with the original level stretched out below it.
If you’re coming to this new version, wondering if anything has changed in that regard, the answer is yes, but only insofar as you’ll be hunting down Starries this time around. While I must admit I had been expecting a separate menu icon a la Jamboree TV Switch 2 upgrade, or even Super Mario 3D World + Bowser’s Fury, I was surprised to jump into my old save and see that everything happens in the same world map.
Star-Crossed World's story is as simple as a mystery meteor landing and turning various older areas into more colorful, crystal-tinted versions, while even giving some of Kirby’s (admittedly adorable) foes a crystalline makeover, too.
Your pink blob’s mission is simple: rescue Starries in each level, while also ticking off some side objectives that might require a little more exploration.
What’s old is new(Image credit: Nintendo)While there’s an argument that for around $20 / £16.99, fans should be able to expect wholly new levels, that’s not what’s happened here. In fact, it’s much cleverer than that. Kirby is tasked with reclaiming Starries (not as cute as Waddle Dees, for my money) by finding them in existing levels, but each becomes a much more expansive quest.
As an example, one area sees Kirby travel through an existing level, only to essentially part the sea midway through and explore a whole new region under what would have been the water. In another (and a personal favorite), our puffy pink protagonist hits the gem to open a new path, only for it to begin a railway track or rollercoaster of sorts that they need to fight and platform their way along.
Given a big differentiator of the base game from the rest of Kirby canon was having our hero wander through a sort of post-apocalyptic, recognizable world, some took umbrage with the more restrictive creativity brought upon by a new setting. That’s almost entirely jettisoned here, like Nintendo is letting its hair down somewhat.
In fact, if you’re jumping in for the first time, the meteor hits right after the first set of levels is completed, so you don’t have to reach the end credits to experience everything new.
All you can eat (Image credit: Nintendo)The Mouthful mode returns in Star-Crossed World, and the same criticisms from the original TechRadar Gaming review apply - namely that, as funny as it is to see Kirby become a vending machine or a traffic cone, its implementation is all very linear.
This time around, there’s a Spring for jumping high and crashing down on foes, as well as a Sign that turns Kirby into a sort of flat shape for downhill sliding sections. The highlight, however, is the Gear Mouth, which allows Kirby to roll around on floors, walls, and ceilings, adding a literal new dimension to platforming.
That brings us to the platforming, and while it’s mechanically great to play, it’s just lacking the challenge of, say, a Super Mario Odyssey or even some of Donkey Kong Bananza’s trickier sections. I should stress that this doesn’t make all of the game’s imaginative ideas moot, but it does mean it’s easier to blow through in a weekend than some of its genre peers.
Another holdover from the base game is that boss fights are a little formulaic. While I appreciate that there are usually a handful of approaches to take with a few different upgrades available before the start of each skirmish, it does tend to devolve into dodging as much as you can and then spamming whichever attack you have to hand.
There’s a new Ultimate Cup Z EX boss rush that’s been added to the Coliseum for those looking for more of a challenge, though, which is a nice touch and helps scratch that trickier itch similarly to the Forgo areas of the 2022 original.
Not quite 4K(irby)(Image credit: Nintendo)Although the original game was hardly a slouch in terms of visuals, the bump in resolution on Nintendo Switch 2 is welcome.
Both The Forgotten Land and its Star-Crossed World additions run at what appears to be 1440p while docked, meaning it’s not quite as sharp as the Switch 2 upgrades of Tears of the Kingdom or Breath of the Wild, but it does run at a crisp 1080p in handheld.
The real relief is that it’s now running at 60fps across the board, which makes replaying even old levels feel just a little fresher thanks to the smoothness on offer. Load times have been improved, too.
Still, I do feel like Nintendo could have divorced the new content and the visual upgrade when it comes to what’s on offer.
(Image credit: Nintendo)Is the company really going to be any worse off for giving away the visual upgrade for free and charging just for the extra content? It’s hard to say, but if you’ve been waiting to play Kirby and the Forgotten Land on Switch 2, you won’t get any visual improvements without paying.
All in all, then, Kirby and the Forgotten Land - Nintendo Switch 2 Edition + Star-Crossed World is one of the easiest ‘upgrade packs’ to recommend at the time of writing for Nintendo’s nascent console.
While I wish the visual upgrade had been free to anyone with a Switch 2 and a copy of the base game, the added areas in Star Crossed World are some of the best yet, and I’d wager playing the game without them would now make the game feel incomplete in some ways.
Should you play Kirby and the Forgotten Land Nintendo Switch 2 Edition + Star-Crossed WorldPlay it if...You want a meaty adventure
There’s so much here to keep you busy, from finding Waddle-Dees and Starries to completing additional objectives across new and older areas alike, that you could be playing for a while to earn 100%.
You’re looking for a platformer post-Donkey Kong
Bananza’s destruction-based platforming wasn’t for everyone, and if you’re looking for something more traditional, Kirby and the Forgotten Land + Star Crossed World will fill that gap.
You want a Switch 2 upgrade that’s actually worth the money
While Super Mario Party Jamboree’s Switch 2 upgrade pack was less comprehensive, it’s hard to argue that what’s on offer in this Switch 2 upgrade is worth the money, between the visual improvements and additional content.View Deal
You’re looking for a challenge
While the new content is a tad more challenging than the base game, it’s a low bar to clear. It’s simply not the game for anyone looking for a real challenge, but that does make it pretty approachable for almost everyone.
Sadly, there aren’t a huge number of accessibility features here. There are two difficulty modes, Wild Mode and Spring-Breeze Mode, which offer additional difficulty for more coins, or additional health, respectively.
There’s no button remapping outside of swapping between a pair of preset options, either.
How I reviewed Kirby and the Forgotten Land Nintendo Switch 2 Edition + Star-Crossed WorldI spent the last couple of weeks playing the new content, immediately after replaying the entirety of the base game to give me a better perspective on how things differ and what’s new.
I played both in docked and handheld, with the former being on a Sky Glass TV while the latter made use of AirPods Max for listening to those oh-so-satisfying sound effects that had me itching to play Super Smash Bros. Ultimate again.
First reviewed August 2025
Categories: Reviews
The LG Ultragear GX9 Gaming Monitor engulfed me with its ultrawide, immersive OLED screen, and I don't want to give it back
LG Ultragear GX9: Two-minute review
The LG Ultragear GX9 is an impressive, immersive gaming monitor that’s ideal for a relatively small subset of gamers. Let's get a couple of things out the way early though: first, it’s not cheap, so any gamer on a budget will probably want to look elsewhere; and as awesome as a 45-inch (well, technically 44.5-inch) ultrawide screen is, some might find it too wide for practicality’s sake.
After all, it can be tough to focus on the action in the center of the screen and also keep tabs on your health bar in the top-left corner when you have to move your gaze over 20 inches to check on it. This also means it's not ideal for esports gamers, despite the impressive refresh rate and response time.
However, those are issues endemic to this ultrawide form factor and not necessarily a knock on the LG Ultragear GX9. All the best gaming monitors with an ultrawide screen are on the pricier side, and too wide to rely on peripheral vision to catch important information.
For those who have the money and aren’t playing esports (or still want that wrap-around experience), that wide display and 800R curvature, along with the 4K resolution, good color coverage, and speedy refresh rates and response times, make this monitor a delight to use with most games.
Cyberpunk 2077 or Monster Hunter Wilds, for example, look gorgeous and completely envelop my vision during gaming sessions. Of course, it helps that the built-in speakers sound pretty decent as well.
There are a few other pluses as well, such as all the necessary ports (minus a USB hub with KVM support), including a USB-C port with power delivery, and good ergonomics for such a wide monitor. This is a hearty recommendation as the best monitor for the right gamer.
LG Ultragear GX9: Price & availability(Image credit: Future / James Holland)- How much does it cost? $1,999.99 / £1,799.98 / AU$3,499.00
- When is it available? Available now
- Where can you get it? Available in the US, UK, and Australia
When you look at the best ultrawide monitors, the price of the LG Ultragear GX9 doesn’t seem out of place, though it’s still expensive. You can get a nice gaming laptop with an OLED panel or a powerful gaming desktop for the LG Ultragear GX9’s $1,999.99 / £1,799.98 / AU$3,499.00 asking price.
The Samsung Odyssey OLED G9, which originally went for $2,199.99 / £1,599 / AU$3,399 and is now $400 cheaper, is a good comparison. It is a little bit older, hence the price drop, but it’s got a great OLED screen with sharp resolution, fast refresh rates/response times reaching up to 240Hz, and good color coverage. It’s also bigger than the Ultragear GX9 at 49 inches across.
However, like most ultrawide monitors, it peaks at a 5,120 x 1,440p resolution compared to the LG Ultragear GX9’s 5K2K or 5120 x 2160p resolution.
- Value: 4 / 5
Screen size:
44.5-inch
Aspect ratio:
21:9
Resolution:
5120 x 2160
Brightness:
275 nits
Response time:
0.03ms (GTG)
Viewing angle:
178˚/178˚
Contrast ratio:
1,500,000:1
Color support:
98.5% sRGB
Inputs:
1x DP 1.4, 2x HDMI 2.1, 1x USB-C (90W), 2x USB-A downstream
Weight:
30.9 lbs (14 kg)
LG Ultragear GX9: Design(Image credit: Future / James Holland)- The monitor is massive
- Decent, if limited, ergonomics
- Plenty of ports, including USB-C
The LG Ultragear GX9 is a massive gaming monitor. Its 44.5-inch monitor (measured corner-to-corner diagonally) results in a length of 39 inches and a height of 18 inches, not including the stand. This can be an overwhelming monitor to use.
Of course, it has a nice 800R curvature, which brings the far ends of the screen in so that, experientially, its outer reaches fill out the peripheral vision.
(Image credit: Future / James Holland)It’s big enough that I have to dart my eyes to the edges to read specific information, like a health bar, which makes the size and curvature great for immersive experiences but not for esports-type gaming (I’ll get into the actual performance aspect below).
Since the monitor is so big, it does have somewhat limited ergonomics. While no specifics are listed, its biggest possible adjustments are a height adjustment of about 5 inches. If I had to guess, it swivels and tilts about 15 degrees in each direction. It’s not a lot, but more than enough for this kind of monitor.
(Image credit: Future / James Holland)Since this is such a big monitor, it has a large, strong, and stable stand with a wide base. There is cable management, though it’s basic, with a passthrough hole in the middle of the stand so all the cables go in one direction out the back and towards whatever they’re connected to.
Speaking of ports, the selection is pretty good. There are two HDMI 2.1 ports, so you could use this with a next-gen console or gaming computer, a single 1.4 DisplayPort, and one USB-C with 90 watts of power delivery for use with Ultrabooks, MacBooks, and the like.
(Image credit: Future / James Holland)There are also two USB-A downstream ports for charging peripherals. Unfortunately, there's no KVM capability via those USB ports.
Lastly, there’s a single button in the center of the lower back for power and navigating the OSD menu.
- Design: 4.5 / 5
- Game modes in OSD menu
- Supports variable refresh rates
- Has picture-in-picture and picture-by-picture, but no KVM
The monitor has a couple of cool features baked into the OSD menu worth knowing about beyond the usual, such as HDR and curvature. For instance, there’s a Game Mode icon in the OSD that brings up four presets with settings such as color temperatures, refresh rate max, and whether VRR, HDR, and DAS Mode (Dynamic Action Sync to minimize lag) are on.
Beyond the different modes, you can change the aspect ratio in the OSD menu to a narrower image for when you need all your gaming info in front of you, offsetting the potential esports-related issue I’ve mentioned with using such a large screen.
(Image credit: Future / James Holland)Not only is there support for HDR, but the LG Ultragear GX9 also comes with support for VRR (variable refresh rate), which synchronizes the frame rates of the monitor with the source to minimize screen tearing, stuttering, and the like.
Picture-by-picture and picture-in-picture are both available as well if you want to use two sources at the same time. Unfortunately, as I’ve previously mentioned, there’s no KVM (keyboard, video, mouse) system where you can use a keyboard and mouse plugged into the monitor to control whichever source you have pulled up.
- Features: 4.5 / 5
- Can handle any game, though some are not ideal for the aspect ratio
- Very good contrast and colors, along with a 5K2K resolution
- Good but not great audio
I've played a number of games on the LG Ultragear GX9, namely Monster Hunter Wilds, South of Midnight, Baldur’s Gate 3, Cyberpunk 2077, and Gotham Knights, and found the monitor to be everything it's advertised to be.
Really, the only limitation is when loading up a game that doesn’t support the ultrawide resolution, such as South of Midnight – this just means there are black bars on the sides instead of the game stretching edge to edge – or when a game isn't ideal for that ultrawide resolution.
However, as mentioned before, you can change the aspect ratio. If you don’t change it, and then open up something fast-paced where you need to keep an eye on that health bar, you’re going to be in trouble.
The OLED screen and HDR support provide very good contrast – specifically DisplayHDR TRUE BLACK 400 – enabling me to see in the shadows in certain games. And the colors look more vibrant because of it. It also helps that the LG Ultragear GX9 has a rated 1500000:1 contrast ratio and 98.5% DCI-P3 color coverage.
Between the 165Hz refresh rate, 0.03ms response time, and VRR support, the action is smooth no matter how fast. And the 5K2K resolution (5120 x 2160p) is sharper than most of the competition, as most ultrawide monitors I’ve come across use a 5120 x 1440p resolution.
Since this monitor is so large, I appreciate the fact that it comes with built-in speakers. And while they’re not as good as the best computer speakers, discounting the budget options, they sound pretty decent. You don’t get any real low-end or rumble, but the sound is full and packs a good punch otherwise.
- Performance: 4.5 / 5
Attributes
Notes
Rating
Value
The LG Ultragear GX9 is very pricey. However, considering what it is and what it does, the price is more than justified.
4 / 5
Design
Yes, it’s massive, but it has decent if limited ergonomics and a good selection of ports.
4.5 / 5
Features
Variable refresh rates, picture by / in picture, and more make this fairly feature-rich, even if it doesn’t have KVM.
4.5 / 5
Performance
It’s gorgeous, immersive (sometimes a little too much), and has great contrast and colors.
4.5 / 5
Average rating
The good news is that it’s massive. The bad news is that it’s massive. Either way, you have to decide if it’s worth the price.
4.38 / 5
Buy the LG Ultragear GX9 if…You want an immersive gaming experience
The LG Ultragear GX9 is so massive that it will cover your peripheral vision, transporting you into any game that can take advantage of the ultrawide screen real estate.
You want a great-looking screen
Not only is it OLED, but it has great contrast, helped by the HDR, as well as strong color coverage. Last but not least, it has 5K2K resolution – a higher resolution than what I usually see in the ultrawide monitor space.
You want a gaming monitor with USB-C
There are a lot of good gaming monitors out there. However, USB-C with power delivery is still not standard. So, if you need that to plug in a MacBook when not gaming, it's available here.
You’re turned off by the price
Whether it’s out of your budget or dropping 2K on a gaming monitor puts a pit in your stomach, there are much cheaper gaming monitors that still offer a good gaming experience.
You don’t want to be overwhelmed
Even if the price doesn’t make you flinch, the sheer size of the monitor could be overwhelming for some, especially if you like playing esports and want a screen where you can see it all without having to constantly move your eyes.
If my LG Ultragear GX9 review has you considering other options, here are two more monitors to consider...
Samsung Odyssey OLED G9
The Samsung Odyssey OLED G9 is a little older, so its price is now much lower than the LG Ultragear GX9 while offering an even wider 49-inch size. The resolution is lower at 5120 x 1440p, but it has a lot of the same features, including the same level of HDR.
Read our full Samsung Odyssey OLED G9 review
MSI MPG 491CQP QD-OLED
The MSI MPG 491CQP QD-OLED might be a mouthful to say, but it’s a great ultrawide monitor. Again, it has that lower ultrawide 1440p resolution, but also an almost-as-fast 144Hz refresh rate, and the same HDR and color coverage, plus it goes for about half the price.
Read our full MSI MPG 491CQP QD-OLED review
How I tested the LG Ultragear GX9- Used regularly for a couple of weeks
- Tested with various games and media
- Tried out all the features
I used the LG Ultragear GX9 Gaming Monitor regularly for a couple of weeks. I tested it with various games and media, especially Monster Hunter Wilds, South of Midnight, Baldur’s Gate 3, Cyberpunk 2077, and Gotham Knights, to see how it would fare. I also played around with the OSD menu, features, and ergonomics.
The LG Ultragear GX9 Gaming Monitor is clearly meant for gamers who want an immersive experience, specifically those who like their games to feel more cinematic, and it does that job well. Of course, it comes with a price tag to match.
I’ve tested a lot of tech gear over the years, from laptops to keyboards and speakers, so I can use my expertise towards giving an honest and fair opinion, not to mention a critical eye, to any product I test.
- First reviewed August 2025
Categories: Reviews
The Lenovo Yoga Slim 9i has just about everything you'd want in a Windows laptop, but falls short of perfection
Lenovo Yoga Slim 9i: Two-minute review
The Lenovo Yoga Slim 9i may face some stiff competition from the usual excellent offerings from Apple, Dell, and the like, but it’s more than up to the challenge. In fact, I believe it deserves to be mentioned in the same breath as the best Ultrabooks of this generation.
It’s very slim and portable, helped by the fact that the webcam is hidden under the display in a unique and space-saving measure. And its performance is snappy and responsive, comparing well to the best laptops of this type (don’t expect it to match the power of a gaming laptop, of course). Just as important, the Lenovo Yoga Slim 9i is a gorgeous-looking laptop with an equally gorgeous-looking OLED display.
Really, there are only two drawbacks. The first is price. It’s not anywhere near a budget offering, though that's to be expected of this type of laptop, not to mention that an OLED display always brings a price bump.
The other issue is a little more concerning. The port selection is worse than on an Apple MacBook Air, which is saying something, as that’s already very minimal. More specifically, there’s no audio jack, so hopefully, you have a good pair of Bluetooth earbuds on hand.
However, that’s a pretty short list of things to be concerned about, and one of them (price) is to be expected with a nice Ultrabook. All in all, the Lenovo Yoga Slim 9i is a wonderful laptop that will make a solid upgrade for anyone looking for an attractive, portable, and powerful Ultrabook.
Lenovo Yoga Slim 9i: Price & availability(Image credit: Future / James Holland)- How much does it cost? Starting at $1,759.99 / £1,800.00 / AU$3,829.00
- When is it available? Available now
- Where can you get it? Available in the US, UK, and Australia
The 10th-generation model of the Yoga Slim 9i comes in two configurations, with both available in the US, UK, and Australia. And both configurations are very similar.
The more basic configuration goes for $1,759.99 / £1,800 / AU$3,829 and comes with an Intel Core Ultra 7 256V CPU and 16GB of RAM. The more robust configuration with Intel Core Ultra 7 258V and 32GB of RAM costs a nominally higher price tag of $1,899.99 / £1,900 / AU$4,179. There’s very little difference in performance between the CPUs – it’s just that the 258v supports 32GB of RAM. Essentially, the price difference comes down to whether you want 16 or 32GB of RAM. Everything else is the same, from the color options to the screen and the storage capacity.
The Apple MacBook Pro 14-inch (M4) makes for an easy comparison. Not just because they have a similar-sized screen, though the Yoga Slim 9i has better resolution, but because they have similar price points. This 14-incher from Apple starts at $1,599 / £1,599 / AU$2,499, but that gets you a 512GB SSD. If you want the same amount of storage (1TB), the price goes up to $1,799 / £1,999 / AU$3,299, which is a little more than the Lenovo Yoga Slim 9i. Of course, you’ll probably gravitate towards one over the other, mostly depending on whether you want macOS or Windows.
The Dell XPS 13 offers an interesting comparison, too. It comes in at a similar price – $1,999.99 / £2,049 / AU$3,998.50 – if you opt for a touchscreen like the Lenovo Yoga Slim 9i has, but the screen is smaller. And while the Dell XPS 13 does have an OLED display, it’s at a lower, though still pretty good, 2880 x 1800p resolution. Both laptops have limited ports, but both have plenty of power.
However, the Dell XPS 13 has an interesting design with its edgeless keyboard (meaning it stretches edge to edge) and a touchpad that just uses haptic feedback and doesn’t have a defined physical boundary. This is one of those love-it-or-hate-it design choices and will probably be a deciding factor for most.
- Price: 4 / 5
Of the two available configurations, there’s very little difference. You basically get to choose between two almost identical CPUs, the Intel Core Ultra 7 256V and the Intel Core Ultra 7 258V, which is about 0.5% better.
However, if you select the ever-so-slightly better CPU, you get 32GB of RAM instead of 16GB, since that CPU supports the higher amount of RAM.
Lenovo Yoga Slim 9i SpecsBase configuration
Review / Max configuration
Price:
$1,819.99 at Lenovo.com / £1,830 at Lenovo.com / AU$3,849 at Lenovo.com
$1,979.99 at Lenovo.com / £1,900.00 at Lenovo.com / AU$3,909.76 at Lenovo.com
CPU:
Intel Core Ultra 7 256V
Intel Core Ultra 7 258V
Graphics:
Intel graphics
Intel Arc graphics
RAM:
16GB LPDDR5X
32GB LPDDR5X
Screen:
14" WQUXGA (3840 x 2400), OLED, Glare, Touch, HDR 600 True Black, 100%DCI-P3, 400 nits, 120Hz, Glass, Camera Under Display
14" WQUXGA (3840 x 2400), OLED, Glare, Touch, HDR 600 True Black, 100%DCI-P3, 400 nits, 120Hz, Glass, Camera Under Display
Storage:
1TB SSD
1TB SSD
Ports:
2x USB-C Thunderbolt 4
2x USB-C Thunderbolt 4
Wireless:
Wi-Fi 7 2x2 BE 320MHz & Bluetooth 5.4
Wi-Fi 7 2x2 BE 320MHz & Bluetooth 5.4
Camera:
32MP camera-under-display with e-privacy shutter
32MP camera-under-display with e-privacy shutter
Weight:
Starting at 1.25kg / 2.76lbs
Starting at 1.25kg / 2.76lbs
Dimensions:
312.93mm x 203.5mm x as thin as 14.55mm / 12.32 x 8.01 x as thin as 0.57 inches
312.93mm x 203.5mm x as thin as 14.55mm / 12.32 x 8.01 x as thin as 0.57 inches
Outside of the internal upgrades to CPU and RAM, there are no other upgrades. Both configurations come in one color, Tidal Teal, which is admittedly beautiful.
And there’s just the one display available. Thankfully, it’s also very nice with high-resolution and responsive touchscreen capabilities.
Lenovo Yoga Slim 9i: Design(Image credit: Future / James Holland)- Attractive and slim
- Gorgeous and impressive display
- Limited ports, including a lack of an audio jack
Available in Tidal Teal, a shimmery blue with hints of green, the Lenovo Yoga Slim 9i is a beautiful laptop even before opening it up. It’s slim and light, even for a laptop of this size, and is about as portable as it gets.
In terms of form factor, the one unusual thing I noticed is that there is a raised bar near the top of the lid. This houses the 32-megapixel webcam that’s hidden under the display and pops up near the top-middle of the screen when in use. Though there’s no physical shutter for the webcam, it does have an effective e-privacy toggle next to the right USB-C port.
Image 1 of 2(Image credit: Future / James Holland)Image 2 of 2(Image credit: Future / James Holland)It’s also worth noting that, despite having a touchscreen, this is not a 2-in-1, so don’t expect to be able to fold it to use as a tablet. That said, the touchscreen is very responsive and very sensitive, enough so that I’ve accidentally closed my browser multiple times when lightly touching the corner of the screen without thinking.
The screen is pretty remarkable beyond its touch capabilities. This 14-inch OLED panel has a 4K or 3840 x 2400 resolution (that’s a 16:10 aspect ratio) with a 120Hz refresh rate, along with 100% sRGB and DCI-P3 color coverage, which is ideal for photo editing. It also has a Vesa Certified DisplayHDR True Black 600 rating. It even supports Dolby Vision. You get the idea – the display is pretty spectacular.
(Image credit: Future / James Holland)The keyboard is a bit shallow, so it's not the most comfortable one I’ve used, but that’s to be expected with a laptop this slim. It’s otherwise accurate and responsive, and I had no trouble pounding out a couple of articles on it.
The touchpad is just as snappy and accurate. While a lot of newer laptops seem to increase the size of the touchpad, that’s not the case here. If you want a really big touchpad, you’re not going to get it here.
Finally, the port selection is very, very minimal. There are just two USB-C ports, one on each side. They’re both Thunderbolt 4, so there’s plenty of throughput if you want to use a dongle. Still, it’s very limited. What I’m most upset about is the fact that Lenovo has done away with any kind of audio jack. As ubiquitous as wireless earbuds are, some of us still use wired headphones from time to time.
- Design: 4.5 / 5
- Snappy, responsive performance
- Copilot+
- Great audio quality with spatial audio
The Lenovo Yoga Slim 9i is quite powerful. It can handle day-to-day work easily. Opening, scrolling, clicking links, typing, photo editing: all the sorts of things most people want from an Ultrabook. For example, I was able to open 20 browser windows very quickly, just by pressing the Plus sign in Microsoft Edge.
Each window, which opens the MSN homepage filled with different news stories and information, loaded up almost immediately. Of course, I reviewed the 32GB configuration, but the CPU and RAM still do quite a bit of heavy lifting.
Even the camera behind the screen pops up promptly. Speaking of which, the webcam performs smoothly and looks good, though it does struggle with noise in low light.
Lenovo Yoga Slim 9i CPU / System BenchmarksBenchmark
Score
Geekbench 6.4 Single Core
2,755
Geekbench 6.4 Single Core
11,186
Crossmark Overall
1,689
Crossmark Productivity
1,638
Crossmark Creativity
1,934
Crossmark Responsiveness
1,234
25GB File Copy Transfer Rate (MB/s)
1,032.87
Now, it’s not a gaming laptop, but I was able to run some less demanding or older games without any trouble, like Sable and Alan Wake. For those games, the action was crisp, clear, and smooth. That gorgeous OLED screen really helps. Still, there were some games I tried to run that wouldn’t even open.
As this is a newer laptop, it comes with Copilot+. Using the app is quick and responsive, though I still don’t find it to be a game-changer in my computing experience.
(Image credit: Future / James Holland)Lenovo Yoga Slim 9i GPU / Gaming BenchmarksBenchmark
Score
3DMark Fire Strike
9,107
3DMark Time Spy
4,436
3DMark Speed Way
6,094
3DMark Steel Nomad
823
3DMark Night Raid
35,326
Borderlands 3 (Badass, 1080p)
27fps
Shadow of the Tomb Raider (Highest, 1080p)
46fps
Sid Meier's Civilization VI: Gathering Storm (Max impact, 1080p)
67fps
Total War: Warhammer III (Ultra, 1080p)
37fps
I’ve rarely been impressed by the audio from a laptop. I was when I reviewed the Lenovo Yoga Book 9i, and I am here. That’s probably because there are more than two speakers in the Lenovo Yoga Slom 9i. Specifically, there are two 2-watt tweeters and two 3-watt woofers. There’s also some virtual spatial audio since the laptop supports Dolby Atmos.
Lenovo Yoga Slim 9i: Battery life(Image credit: Future / James Holland)- Decent if disappointing battery life
- Doesn’t seem to do fast charging
Laptops with OLED displays aren’t always the most efficient, so the Lenovo Yoga Slim 9i’s just under 10 hours of battery life in the PCMark 10 Battery benchmark is not surprising, though it is a bit disappointing. It did manage a better showing in our Web Surfing test, where it managed to get just over 11 hours of battery life.
While not the best results we've seen, this isn't terrible battery life. However, we’re seeing a few laptops, particularly ones that this one competes with, hitting up to double those numbers. To be fair, I turned off the laptop’s battery-saver feature, which makes the laptop run more efficiently when the battery is low, so you might manage to squeeze more juice from the battery depending on the settings.
On the bright side, it was very good at maintaining battery life when the lid was closed. I’ve used and tested some laptops where the battery would continue to run down when idling, and that’s not an issue here.
- Battery life: 3 / 5
Category
Notes
Rating
Value
While pricey, this laptop is thin, powerful, and comes with a wonderful OLED screen.
4 / 5
Design
It’s not only thin and light, but it is gorgeous. Too bad it lacks an audio jack and only comes with two USB-C ports.
4.5 / 5
Performance
The performance (and audio quality) is excellent, especially for productivity work.
4.5 / 5
Battery Life
The battery life is decent, but compared to the competition is lower than expected.
4 / 5
Final score
It’s gorgeous, light, and comes with robust performance. Plus, it has that OLED screen.
4.25 / 5
Buy the Lenovo Yoga Slim 9i if...You want a thin, light laptop
At under three pounds (and with a 14-inch screen), this laptop is about as portable as it gets.
You want a gorgeous screen
Not only is the Lenovo Yoga Slim 9i a looker, but it comes with a high-resolution OLED display that might be the centerpiece.
You want responsive performance
This might not be a gaming laptop, but its performance is snappy and responsive, exactly what one needs for most productivity work.
You want more ports
Only two USB-C Thunderbolt ports are limiting enough. The fact that there’s no audio jack is pretty disappointing.
You have limited funds
While worth the cost, this is not a cheap machine. If you’re limited on funds, there are some great laptops out there without an OLED screen that are probably within reach.
If my Lenovo Yoga Slim 9i review has you considering other options, here are two laptops to consider...
Dell XPS 13
Between the long-lasting battery life, strong performance, and gorgeous OLED screen, the Intel Core Ultra 2nd Gen version of the Dell XPS 13 is the ideal Ultrabook. That is, if you’re game for an innovative design change that some will love and others not so much – essentially a haptic-only touch bar and touchpad.
Read our full Dell XPS 13 review
Apple MacBook Pro 14-inch (M4)
The Apple MacBook Pro 14-inch (M4) may not have WiFi 7 or any major physical design upgrades, but it’s an almost perfect laptop otherwise. It has powerful and incredibly efficient performance (meaning it also has a very long battery life) and comes with some unique features such as the centerstage camera and optional nano-texture screen.
Read our full Apple MacBook Pro 14-inch (M4) review
How I tested the Lenovo Yoga Slim 9i- Tested for a month
- Used it for work, gaming, and streaming
- Tested its various features
I used the Lenovo Yoga Slim 9i for a month, testing it for work, including this review (along with the requisite online research). I used it to stream video. I even did some light gaming. I played with the webcam, the audio, and the AI features as well.
After spending time with the Lenovo Yoga Slim 9i, it’s clear that this is perfect for those who want a premium experience (and can pay for it) in a gorgeous wrapping.
I’ve spent the last few years reviewing tech gear for gaming and otherwise, where I’ve gotten a feel for what to look for and how to put a piece of kit through its paces to see whether it’s worth the recommendation.
- First reviewed August 2025
Categories: Reviews
I’ve just tested a multi-talented air purifying table – turns out, it can do much more than hold your keys
SwitchBot Air Purifier Table: two-minute review
The SwitchBot Air Purifier Table integrates an air purifier with a tabletop, a wireless Qi charger, a colored ambient light, and a fragrance diffuser.
It has a list price of $269.99 / £299.99, and can be purchased from SwitchBot and Amazon; however, there appear to be very regular discounts on the SwitchBot Air Purifier Table, and at the time of writing, it’s on offer for $175.50 / £180.
Replaceable filters cost $39.99 / £44.99, and will need to be replaced roughly every 6-12 months, depending on use, so it’s important to factor this extra cost in.
(Image credit: Future)Setting up the SwitchBot Air Purifier Table was fairly simple but a little fiddly, on account of the little electrical connector I needed to plug in before putting the tabletop in place.
It’s a good height for having next to the couch or bedside, and the built-in wireless charger proves particularly useful in these cases. The onboard controls are a little tricky to see due to the tabletop, but I found myself using the SwitchBot app to control the purifier most of the time.
The simple-to-use companion app was pleasingly responsive when operating the air purifier and offers air quality data, scheduling, and a timer, which are all good features to have.
(Image credit: Future)During testing, the SwitchBot Air Purifier Table quickly detected and cleared dry shampoo contamination. While it didn't immediately remove fragrance, it was cleared fairly quickly once I intervened and increased the fan speed myself.
It operates quietly in sleep mode, and is only as loud as light traffic when on top speed. Pet Mode didn’t operate as I’d expected, but the overall low volume of the purifier meant that it didn't bother my cats. I also found the fragrance diffuser to be efficient in lightly fragrancing the room after I’d applied drops of fragrance oil to the pop-out pad.
Overall, this is a good price for a multi-talented and Matter-compatible air purifier with an efficient companion app. If you’d like to explore other air purifiers we recommend, I suggest taking a look at our guide to the best air purifiers.
SwitchBot Air Purifier Table review: price & availability- List price: $269.99 / £299.99
- Available now in the US and UK
The SwitchBot Air Purifier Table is available to purchase from the official SwitchBot website and Amazon, and has a list price of $269.99 / £299.99.
The list price sounds pretty high considering the SwitchBot Air Purifier Table only detects and reacts to PM2.5; however, there appear to be regular discounts on offer on the SwitchBot site and at Amazon, so it’s common to find it available at a lower price. For instance, at the time of writing, the Air Purifier table has 35% off in the US, and 40% off in the UK at SwitchBot, knocking a considerable $94.50 / £120 off the list price, and lowering the cost to $175.50 / £180.
(Image credit: Future)There’s a cheaper model available too, the SwitchBot Air Purifier, which includes most of the features mentioned in the following review, just without the tabletop and wireless charging. This has a list price of $219.99 / £239.99 but, as with the Air Purifier table, this price is often discounted, and it’s listed at $119.99 / £139.99 at the time of writing.
Both models use the SwitchBot Air Purifier Filter, which has a list price of $39.99 / £44.99. As with all HEPA filters, this will need to be replaced on occasion, with SwitchBot advising a lifespan of 6-12 months depending on usage and air quality, so it’s important to factor in this regular cost.
Taking into account the convenience and additional features of the Air Purifier Table, and that it’s very regularly available for less than its official list price, I would say that you’re getting good value for money here.
- Value score: 4 out of 5
Type
Air purifier table
Fan speeds
3
Timer
Yes
CADR (Clean air delivery rate)
236CFM
Filter
Pre filter, HEPA and activated carbon
Particle sizes detected
PM2.5
Dimensions
11.4 x 11.4 x 16.5 inches / 290 x 290 x 420mm
Weight
10.7lb / 4.9kg
Control
Onboard power buttons, app, and voice control
Additional modes
Auto, Sleep, Pet
Extra features
Fragrance diffuser, Light sensor, Wireless charging, Matter
SwitchBot Air Purifier Table review: design and features- 4-in-1 air purifier, wireless charger, fragrance diffuser, and ambient light
- Simple to set up, but a little fiddly
- Detects and reacts to PM2.5 contamination
It feels like they were having a “yes” day in the SwitchBot office when they came up with the concept of the Air Purifier Table, like every idea thrown out was met with an enthusiastic nod. But somehow they found a way to make it work.
The SwitchBot Air Purifier Table consists of an air purifier with a tabletop, as one might expect, but it also boasts a wireless Qi charger, a colored ambient light, and a fragrance diffuser. It made a useful little side table next to my couch, and the built-in Qi wireless charger proved handy for keeping my iPhone or Motorola Moto Buds+ earbuds topped up, which was a nice bonus feature.
Does an air purifier really need all these things? Perhaps not, but I appreciated the thought, and found these extra features useful, so you may do, too.
(Image credit: Future)The air purifier is capable of detecting and reacting to PM2.5 (particle matter of 2.5 micrometers or smaller), but it is also capable of filtering VOCs and odors, thanks to the HEPA and activated carbon filter. This filter sits within the base of the machine, behind a washable pre-filter, both of which can be easily accessed by removing the outer panel.
Setting up the SwitchBot Air Purifier Table was a little fiddly, as there are two parts of a little electrical connector between the purifier and the table top that need to be connected together. Once this was done, it was a case of rotating the table top until it clicked into place. There were four little screws that were meant to be screwed into the purifier underneath the tabletop for extra reinforcement, but this seemed basically impossible, even with my tiny hands, so I had to leave them.
(Image credit: Future)There are a number of controls on the top edge of the purifier, underneath the tabletop, to use when you’re within reaching distance, or you can use the companion app to control the SwitchBot Air Purifier Table. The onboard controls include a button to change between the air purifier’s three modes: Auto, Pet, and Sleep, a button to cycle through the three fan speeds, a child lock, and a timer.
The controls were a bit tricky to reach, as they’re somewhat hidden underneath the tabletop. It wasn’t easy to change the settings unless I was sitting down and had a better view, although this wasn’t such a problem once I’d used them for a while, and it made more sense to use the app to adjust the settings, anyway.
- Design score: 4 out of 5
- Responsive and simple to use
- Can set schedules and timers
- Shows current and historical air quality data
The SwitchBot companion app is simple to use and houses a good range of features and air quality data insights for the price of the appliance. It proved very responsive over the weeks I used it, making it easy to switch modes or power on or off.
It clearly displays the air quality reading on the dashboard, using ratings from very good to bad, along with a numerical reference that relates to the number of micrograms of PM2.5 per meter cubed.
The app also provides historical data in graphs spanning either the last 24 hours or 30 days. This meant I could view which hour any spikes in air contamination occurred over the last day, and see what the minimum and maximum readings were each day over the last month. It would have been nice to have access to a 24-hour graph for previous days of the month, but this is only a small niggle, really.
(Image credit: SwitchBot / Future)I could also set schedules within the app, either as a one-off occurrence or repeating on particular days and times. There’s a timer function, too, which offers both hours and minutes, up to 12 hours, so I could leave it running for exactly 11 hours and 26 minutes, if I really wanted to.
Finally, the care and maintenance section told me how many hours of life were remaining on the filter, and how many hours I’d been using it for. At this moment, it’s telling me that I’ve used it for 184 hours, and I’ve got 4,136 hours left. This section also advises that the pre-filter should be cleaned with a vacuum cleaner every two to four weeks, which is all handy info to know.
- App score: 4.5 out of 5
- Quick contaminant detection and clearing
- The noise didn’t disturb my rescue cats
- Subtly fragranced the air
The SwitchBot Air Purifier Table was pleasingly responsive when I tested it by spraying dry shampoo from roughly two feet away. It took just a few seconds to detect the contamination, with the PM2.5 reading increasing to 619 micrograms per meter cubed in thirty seconds.
In this time, the fan speed increased in order to tackle the detected contamination, and took a further thirty seconds to return the air level to “good”, and back to “very good” in less than two minutes from the initial detection.
As it tackled the contamination so quickly, and therefore returned to its lowest setting, it didn’t do much to tackle the lingering fragrance of the dry shampoo in this time, though this is standard for air purifiers incapable of reading the ambient levels of VOCs in the air. This doesn’t mean that it doesn’t capture VOCs, however, as the HEPA and carbon filter is capable of doing so, but it needs to be manually set back to a higher fan speed to do so efficiently. I upped the fan speed to level two, and could no longer detect the fragrance after about fifteen minutes.
(Image credit: Future)On the subject of scents, the built-in fragrance diffuser worked better than I was expecting. I’ve encountered this feature before with my beloved GoveeLife Smart Air Purifier Lite, though it was one of the rare sources of disappointment, as it wasn’t very efficient. Things were a bit more positive when it came to the diffuser in the SwitchBot, however; I could detect a good amount of the fragrance from the oils I’d placed on the pad.
One important thing to note regarding fragrance or essential oils and pets is to please make sure you do your research on whether any oils you plan to use are safe, as some can prove toxic to our furry friends.
The SwitchBot Air Purifier Table was very quiet when in sleep mode, measuring just 26dB from two feet away, which is quieter than a whisper. It was therefore very easy to sleep next to, and so I’d have no concerns using the SwitchBot Air Purifier Table as a nightstand.
(Image credit: Future)Pet Mode worked a little differently than I expected. On the SwitchBot site, Pet Mode is described as using a softer air supply to prevent disturbing pets. In practice, I found that enabling it just seemed to bump the fan speed up to two, regardless of the air quality, which was already good. Nonetheless, neither of my rescue kitties seemed bothered by the 49dB volume, and were happy to come up and have fusses right next to it.
At its top fan speed, the SwitchBot Air Purifier Table gave a reading of 55dB, making it a little louder than the Blueair Blue Pure Mini Max, but seeing as this is still only as loud as light traffic, it’s perfectly acceptable.
Overall, the SwitchBot Air Purifier Table is an efficient air purifier for the price, and a handy little side table and phone charger.
- Performance score: 4.5 out of 5
Section
Notes
Score
Value for money
Provided you purchase it at what appears to be a regularly discounted rate, you’re getting a good little air purifier and some fun additional features for the price.
4/5
Design & Features
There’s a lot packed into this little table, thanks to its air purifying, charging, and fragrance diffusing features. The setup was a little fiddly in places, but easy enough overall.
4/5
App
The companion app was simple to use and responsive. It gave some insights into any spikes in contamination throughout the day, plus min and max readings over the past thirty days.
4.5/5
Performance
The air purifier reacted to and tackled contamination quickly during testing, and dealt with the odor left over, once I’d manually upped the fan speed.
4.5/5
Buy it if...You want a smart purifier
Having the SwitchBot app made it really easy to control and schedule the air purification, and it proved responsive and informative during testing.
You’ll make use of the extra features
If you happen to need a new side table or nightstand with built-in wireless charging, then the SwitchBot Air Purifier Table is a great way to feed two birds with one scone.
You want a purifier with auto-detection
It’s always useful to have an air purifier that can be left to its own devices, and the automatic detection and reactivity to PM2.5 means the SwitchBot Air Purifier Table will jump into action on its own accord.
You want VOC detection
Unsurprisingly, considering its price point, the SwitchBot Air Purifier Table doesn’t detect or react to VOC contamination. If you’re looking for something that does, and you have a little more to spend, I highly recommend checking out the Dyson Purifier Cool Formaldehyde TP09 instead.
You just want an air purifier
If you’re not bothered about having an extra side table or a wireless charger, then you’re probably better off opting for the standard SwitchBot Air Purifier and saving some money.
You want it to deal with odors unaided
As it only detects and reacts to PM2.5 contamination and deals with it quickly, the fan isn’t running high enough for long enough to tackle odors. Therefore, manual intervention is required by turning up the fan speed until the odor is gone.
SwitchBot Air Purifier Table
Blueair Blue Pure 411i Max / Blue Max 3250i
GoveeLife Smart Air Purifier Lite
Price
$269.99 / £299.99
$169.99 / £169
$49.99 / £59.99
Fan speeds
3
3
3
Modes
Auto, Sleep, Pet
Auto, night mode
Sleep, Custom
Additional features
Fragrance diffuser, Light sensor, Wireless charging
Washable fabric pre-filter
Aromatherapy
Filter
Pre-filter, HEPA and activated carbon
HEPA and activated carbon
3-in-1 HEPA filter
App support
Yes
Yes
Yes
Dimensions
11.4 x 11.4 x 16.5 inches / 290 x 290 x 420mm
18.9 x 10.6 x 10.6 inches / 481 x 269 x 269 mm
6.2 x 6.2 x 10.75 inches / 158 x 158 x 273mm
Weight
10.7lb / 4.9kg
7.5 lbs / 3.4 kg
2.4lb / 1.1kg
Blueair Blue Pure 411i Max / Blue Max 3250i
This delightfully lightweight air purifier offers simpler on-board controls, with one touch button to cycle through the three fan speeds, and auto and night modes. There’s a handy companion app that allows for easy control, along with air quality data based on the ambient levels of PM2.5. BlueAir has cleverly made the pre-filter part of the aesthetic, opting for a washable fabric covering, making this air purifier more pleasing to the eye. If you’d like to find out more, check out my full Blueair Blue Pure 411i Max / Blue Max 3250i review.
GoveeLife Smart Air Purifier Lite
This is another favorite of mine, and makes for a great desktop option. Similar to the BlueAir above, it’s simple to control with a touch button to cycle through the fan speeds and modes. One such mode is the custom mode, which was great, as it allowed me to run a customized routine. The Smart Air Purifier Lite can be controlled via the fantastic Govee Home companion app and voice control, too. For more information, why not take a look at my full GoveeLife Smart Air Purifier Lite review?
- I tested the SwitchBot Air Purifier Table for a few weeks
- I explored the different modes and features
- I tested its detection and reaction speeds
I passively tested the SwitchBot Air Purifier Table by having it next to my couch for a few weeks. I used it as a side table, charged my iPhone and earbuds, and made use of the fragrance diffuser and ambient lighting.
I tested out all of the different modes, like Sleep mode when I napped on the sofa, and Pet mode when my rescue cats were about. I explored the app and made use of the various features.
I tested how fast the SwitchBot Air Purifier Table would react to and clear contamination by spraying dry shampoo around two feet away. I also monitored the readings on the app during this time.
- First reviewed: August 2025
- Read TechRadar's Reviews Guarantee
Categories: Reviews
Domain.com review
Get 25% off EVERYTHING at Domain.com
Want to buy a domain name? Kickstart an online empire? Become a self-made millionaire with a web-based business? Then fill your cart at Domain.com and get 25% off your order using the discount code TECHRADAR. T&C apply, see further down the page.View Deal
Founded in 1998, Florida-based Domain.com is a web hosting provider and domain registrar who claims to power 1.2 million websites across the globe.
The company is now owned by Newfold Digital (previously known as Endurance International Group), the power behind other hosting names like Bluehost, HostGator and iPage. As of August 2025 the site is closed and has merged with Network Solutions.
- Want to try Domain.com? Check out the website here
Domain.com offered easy-to-use and low cost shared hosting plans in various forms: WordPress hosting, a website builder, an online store builder, and general-purpose do-everything shared hosting plans to cover everything else.
The company didn't offer VPS hosting, dedicated server hosting, or any more advanced hosting plans.
(Image credit: Domain.com)Domain.com shared hosting (No longer available)Domain.com's shared hosting range is refreshingly simple. There are only three plans, all with the same core features: free domain, free SSL, unlimited bandwidth, 1-click WordPress install and a free website builder. Upgrading only adds more resources, so there are no extra features to weigh up. Prices start at $3.75 a month on the annual plan, $4.99 on renewal, but there's no complex discounting scheme if you sign up for longer. Choose a one, two or three-year contract, it's still $3.75 a month.
We signed up, but quickly ran into problems. Domain.com doesn't use any of our favorite hosting management platforms (cPanel for its all-round tools, Softaculous to install and manage WordPress and other apps.) We found its replacements have fewer options and aren't always organized logically, often leaving us struggling to find key functions.
The 1-click installer is especially disappointing. It only covers WordPress, has the bare minimum of configuration options, includes few management tools, and has occasionally failed to install WordPress in the past (though not during this review.)
The plans have some feature gaps. In particular, there are no backups with the cheaper plans (adding them to our test account would cost an extra $2.13 a month.) Even when we got our site online, performance was below average (more on that, later.)
If you're running a basic site, with few visitors, and long-term prices are your top priority, then Domain.com might, just about, be acceptable. Although many providers have lower prices in the first term, they tend to jump on renewal, and Domain.com's 'from $4.99' renewal price is very low.
Unfortunately, opting for Domain.com means you'll pay in other ways, with below-par speeds, few features and poor management tools.
Hostinger's shared plans start a little cheaper at $2.99 a month on the annual, two or four your plans, although they're more expensive after that $6.99 to $8.99. Backups are still limited on the cheapest plans (weekly rather than daily), but performance is good, there's an excellent control panel and 1-click installer, useful WordPress extras, six data centers, and more.
The WordPress plans come with preinstalled plugins and themes (Image credit: Domain.com)Domain.com WordPress hosting (No longer available)WordPress is the world's favorite website creation platform, a hugely configurable tool which can handle everything from a single page personal site to a product-packed international web store.
Domain.com's shared hosting supports installing WordPress, perhaps enough if you just want to explore what it can do. But if you've something more serious in mind, Domain.com's WP range extends the range with a handful of extra features.
The WP Starter plan is priced from $3.75 a month, just like the shared hosting, but adds unlimited storage, a customized control panel and pre-installed themes and plugins. They're small improvements, but not worth very much. You probably don't need a lot of storage (simple WordPress sites are often barely 1GB in size), and even newcomers can find plenty of quality themes and plugins for themselves.
The WP Essential plan (priced from $6.95 a month) includes more valuable extras, including Sitelock's malware scanning and removal service, and a direct phone line 'to a team of support agents who are specially-trained in all things WP Essential.'
Malware scanning is useful (hacked WordPress sites are a well-known web danger), and the plans are fair value, but they just don't have enough WordPress-related functionality to justify your time. Many hosting providers offer malware scanning as a paid extra, and you could easily buy a better shared hosting package elsewhere and add malware scanning yourself.
Domain.com does have one unusual extra in its WP Live support service. Priced from $29.95 to $149.95 a month, this goes beyond troubleshooting problems to giving advice on all kinds of design and optimization issues: social media strategies, creating an online store, making sure your site works well on mobile devices, more.
This could be useful in some situations. If you're new to WordPress, just starting your site, spending a one-off $149.95 for a month of design advice could save you a lot of time, and produce a better site. But in reality, you're likely to be better off choosing a more capable WordPress plan with additional WordPress-related features, faster hosting underneath, and the option to upgrade to VPS hosting if your site grows.
Alternatives include Hostinger's shared package, very cheap but with handy WordPress extras. Bluehost has a wide range of plans, with some strong business features at the top of the range. And if you're not quite sure what you need, IONOS' has WordPress options ranging from the impossibly cheap ($0.50 a month for year one, $8 on renewal) to supremely powerful ($120 a month for agencies and developers).
The website builder includes a powerful web store (Image credit: Domain.com)Does Domain.com have a website builder? (No longer available)If you're looking for the easiest and quickest route to create a web presence, then a website builder is often the best choice. Most builders come with or can create starting sites in minutes, and adding elements to pages (text, images, videos forms) is as easy as dragging and dropping.
Domain.com has three website builder plans, ranging from $1.99 a month (billed monthly) for a limited product which supports a maximum of six pages, to a $12.99 a month ecommerce plan with product listings, inventory tracking, integrated shipping, order and tax management, and more.
The builder is certainly easy to use. No need to browse through templates to find something that appeals: just answer a few questions on yourself, your site and its goals, and it creates a starter site for you right away.
There's a reasonable set of features, too. All plans include free SSL, unlimited storage, social media sharing, blogs, contact forms, easy integration with an existing Facebook page, and more.
The plans are fair value, and the $1.99 plan in particular could be a smart low-cost solution for very simple sites.
As with Domain.com's WordPress plans, though, the lack of VPS or dedicated support is a problem for more demanding projects, such as a web store. If your site outgrows Domain.com's basic shared hosting infrastructure, you can't upgrade to anything better, and could be forced to move somewhere else.
Wix is a capable website builder with many more features and a far wider range of plans. Casual users can build and host a website for free, and an array of other plans covers everyone from personal users to (potentially) big international corporations.
Squarespace is a powerful alternative with great-looking templates and professional business and e-commerce plans. Or if it's value you're after, Bluehost has plans from $2.95 a month, while the Hostinger-powered Zyro has an 'e-commerce essentials' plan from an initial $3.99 a month.
(Image credit: Domain.com)How fast is Domain.com?Reliability is a must-have for any serious website. If your site is regularly broken, or down entirely, it hurts your reputation and may drive users away.
We check reliability by using Uptime.com to access a test site every five minutes over a two week period. We expect hosts to show 100% uptime with this short a test, but Domain.com managed a disappointing 99.11%. That puts it last in our last 15 tests (11 hosts hit 100% uptime, even the next-to-last host managed 99.63%.)
Uptime also records the response time of each test web server. Domain.com came bottom of the list here, too, with an average response time of 2.97 seconds (nine of our last 15 averaged less than 0.5 seconds.)
(Image credit: GTMetrix)We measure hosting performance by using a tool called GTmetrix to access a test WordPress site and calculate how long it takes to display the main content of a page (a figure technically called Largest Contentful Paint, or LCP). The lower the LCP, the faster and more responsive your site appears, and the happier your visitors will be.
Domain.com's LCP was relatively disappointing at 1.5 seconds, far slower than providers such as Bluehost (0.8 seconds), GoDaddy (0.7 seconds) and Hostinger (0.6 seconds.) Although 1.5 seconds is still acceptable, keep in mind that's based on launching our very simple template site. If yours has any significant content or features then it could be much slower.
(Image credit: k61)Finally, we use k6 https://k6.io to measure website performance when it has many visitors loading pages at the same time. Our Domain.com site handled an average 22.67 requests per second, but with a price. Response times became even longer and more unreliable as the site load increased, and the overall test response time was a lengthy 1.591 seconds. Most providers were at least a second faster, and Hostinger, HostGator, InMotion Hosting and Bluehost managed response times of around 100ms or less.
Domain.com's web control panel is basic (Image credit: Domain.com)How easy is Domain.com to use?Buying a Domain.com plan is easier than usual. There are generally only a few plans, and the site only displays the bare minimum features for each. Pricing is clear and there are no misleading discounts to catch you out (a '$4.99' starter price which leaps to $14.99 after a year, say).
Managing your plan isn't as straightforward. Domain.com doesn't use standard tools such as cPanel or Softaculous, opting for its own custom control panels, instead. We found them relatively basic, with fewer features. These don't seem as intuitive or well organized as more standard control panels, either, and we spent longer than expected trying to carry out some tasks.
Use the control panels for a while and these initial impressions won't matter as much, because you'll learn where everything is. But if you're looking for the most straightforward shared hosting, we'd generally recommend choosing a host which offers quality tools such as cPanel or Softaculous.
Alternatively, there are some hosts who do produce very capable control panels of their own. Hostinger's hPanel is a great example, and it's available in the company's budget shared hosting range (from $1.99 a month).
(Image credit: Domain.com)What is Domain.com's support like?Domain.com offers 24/7 live chat support and a web knowledgebase. There's no ticket support, though, and the company no longer offers telephone support. That can become a problem if you've a long-term issue, as you'll have to explain the situation from the beginning whenever you talk to an agent.
The web knowledgebase has plenty of useful content, and its search engine does a good job of displaying the most relevant articles at the top. We noticed that some content appeared to be cut-and-pasted from iPage, (both iPage and Domain.com are owned by Newfold Digital), and no-one had remembered to replace the 'iPage.com' references with 'Domain.com.' That looks a little clumsy, but as iPage and Domain.com use the same technology, the articles should hopefully apply to both hosts.
We opened several test live chat sessions, and in every case an agent appeared to respond in under a minute. The initial responses are largely automated, and appeared more or less identically for every test question, but typically we still had an initial reply to our issue within three to four minutes.
The quality of responses varied depending on the issue, with agents performing noticeably less well on more complex or unusual problems (how to install WordPress on a subdomain, and the SSL consequences of that.) But when it came to common issues which you're far more likely to have, the agents quickly identified each problem and pointed us to the best solution.
Domain.com has very few plans (Image credit: Domain.com)Final verdictDomain.com's low long-term prices are appealing, and if cost is your top priority, your site is basic and you're not that bothered about power or performance, it might - just about - do the job. But if you're managing any more serious project, you'll find faster, more reliable and powerful hosting available elsewhere for only a little extra cash.
Domain.com FAQsWhy have you not completely removed this review?Domain.com only recently closed. Some readers might want to read back over a review to compare what hosting was like at domain.com and compare it to Network Solutions.
What payment types does Domain.com support?Domain.com accepts payment via card and PayPal.
Does Domain.com offer refunds?Domain.com has a 30-day money-back guarantee covering hosting, but not domain registration, setup fees, or the cost of any additional services.
The small print warns that all first-time hosting accounts are eligible. If you've been a customer before, and signed up again, you won't be able to claim a refund.
(Image credit: Domain.com)Does Domain.com have an uptime guarantee?The Domain.com states in several places that some hosting plans have a 99.99% uptime guarantee, which translates to a downtime of just four minutes and 23 seconds a month. Sounds like good news, especially as most hosting packages only offer 99.9% uptime, or 43 minutes and 50 seconds a month.
Unfortunately, we can't find anything on the Domain.com website which explained anything about the policy: what counted as downtime, what didn't, when you might start being compensated for problems, and you might get. We asked support but our agent couldn't tell us, either.
Maybe the company has the tech to hit that target, maybe it doesn't, but with no clear definition of what 'downtime' means, it's not a meaningful guarantee. We'd recommend you ignore it until Domain.com adds some relevant details to its terms and conditions.
Where are Domain.com's data centers?The Domain.com website doesn't have any significant information on the company's data centers, and we weren't offered a choice of locations when we signed up for our regular hosting account.
We put our server IP address into IPLocation.net https://www.iplocation.net/ip-lookup to find out where the server is located. This doesn't always return an accurate answer, but of the eight databases IP Location checked, six suggested our IP was in Florida, one said Massachusetts, and one couldn't give us a location.
What is my Domain.com IP address?Log into the Domain.com customer account panel.
Click the Hosting tab at the top of the screen.
The server IP address is displayed in the Server Information box on the right-hand side of the control panel.
What are Domain.com's nameservers?Log into your Domain.com customer account panel.
Click 'DNS & Nameservers' in the left sidebar.
Domain.com's nameservers are displayed beneath the 'Add Nameserver' button. (If you don't see them, they're probably ns1.domain.com and ns2.domain.com: try those, first.)
Domain.com's change auto-renewal status to cancel a product (Image credit: Domain.com)How do I cancel a Domain.com product?Log into your Domain.com web account.
Click the Hosting Tools icon at the top of the page (nine small dots arranged in a square.)
Click the 'Logged in as ' box at the top of the screen, and choose Hosting Renewal.
Choose whether you'd like your hosting canceled immediately, or when your subscription expires. Read the details carefully to avoid any mistakes, and click Change Status.
The TECHRADAR coupon is good for 25% off the cart total with no minimum purchase. All renewals after the initial discounted period will be charged at the then current standard list price for the selected period. Coupon is not valid with sunrise registrations, landrush registrations, EAP registrations, pre-registrations, premium registrations, renewals, transfers, custom website design, other coupons, or special pricing.
Categories: Reviews
Surfshark VPN review - a high speed, high value security solution
Surfshark is one of the newer names in the world of VPNs, but it has already made a huge splash. The balanced offering of security-boosting features, an expansive server network, and budget-friendly prices make Surfshark a worthy contender to the throne in our overall best VPN rankings.
We found that Surfshark covers all the basics you'd expect a VPN to have, but there are a few sticking points that might make you consider alternatives. To help you determine if Surfshark is your perfect match, we've examined its speed, privacy policy, streaming performance, and overall value for money to put together this detailed review. So, let's dive in!
FeaturesSurfshark's roster of tools is varied and impressive, and all are designed to give your digital privacy a major boost while you do your thing online. It's also great to see that the core VPN features are present and correct, too.
For starters, you'll be protected by robust AES-256 encryption and two tried-and-tested VPN protocols: WireGuard and OpenVPN (you can also choose between TCP and UDP).
A kill switch is also available. It's not enabled by default, and one of the first things we did was head into the settings menu and enable it to prevent IP leaks in the event of a VPN dropout.
In June 2025, Surfshark unveiled a shiny new tool designed to boost VPN connection stability, called Everlink. It's not quite a kill switch, but it does work quietly in the background of your device to recover dropped VPN connections without risking any exposure to your IP address. On the surface, this feature might not be as flashy and exciting as, say, a whole host of new servers, but we're still happy to see Everlink make its debut. VPN connection quality is an important metric in our in-house testing and for real-world use, and Surfshark is confident that it'll make a difference in terms of the overall experience. Nobody likes troubleshooting constant VPN dropouts, after all.
You'll also find Surfshark's split tunneling tool in the settings. It's called Bypasser, and it allows you to flag specific sites and services you'd rather route through your original connection, not the VPN tunnel, which is handy for any online banking you plan to do (as logging in to these apps can be tricky if you're connected to a VPN server).
Image 1 of 3Surfshark Search is Surfshark's private, ad-free search engine, offering you can access through its Chrome extension or apps to a more secure browsing experience. (Image credit: Future)Image 2 of 3(Image credit: Surfshark)Image 3 of 3(Image credit: Surfshark )Another basic tool that we're glad to see included in the Surfshark roster is the auto-connect. It's nice and easy to use – just enable it via the settings menu. You can choose which server to set as your default – the one you'll connect to automatically – and add trusted Wi-Fi networks to a specific list. Surfshark won't automatically connect to a server when you use these Wi-Fi networks.
Multihop, accessible via the server list, allows you to route your traffic through an extra server for an added layer of protection. It's a nice extra, especially for folks living with invasive data privacy laws.
Surfshark's standout features pack more of a punch. Take CleanWeb, the DNS-level blocker that keeps ads and malware at bay. There's also a browser-based add-on called CleanWeb 2.0 that mops up any threats that slip through the net within your browsing sessions.
During our most recent round of testing, Surfshark successfully blocked 84% of ads, which makes it more effective than Proton VPN's ad-blocker at 79% but second to ExpressVPN at 90%.
Image 1 of 2(Image credit: Surfshark )Image 2 of 2Surfshark Alternative ID offers a one-stop solution to avoiding risk when signing up for websites you don't trust or sites you don't want to use your details for marketing purposes. (Image credit: Future)Alternative ID is a fantastic addition to Surfshark's toolkit and a unique feature. It generates an entirely new online persona for you in the click of a button, including an email address. This means you don't have to hand over your actual identifiable details when signing up for sites, newsletters, and services, reducing the risk of being caught up in data breaches and scams. Plus, we found that it's a lot quicker than creating a one-use burner email.
Alternative Number adds an extra layer of privacy to your online life by creating a secondary phone number you can use during sign-up, too, preventing potential misuse of your real contact details.
We especially like that you generate and use the number from within the Surfshark app itself and that it doesn't interfere with your original phone number or require you to swap your SIM card. Bear in mind, however, that Alternative Number is a paid extra you'll need to add to your account.
On that note, upgrading to a Surfshark One plan will bag you some extra goodies, including the aforementioned antivirus. You'll also have access to Surfshark Search (an ad-and-tracker-free search engine) and Surfshark Alert, which will let you know if your data is involved in a data leak or your ID is compromised.
Bump things up to a One+ plan, and you'll get access to Incogni, a data removal service that automates requests to remove personal information from databases and people search sites.
Features score: 9/10
Server networkSurfshark has servers in 100 countries – that's an impressive spread and more than Private Internet Access (91); however, it's still fewer than ExpressVPN (105) and NordVPN (118). In terms of locations, Surfshark’s servers span 140, again trailing behind ExpressVPN (148) and NordVPN (111).
Although Surfshark can't claim to have the most pins on the map, we think that the overall distribution of servers is excellent, leaving no region hungry. Europe and the Americas are well-served, and Surfshark even boasts extensive coverage across Asia, the Middle East, and Africa.
There's even a Chinese Macau SAR server, though, as expected, there are no available locations in Russia.
It's well worth noting that all of Surfshark's servers are RAM-only. That means they're wiped whenever they're rebooted, erasing any stored user data, which is a nice boost to a user’s overall digital privacy.
We're also glad to see that Surfshark now labels whether its servers are virtual or physical. Physical servers provide an IP address based in that same location, whereas virtual servers don't – virtual servers in India, for example, aren't located within the country itself.
Virtual servers come in handy if it's difficult to set up servers in a country with censorship, but they can introduce security issues, especially if your traffic is routed through a country with draconian data protection laws.
Surfshark doesn't offer specialized streaming, gaming, or torrenting servers, but you can check out its static IPs or invest in a dedicated IP (for an extra monthly fee). Similarly, Surfshark's multihop tool lets you route traffic through an extra server. You can choose from a preselected pairing of servers or, if you're feeling choosy, create your own combination.
Server network score: 8/10
AppsSurfshark has apps for all major platforms, including Windows, Mac, Android, iOS, and Linux.
Our hands-on testing experience with the Surfshark UI was smooth and hiccup-free. The UI is a minimalist's dream, without any clutter to slow you down or confuse VPN newbies, and we found it just as easy to switch between tabs on the left-hand side of the screen.
The simplicity means there's nothing to write home about in terms of flair (think Proton VPN and its cyber-chic purple and black UI), but it does mesh well with the native interface of both Windows and Mac clients.
The mobile apps are similarly well-crafted, with a few small improvements proving that Surfshark is thinking about making its offering stand out in an increasingly saturated market.
Whether you’re an Android or iOS loyalist, you’ll be glad to learn that the experience across both platforms is virtually identical.
Image 1 of 2(Image credit: Surfshark )Image 2 of 2Surfshark's Alternative Number feature is hosted within the app, and offers a near-identical experience to what you'd expect from your usual messaging service. (Image credit: Future)Now, Surfshark's mobile app has widgets that allow you to control your VPN connection without opening the full app. You can also log in by scanning a QR code on a device that's already logged in, which makes it way easier to get the app set up on your mobile phone (and make good use of those unlimited simultaneous connections).
Our testing showed that the Chrome browser extension has improved since our last investigation, and more tools are available directly within the browser. You can now auto-fill forms with your Alternative ID, too, speeding up a previously monotonous process and eliminating the need to fork over real details in the process. It's a win/win and exactly the sort of innovation we like to see.
Currently, Surfshark is one of only a handful of VPN that offer a graphical Linux client rather than a command line interface. It's encouraging as Linux regularly remains an afterthought even among today's top services.
Surfshark gave its Linux app some extra TLC, too, finally adding a kill switch, split tunneling, and its roster of CleanWeb features to the mix.
As is now the norm, Surfshark is also compatible with less common clients, such as Fire Stick, Apple TV, and routers.
Apps score: 9/10
Ease of useWe found the Surfshark app easy to install and set up. Once you've picked your plan and downloaded the right package for your device, you just follow along with an installation wizard and log in to the app when prompted.
(Image credit: Future)Then, you'll see Surfshark's location tab. The UI is easily digestible. Your recommended servers are displayed at the top of the page, with your pinned favorites and recently used servers right underneath, meaning you can quickly open up the app and connect without scrolling through the lengthy server list.
The panel on the right displays your connection status, which is, really, the most important detail. Others are there for more technically minded folks, including the protocol you're using, your new IP address, and which features you've toggled on or off.
Ease of use score: 9/10
Speed and performanceHow we perform speed tests(Image credit: Shutterstock)Our testing setup uses two virtual machines positioned in the UK and US, each one with its own 1 Gbps connection. We use this to record VPN speeds. Then, to calculate the averages, we use multiple speed testing sites at different times of the day while connected to the various protocols on offer. You can find out more in our VPN testing methodology.
Surfshark sits at the top of our fastest VPN rankings, and recorded another unbeatable performance during our most recent round of testing. If you're looking for speed, Surfshark is your best bet.
We used the WireGuard protocol to put Surfshark's speeds to the test. Using a 1 Gbps line and connecting to a local UK-based server, we recorded a performance of 848 Mbps. That's pretty impressive, and certainly means that Surfshark is one of the quickest VPNs on our books, but it's a slight fall from grace, too, as the provider previously clocked in at 950+ Mbps.
Our testing also underscored a noticeable amount of variance, here. In the mornings, we saw speeds of 1,045 Mbps, but these dipped to 651 Mbps when we repeated the process in the evening. While this isn't a major red flag, it is something to be aware of if you're going to use your VPN around the clock.
Surfshark's OpenVPN speeds weren't as blistering, coming in at 431 Mbps. This is to be expected, however, as OpenVPN isn't as lightweight and efficient as WireGuard.
Still, it's worth noting that Surfshark's OpenVPN speeds were amongst the most consistent in our hands-on testing. We barely saw any prominent fluctuations throughout the day, meaning that Surfshark is a great pick for tasks like torrenting - where you'll want uncompromising security and decent speeds.
The important takeaway here is to remember that, whether you opt for WireGuard or OpenVPN, Surfshark is more than fast enough to keep up with your day-to-day browsing. You only need 25 Mbps to stream in 4K, too, so you'll have no problem tuning in to buffer-free HD content.
Finally, we noted that it regularly took a few seconds to connect to a Surfshark server. This isn't a total deal-breaker by any means, but I find that NordVPN and ExpressVPN connect in around a second (or even less).
Speed and performance score: 10/10
Unblocking sites and contentSurfshark has made a mark in the industry as a reliable VPN for streaming and unblocking all sorts of platforms. In fact, it currently claims the third-place position in our overall streaming VPN rankings, and fourth-place in our torrenting VPN shortlist.
We put VPNs through a rigorous testing process to see how well they work with Netflix and its global library in the US, UK, Australia, Canada, and Japan. We also investigate how well VPNs can unblock other platforms, including Amazon Prime Video and Disney+. Surfshark performed flawlessly across all of our tests. We had no trouble checking out content on any platform, regardless of the location, and always on the first try.
Surfshark worked like a charm with smaller regional sites, too, and we unblocked BBC iPlayer, ITVX, Channel 4, 9Now, and 10 Play.
While some VPNs have a collection of servers optimized for streaming, Surfshark doesn't. It's not all bad news though, as all of Surfshark's servers are capable of accessing region-specific streaming content.
This means that you don't have to hunt for one specific server to join when you're in the mood for some Disney+ or Hulu – which is a nice bonus for VPN newbies who don't want to be bogged down in menus.
Similarly, Surfshark has no torrenting-optimized servers, but you can engage in P2P activity on any of them. The only thing to note here is that, unlike PIA, Surfshark does not have a port forwarding feature, which means you might have trouble seeding.
Unblocking score: 9/10
Privacy and securityFirstly, it's great to see that Surfshark's privacy policy and no-logs promise are easy to find and navigate. The information is dense, certainly, and not what we'd call light reading, but there's a table of contents that allows you to skip through to relevant sections.
We like that Surfshark takes the time to discuss each of its tools and how associated data is handled, giving users more leverage to decide whether they want to check them out or not.
Surfshark has proven, on multiple occasions, that transparency is a critical part of its operations. A warrant canary clearly states that the service hasn't endured any data breaches or leaks, and recent audits by Deloitte and Cure53 prove that the service just isn't interested in keeping tabs on user activity or logging it. Surfshark has also undertaken audits of its server architecture and apps.
In fact, the results of Surfshark's most recent audit were made public in June, 2025. The VPN invited Deloitte to comb through its no-logs policy for a second time, with the auditors confirming that the policy is properly implemented and enforced. Simply put, Surfshark has no interest in keeping tabs on what you get up to while connected to one of its servers.
On a more technical level, Surfshark relies on industry-standard AES-256 encryption to secure user data as it travels between the user’s device and the VPN server.
Only the OpenVPN and WireGuard protocols are available, which is encouraging, as they both ensure that data remains safe from snooping and tampering while inside the VPN tunnel.
We found that Surfshark ticks off the basics, too. The kill switch is a simple on or off switch and cuts your internet connection in the event of a VPN dropout to prevent data leaks. We previously noted some kill switch bugs, but Surfshark quickly released an update improving the stability of the feature.
We especially like that the kill switch is customizable. You can choose a more lenient option, which disables the internet during accidental interruptions, or a stricter version that will cut the internet if the VPN is interrupted in any way at all.
Image 1 of 2(Image credit: Future)Image 2 of 2(Image credit: Future)Other must-have tools include DNS leak protection that stops ISP snooping, multihop that routes traffic through an extra server for more security, and a No Borders mode that allows users to bypass strict government censorship to enjoy a freer, safer internet.
We also put Surfshark's phishing and malware site detection to the test by feeding it 100 new malicious URLs from OpenPhish. Unfortunately, the results leave something to be desired.
In testing, Surfshark only blocked 6% of malware sites and 7% of phishing sites, underscoring the simple fact that while you can rely on a VPN package to shore up your online security, you’re better off opting for a dedicated antivirus.
Privacy and security score: 9/10
Track recordSurfshark has a keen ear and listens to its customers – it's a great reputation to have, even if the service has experienced its ups and downs over the years.
In 2024, Surfshark addressed an issue where it was not correctly labeling all of its virtual servers – only 27 out of 50 locations were identifiable. After we spoke to the VPN directly, Surfshark amended these labels within two days, which is a fantastic turnaround.
Surfshark is based in the Netherlands, which, to privacy purists, will be a point of concern. The Netherlands is part of the infamous intelligence-sharing organization: the Nine Eyes.
Fortunately, the VPN has begun publishing a quarterly transparency report outlining the number of requests for user information that Surfshark has had to respond to, as well as law enforcement inquiries. Currently, we can assume that Surfshark has not handed over user information related to a single inquiry.
Track record score: 8/10
Customer supportSurfshark has several avenues of customer support, but the first one we ran into was the AI chatbot. We had a brief conversation with this bot, querying basic information about server numbers and locations, and were sent links to relevant knowledgebase articles.
If you'd rather speak to a human being, the good news is that it's easy to do so, and we found Surfshark’s agents to be friendly, helpful, and knowledgeable about the service.
As you'd expect from such a big name in the VPN world, Surfshark has an extensive knowledge base. Inside, you'll find all sorts of articles, including setup guides for each platform and more in-depth explainers about the various tools.
The "Surfschool" is especially neat and contains end-to-end advice on how to use the VPN, making it a good place for newbies to start.
Customer support score: 8/10
Pricing and plansNordVPN pricing- 1-month plans: $15.45/month (Starter) $17.95/month (One) $20.65/month (One+)
- 12-month plans: $3.19/month, plus 3 months free (Starter) $3.39/month, plus 3 months free (One) $6.09/month, plus 3 months free (One+)
- 24-month plans: $2.19/month, plus 3 months free (Starter) $2.69/month, plus 3 months free (One) $4.29/month, plus 3 months free (One+)
Surfshark is by far the cheapest premium VPN on the market, but you won't sacrifice quality for a budget-friendly price tag. On the contrary, Surfshark's roster of tools and unlimited simultaneous connections make it an excellent value for money, especially if you subscribe to a multi-year plan.
A 2-year subscription to the Starter plan is only $2.19 a month – and even comes with an extra 3 months for free. Only PIA is cheaper, at $2.03 a month for 3 years. It is worth noting that Surfshark's prices rise to $4.98 upon renewal, making the rock-bottom price point a one-and-done sort of deal.
If you want access to all of Surfshark's privacy-boosting tools, you'll need to subscribe to a One or One+ plan. A dedicated IP is a separate add-on to consider, too, and will set you back an additional $3.75 a month.
Pricing score: 9/10
Should you use Surfshark?Surfshark is a stellar service and a worthwhile alternative to the likes of NordVPN and ExpressVPN, especially if you're on the hunt for a bargain. Plus, while some VPNs focus solely on their VPN product, Surfshark has become an all-in-one security solution.
Add unlimited simultaneous connections to the mix, and we think it's a service that offers serious value for money on top of rock-solid security.
Surfshark isn't without its drawbacks, though, especially if you plan on relying on its phishing or malware site protection. Other providers have more servers in more locations, too, and more regular audits under their belt.
Still, with a 30-day money-back guarantee, it's well worth taking the time to check out Surfshark in your own time.
Total score: 88/100
Surfshark alternativesNot sure if Surfshark quite fits your needs? Here's our three top alternatives available right now:
1. NordVPN – from $3.09 per month
The best VPN overall
NordVPN is our #1 rated VPN and the total package. It's quick, has a similarly impressive raft of security tools, and receives regular updates across all of its apps and extensions. It's slightly more expensive than Surfshark, but the Spring Sale brings monthly prices on a 2-year plan down to just $3.09. Try it for yourself with a 30-day money-back guarantee.View Deal
2. ExpressVPN – from $4.99 per month
The best VPN for beginners
ExpressVPN is a luxe provider but, unlike Surfshark and NordVPN, has decided to hone in on its VPN offering rather than a suite of tools. Its apps are a breath of fresh air and are easy to use, making it a fantastic option for anyone new to the world of VPNs. Again, ExpressVPN is on the pricey side, but you can put its value to the test with a 30-day money-back guarantee.View Deal
3. Proton VPN – from $3.59 per month
A great pick for small businesses
Proton VPN puts privacy above all else, but that doesn't mean it skimps on features, speed, and unblocking power. We especially like that Proton VPN recently spruced up its app interfaces, making them more accessible and intuitive than ever before. If you're working with a seriously limited budget, you'll also be glad to learn that the free VPN plan is fantastic (but limited), and a great way to get a feel for Proton VPN's tools. See how Proton VPN stacks up with a 30-day money-back guarantee.View Deal
Yes, a free 7-day trial is available to users who subscribe to Surfshark via the App Store or Google Play Store. Once you've picked up your trial, however, you can use it on all of your other devices.
Does Surfshark work with Netflix?Yes, Surfshark is effective at unblocking Netflix as well as other popular streaming services like Amazon Prime, Disney+, and BBC iPlayer.
Does Surfshark have an antivirus?Yes, Surfshark Antivirus is part of Surfshark's One and One+ plans. Users subscribed to a Starter plan will need to upgrade.
Who owns Surfshark?Surfshark and Nord Security (the company that offers NordVPN) merged in 2022, but Surfshark and NordVPN continue to operate independently.
Protect your online privacy with our Surfshark coupons. Get great deals on VPN services and secure your internet browsing at a discounted price.
Categories: Reviews
I spent six hours blasting grubs in Gears of War: Reloaded, and it was a bloody good time
Nearly two decades after Gears of War helped popularize cover-based shooting on the Xbox 360, the game is now on its second remaster, this time developed by The Coalition and sporting the fancy new title: Gears of War: Reloaded.
This outing's many improvements retroactively make the previous remaster, Gears of War: Ultimate Edition, seem like anything but an ultimate version of the first chapter in this decades-spanning series.
Review infoPlatform reviewed: PS5
Available on: PS5, Xbox Series X, Xbox Series S, PC
Release date: August 26, 2025
Gears of War: Reloaded dramatically upgrades the beloved shooter's visuals and performance for a present-day audience. It comes packing 4K assets and remastered textures, HDR support, new lighting and shadows, 60 fps in campaign and up to 120 fps in multiplayer, and more. While it's impossible to fully obscure the game's age, these improvements do a great job at bringing it reasonably close to current-gen expectations.
Additionally, for the very first time, PlayStation fans can download and play a Gears of War game on PS5. We live in wild times, and I'm happy to be along for the ride.
But underneath the fresh coat of paint and the hype of the series joining a new ecosystem, this is still the Gears of War that players fell in love with years ago and whether that makes it worth your time and money is likely to depend entirely on your previous experiences (or lack thereof) with the game.
Gorgeous familiarity(Image credit: Xbox Game Studios)The original Gears of War landed before I was even old enough to drink or rent a car, and I've beaten its campaign at least five times between getting married, buying a house, raising a kid, and becoming old enough to grunt when I get off the couch. It should be old news to me by now, but there's a timelessness to its campaign that made it easy for me to dive back in with Gears of War: Reloaded without feeling like it’s a chore.
It's exactly the same game as it's always been, too. As a grizzled COG soldier named Marcus Fenix, you spend six to eight hours shooting and chainsawing through mutated humanoids called Locusts as you work to find and plant a bomb capable of destroying their subterranean lair. It's loud, gory, and incredibly satisfying third-person chaos that has aged shockingly well.
It may look and sound like little more than a hyper-violent ‘bro’ game at a glance, but the series as a whole is known for its surprising character work, exploring Marcus and his team's struggles with family, sacrifice, and the never-ending toll of war. And while subsequent games admittedly capitalized a bit more on the overarching lore and individual characters' backstories, this introductory entry remains a meaningful foundation for them to build upon.
Best bit(Image credit: Xbox Game Studios)An early showdown against a nearly invulnerable enemy forces you to carefully bait its charging attack to break doors down as you lure it through a building. Once you get it outside, you can finally blast it with an all-powerful laser from the sky. It's a tense game of cat and mouse that switches things up to great effect.
Despite being the same old Gears of War, though, one particularly noticeable update is the all-new lack of loading screens. Sure, it's not exactly surprising that a nearly 20-year-old game can pull that off in the same era as God of War Ragnarok's seamless no-cut camera work, but it's a quality-of-life feature that makes the campaign all the more efficient and enjoyable for both newcomers and veterans alike.
But speaking of the game being almost two decades old, it's important to remember that even with significant visual and performance updates, there's no hiding the Xbox 360's footprint in Gears of War: Reloaded.
The gray and brown aesthetic that defined many seventh-generation action titles can't be erased with snazzy 4K assets and lighting improvements, and some stiff animations give away the game's age pretty clearly.
There's only so much that can be done without completely remaking a game from the ground up, so I'd argue The Coalition has done a commendable job of getting things close to modern standards while maintaining the integrity of the original experience.
Here come the shotguns(Image credit: Xbox Game Studios)While the servers weren't turned on during the review period, I spent enough time with the beta back in June to know that Gears of War: Reloaded's multiplayer, though much prettier and smoother, largely plays the same as it did in 2006. As always, it's a polarizing mode best summed up with the question, "Do you like shotguns?"
Most matches in any Gears of War game, including this one, come down to players repeatedly cancelling slide-to-cover animations to rapidly bounce from wall to wall (which is unsurprisingly called "wall-bouncing") while wielding the Gnasher shotgun. They move in on one another and engage in frenetic hip-fire shootouts to see who explodes into a million pieces first.
While not technically an exploit, wall-bouncing can seem like an abuse of game mechanics to newbies who expect the multiplayer to flow the same way as the campaign. You can find an occasional long-range showdown if you hang back and play defensively, but veteran players who bounce around like the ball in a pinball machine will usually still close the gap and pop you with a single Gnasher shot. This focus on point-blank gunplay isn't inherently bad, of course, but it can make matches feel one-dimensional.
Still, existing Gears of War enthusiasts and new players willing to adapt to the unique playstyle the community espouses will be happy to know that Gears of War: Reloaded is certainly the most complete version of the first game's multiplayer.
It includes all of the post-launch DLC, 60Hz dedicated servers, up to 120 fps (if your TV or monitor supports it), and cross-play support for every platform. And that last point is especially important, as this game reaches an audience it never has before: PlayStation owners.
A new platform for carnage(Image credit: Xbox Game Studios)In a way, all of the visual and performance updates Gears of War: Reloaded brings to the table feel second to the real story here, which is that its release marks the first time the franchise has been available on a PlayStation console.
Seeing the title screen of one of Microsoft's biggest exclusive IPs boot up on my PS5 felt bizarre at first, but as with Forza Horizon 5 earlier this year, it didn't take long for the dust to settle.
Before I knew it, all the running, gunning, and sliding into cover with a DualSense controller felt just as natural as it always has with an Xbox controller. It was a great reminder that, while exclusives can be an important part of a console's identity, the most important thing is that a fun game is a fun game anywhere.
(Image credit: Xbox Game Studios)As you might expect, the DualSense adds some extra flair for those who enjoy its unique features. All of the immersion is in full force here, like how the vibrations differ between firing a weapon or using your chainsaw to grind through a Locust, or the way the adaptive triggers have a specific feel for each gun. Still, if you normally prefer a different platform, I wouldn't consider these DualSense features worth prioritizing the PS5 version.
The important part is that, wherever you decide to play Gears of War: Reloaded, it's the best version of the game available. Whether you're fresh meat or a franchise devotee, this remaster's facelift makes for a great opportunity to join Marcus Fenix and his loyal band of brothers on their first perilous adventure, or see if you've got what it takes to duke it out in some anarchistic multiplayer matches.
Should I play Gears of War: Reloaded?Play it if…You're new to the Gears of War franchise
Gears of War: Reloaded is the first game in the series and a great place to onboard, especially if you've been in the PlayStation ecosystem for the past few generations. However, there's no confirmation of the sequels making their way over to PlayStation yet, if ever. So, if you want to see the rest of the games through, you'll need to check them out on Xbox.
You value strategy over guns-blazing
Gears of War: Reloaded's campaign is about cover as much as it is about shooting. You'll spend a lot of time behind walls waiting for the right time to strike and explode your foes into bloody little bits. Strategic positioning and wielding the right gun at the right time can make all the difference to your chances of survival.
You like chainsaws in your video games
Look, chainsaws have shown up as a melee weapon in a lot of video games over the years for a reason — they're cool as hell. And Gears of War: Reloaded's chainsaws are attached to a frickin' assault rifle so you can saw nearby enemies in half and then get back to shooting. It'll never not be awesome. View Deal
You've beaten the campaign recently and aren't into multiplayer
Gears of War: Reloaded is the second remaster of the 2006 Xbox 360 title, so if you're a franchise fan, there's a good chance you've played this before — maybe even multiple times by now. The flashier visuals and higher framerates are nice, but if you've already seen the campaign through in the past few years, or don't dig the game's shotgun-focused multiplayer meta, it may not be worth the investment.View Deal
Gears of War: Reloaded won't be winning any awards for its accessibility options, but it has the basic suite of features like subtitles and text-to-speech.
You can make it so that button tap challenges allow you to simply hold down the button rather than rapidly press it, while photosensitive players will appreciate the flash reduction setting that limits sudden brightness changes.
How I reviewed Gears of War: ReloadedI played Gears of War: Reloaded on a PS5 Pro using a Sony X90K LED TV. I swapped between my Sony Pulse Elite Wireless Headset and Alienware Pro Wireless Headset for audio.
I played Gears of War: Reloaded for around 6 hours, during which time I worked my way through the full campaign on Normal difficulty while finding all 33 of the COG tag collectibles.
I wasn't able to play any multiplayer since the servers weren't on during the review period, but I got a good feel for it when I spent a few afternoons playing online during the beta back in June.
First reviewed August 2025
Categories: Reviews
I tested Bambu Lab's latest 3D printer - and the H2S single nozzle design comes hot on the heels of the H2D to offer ultimate speed and accuracy
The H2S comes hot on the heels of the H2D full laser combo and standard H2D 3D printer (see my review here), but with a few major differences that make it a superb option for any enterprise business requiring a machine that offers scale, reliability and speed.
It might not have the headline-catching dual nozzle that so interested the 3D printing market, but with much the same form factor, just with a single nozzle rather than dual nozzle tool head, it offers something a little different.
Essentially, Bambu Lab is touting this as a bigger X1C, which has become a staple for many design studios due to its print quality, flexibility, multiple filament printing, and of course, speed. Now, with the H2S taking yet another leap in scale and performance, and what's more, it's also coming in at a relatively affordable price point.
In use, the H2S is impressive, and the single-nozzle hotend is highly tuned for precision and quality. The speed, while quoted as faster than the X1C, in real-world tests using standard settings is on par; however, tweak the options and the full speed of the machine is unleashed, seeing a standard 20-30% boost in print times across the board. The H2S also has a far larger print bed, enabling more potential with the style and type of prints you're able to produce. There's absolutely no doubt that, when it came to side-by-side print quality, the X1C is one of the market leaders, but the H2S just took the edge during my test.
One feature that appeals to me about the H2S is that, compared with the H2D, it is far more affordable and there is a laser option as well, in fact, the new H2S line exactly reflects the H2D, just at a more affordable price.
What this essentially means is that, for any product design studio or anyone looking for the best 3D printer for quality, the Bambu Lab H2S is a balanced option, especially if you mainly print with a single filament with the occasional use of multifilament.
Bambu Lab H2S: Price and availabilityThere are three versions of the H2S available: the Base, the AMS Combo, and the Laser Full Combo. The two more advanced versions, the AMS Combo and the Laser Full Combo, are available now for $1,499 and $2,099, respectively. Bambu Lab will also be releasing the Base unit, which is just a single-nozzle machine, for $1,249.
Each model offers an upgrade route, so if you are working on a budget and just want an exceptionally good single FFM printer, you can start with the Base, then upgrade with the AMS Pro 2 to the AMS Combo. If you want to go all the way, you can upgrade to the Laser Full Combo, but only pick out the additions that you need.
Bambu Lab H2S: Design(Image credit: Bambu Lab // Future)Like the H2D, the H2S has almost an identical form factor, so once again it's a large-scale machine that will take up a sizable amount of your desktop, and now that I have three of these machines side by side, that doesn't leave a lot of space for much else.
The fact is, however, that with the H2S, it cuts away a lot of the frills of the H2D and the excitement those machines create. Instead, the H2S goes back to the core of 3D printing, offering a single nozzle toolhead and a few additional features that help elevate what's possible. It positions itself as a successor to the phenomenal X1C, or if not a successor, then a larger-scale version that takes on the new form factor of the H2 series.
At the base level, the first thing you notice alongside that nozzle is the larger print volume, which measures in at 340 × 320 × 340 mm, making it one of the largest on the market. It also once again utilises the CoreXY system, offering high-speed printing, both single and multifilament, when coupled with the AMS Pro 2.
Once again, the 3D printer is fully enclosed, so if you want to print with more advanced materials, that is perfectly possible, with a heated bed that reaches up to 120°C and a 65°C actively heated chamber. This is great for materials like ABS, nylon, and ASA.
One of the features that I've really liked across all of the H2 series is that large touchscreen. It's just really intuitive, beautifully designed, and very quick to respond, which is not always the case.
Inside, they've also boosted the number of sensors, with five flame sensors covering monitoring, emergency stop, and airflow optimisation, once again almost mirroring the H2D series, but building on the feedback and experience of those first H2 machines.
When it comes to the major differences between the H2S and the H2D, aside from that single nozzle toolhead, most of the other differences come in the technology and steps forward in development. For instance, there's second-generation extrusion motion technology with a PMSM servo motor that exerts a 67% increase in extrusion force. There's also a 20 kg feedback load for precise filament control.
Once again, we see the Vision Encoder, which is optional, but will boost the motion accuracy for prints under 50 microns. This is essentially industrial-grade precision, so it will really only be of interest if you're using this for high-precision product design. However, if you're into gaming and want to make desktop game figures, then this is going to be a great feature. I have noted that there are several 3D artists now producing FFF-ready miniatures. With the Vision Encoder having industrial-grade precision, it could mean that printing miniatures on an FFM machine should now, in some cases, be possible, meaning that you don't have to deal with messy resin.
Bambu Lab has also taken a look at monitoring and intelligence, and the H2S includes 23 sensors inside the machine that are monitoring the print process and conditions. This is coupled with three onboard cameras, one for live view, one for the nozzle, and one for monitoring. This compares to just one on the H2D. There's also smarter fault detection if a print does go wrong, and I have to say, during the three-week test, I didn't have any print failures, even when I tried with an impossible print, the machine just detected it and paused.
Now, while the form factor of the machine is identical to the H2D, when it comes to the build volume, because it only has a single nozzle rather than two, the full print bed can be used, so you have a larger print volume of 340 × 320 × 340 mm compared with 325 × 320 × 325 mm for single-filament printing on the H2D.
Bambu Lab also says that the H2S is a high-speed machine, capable of printing up to 1000 mm/s and with acceleration over 20,000 mm/s². However, during my tests, I'd say they are both pretty much on a par until you delve manually into the settings.
Once again, there's a heated chamber, and in the H2S, this is capable of reaching around 65°C, exactly the same as the H2D. Likewise, the hardened steel nozzle seems to be the same, as does the 5-inch touchscreen.
One of the big questions I had when the machine arrived was: because it is a single-nozzle machine, does it still have the capability of using a laser and cutter? There are, of course, three versions of the H2S, including the Laser Full Combo version that offers laser engraving, cutting, digital cutting, and precision drawing capabilities.
Bambu Lab H2S: Features(Image credit: Bambu Lab // Future)Take a look through the machine's features, and aside from the single nozzle, which is obvious, the main feature aside from technology enhancement is the larger print area, which means that this is essentially a large successor to the X1C. Through the test, the speed of the H2S impressed. Put alongside the X1C on standard prints, print speeds were essentially similar until you delve into the settings. However, there are more options, and if you really want to push the speed of the printer, it is possible to get up to a 30% faster printout of the H2S than the X1C, although there is a small drop in quality.
The maximum speed of the printhead goes up to 1000 mm/s with 20,000 mm/s² acceleration. So, while the acceleration matches the X1C, the print speed essentially doubles, with a real-world speed increase of around 30%.
Like the H2D, the single nozzle of the H2S is capable of reaching 350°C, which makes it a perfect option for printing engineering-grade materials such as ASA and nylon. The H2S is a fully enclosed environment, which helps ensure optimal printing conditions for those materials, and with the filtration also helps to remove any toxins from the materials as they print.
Once again, Bambu has included a whole series of sensors that will detect if any print goes wrong and stop proceedings before issues are caused. Through the test, aside from running out of filament, I only had one occasion where the error-checking needed to kick in, due to some filament falling onto the print bed from a previous print. The new machine now includes 23 sensors and three onboard cameras. During the test, I didn't have any tricky situations with printing. The one issue that could've caused a problem was instantly recognised, and the printing was paused until I removed the filament, then the print completed successfully.
What I also liked was that when it came to filament changes due to running out, the process of restarting the print was absolutely spot-on. There wasn't the usual worry about layer misalignment that can often happen.
One of the big new features of the extruder is that it now includes a PMSM servo motor that can apply 67% more force. While I couldn't visually see the difference, the extrusion of the filament did seem exceptionally smooth for all materials tried, including Carbon fill and TPU. When I compared prints between the H2D and the H2S, there was very little difference; it was only when testing a specific model that I could see a very slight uplift in the print quality coming from the H2S.
Like the ability to add a laser cutter and digital cutter to the machine, there's also the option to add the Vision Encoder, which you'll need if you're going to be using this for professional product design or any dimensionally critical work. The Vision Encoder can be used for any print that needs 50-micron precision.
Through the software, there's also hole and contour compensation to assist with more intricate models. Again, the intelligent monitoring will stop if there is an issue. During the test, I tried to push the printer with a few excessive overhangs just to see what would happen, and the machine essentially paused as the print failure was detected.
As with the H2D machines, there's AMS Pro 2, and again, the new model is fully compatible with the original AMS and the AMS HT. You can also link several AMS modules together so you can extend printing to more than just four filaments, up to 16, and some people have even claimed it can be pushed further.
Bambu Lab H2S: Performance(Image credit: Bambu Lab // Future)Getting started with the H2S is as simple as any other Bambu Lab 3D printer, as it essentially comes pretty much ready to go. In this review, I'm looking at the Bambu Lab AMS Combo, so you get the 3D printer and the AMS Pro 2 to enable multifilament printing.
Getting it all set up is extremely straightforward. First, the packaging is stripped away, the AMS is popped on top, one tube connects the AMS to the machine, and then there's a data cable that also connects between the machine and the AMS. Once that's done, the activation key is popped into the back along with the power cable, and the machine is switched on.
After running through the initialisation and calibration process, which is all handled by the machine, you can then install the four filaments and get started with connecting to Bambu Studio and producing your first print.
As ever with this machine, there are a few prints just to get you started, and it shot through these in no time at all, with the 3D Benchy model looking exceptionally good, fine detail and a high-quality finish to all of the outer walls and using the default settings this took 33 minutes with all checks.
As I went through the test, there were some larger models to print to create a Shadow Force suit of armour, and this is where the machine really started to come into its own. The ability to print at a scale that is normally only possible with large-scale printers, combined with the high nozzle quality, meant that the end result had a surface cleanliness and consistency that you don't usually get with large-scale consumer 3D printers.
What I really liked was that, for quite a few of these large-scale prints, I did run out of filament partway through. However, the filament detection worked exceptionally well. As with many machines, it detected the issue, but what impressed me was that feeding in the new filament aligned perfectly, continuing the print from exactly where it left off. Adhesion to the print bed was sufficient that there was no movement or issue, even when the print had been left for a few hours in between filament changes.
For single filament printing, the print speed was exceptionally good, although at present, there isn't a huge array of presets for materials. So, if you are new to 3D printing and want high-speed prints, it is a little tricky to adjust the settings to get exactly what you want. However, if you are experienced with Bambu Studio, then delving into the quality, strength, speed, and support settings will enable you to fine-tune for those higher print speeds.
At those high speeds, the quality actually remains exceptionally good. While you can see a slight reduction in outer surface quality, for prototyping or quickly printing ideas, the quality is beyond what I've seen with most 3D printers of this type, size and price.
Going on to multifilament printing, again, the speed of the print was good. But, as with all other Bambu Lab AMS system printers, the volume of waste that gets kicked out of the back is quite extraordinary. So, while multifilament 3D printing is obviously a major pull for this machine, the fact that it still produces so much waste is a bit of an issue.
The quality of the 3D prints, however, is once again exceptionally good, with a high-quality finish and one of the best surface finishes for a multifilament print that I've seen. Multifilament print times are obviously slower on the H2S than compared with the H2D. That second nozzle makes a huge difference to both the amount of waste produced and overall duration. Still, because of the high-speed printing that is possible with the H2S, the speed was still good.
As an example, the Robo Tortoise four-colour print took just over 24 hours. On the H2D with its two nozzles, this print took only 20 hours. So, while there is a reduction in speed between the H2S and the H2D for multifilament prints, it isn't huge. The biggest difference really is the amount of waste produced.
As I ran through the test prints, I became more taken with this machine. While the single nozzle isn't as headline-grabbing as the dual nozzle of the other H2D machines, it's still exceptionally high quality and essentially makes this machine a top option for any designer looking to prototype or even run small production batches.
The quality of the casing and the size give you plenty of flexibility in how you use it, and the fact that it has that heated chamber enables you to use engineering materials such as nylon, ABS, and ASA. What really impressed me was that, across multiple prints, there were no real failures.
Bambu Lab H2S: Print quality(Image credit: Bambu Lab // Future)Target 25 = X: 24.88mm / 0.12mm Error | Y: 24.96mm / 0.06mm Error
Target 20 = X: 19.87mm / 0.13mm Error | Y: 19.90mm / 0.10mm Error
Target 15 = X: 14.87mm / 0.13mm Error | Y: 14.80mm / 0.20mm Error
Target 10 = X: 9.90mm / 0.10mm Error | Y: 9.80mm / 0.20mm Error
Target 5 = X: 4.90mm / 0.10mm Error | Y: 4.80mm / 0.20mm Error
X Error Average = 0.114
Y Error Average = 0.152
X & Y Error Average = 0.133
Fine Flow Control – Score of X
Fine Negative Features – Score of X
Overhangs – Score of 5
Bridging – Score of 5
XY Resonance – Score of 5
Z-Axis Alignment – Score of 5
Total Score – 29 / 30
Bambu Lab H2S: Final verdict(Image credit: Bambu Lab // Future)At the end of the test, there's no doubt that I'm impressed once again with this Bambu Lab machine. The H2S takes the scale of single-nozzle 3D printing up a notch, and unlike many other large-scale 3D printers, it offers a brilliant enclosed environment. This enables you to print with engineering materials, not just mainstream PLA that can be used with open frame machines.
Due to the CoreXY mechanics, you also have ultra-fast print speed, reliability, and the dimensional accuracy that comes with it. The test prints that came out of this machine were some of the cleanest I've seen, and at this scale and consistency, it's really difficult to match with any other model.
While the machine compares very closely to the other H2D models, just with a single nozzle, when it comes to print quality and speed, it takes a small leap forward for single-filament printing. Where it really comes into its own is in being able to print larger than any other Bambu Lab printer, and the scale of those prints is genuinely exceptional.
Although the prints Bambu sent me for testing were clearly optimised to show the printer at its best, I also tried it with other complex single-filament prints. It coped with contours, overhangs, and overall print quality exceptionally well. As ever, the AMS Pro 2 is a standout feature, and since I was reviewing the combo version, I was able to give that a proper test with the machine and once again it works exceptionally well, with the only downside being the amount of waste that is produced.
The quality of the multifilament print was again exceptional, and the fact that it's going through a single nozzle just gives you a little more real estate to print large. The full-scale helmet from the Cosplay armour I printed came out with exceptional quality and a support structure that was easy to remove.
One of the big points I would highlight while using this printer was not only the speed and scale, but also the quality of the surface finish.
Surfaces were exceptionally smooth, and when I printed the Autodesk Kickstarter test model I've been using for many years, it was almost a full 30 out of 30. The print surface was exceptional, and the only thing that let it down slightly was dimensional accuracy, although my thought is that, if I used the Vision Encoder, I'd likely hit that full 30 out of 30 for the first time.
Regarding the fine flow test, while I've had many 3D printers that can produce a very clean result, there are often slight signs of angel hair filament, with only the AnkerMake M5C previously producing a model with this level of cleanliness.
The other point I really like about the H2S is its simplicity. The base unit isn't expensive considering. If you're looking at this as an enthusiast or business user, the fact that you can buy the base unit for just over $1,000 and then upgrade all the way to the Laser Combo means it's relatively affordable and offers a solid upgrade path for the future.
At the end of the test, once again, Bambu Lab has demonstrated why it leads the market with its 3D printers, and the H2S single nozzle combo version reviewed here once again shows the level that all other 3D printer manufacturers need to aim for. However, with the likes of the Original Prusa XL and SnapMaker U1, while it's great to see a larger print area single nozzle machine it feels like there is a move now into multitool head options which could leave Bambu Lab behind in the technology stakes.
Image 1 of 2(Image credit: Bambu Lab // Future)Image 2 of 2(Image credit: Bambu Lab // Future)Should I buy the Bambu Lab H2S?Buy it if...You need a large build volume and speed.
Once again, this printer comes in the superb H2 form factor that offers a fully enclosed environment. This time, the single nozzle enables an even larger print area that should suit most home and small business projects.
You need precision for engineering projects
While a fully enclosed environment is nice for some users, if you're working in education or in the professional sector and need to print in engineering materials, this enclosed environment with its heated chamber is absolutely essential.
Don't buy it if...You need native dual-nozzle multi-material
While single-filament printing is exceptionally good, if you need to use support materials as standard, then upgrading to an H2D will probably be a better idea.
You're a casual or first-time hobbyist
Starting with one of the best 3D printers on the market might seem like a great idea, but with so many superb printers at a fraction of the Price, it might be worth starting with a cheaper printer before investing in the H2S.
For more tech for your crafting studio , I've tested the best laser engravers.
Categories: Reviews
I tested the minimalist Hasselblad X2D II 100C – it's my dream portrait and landscape photography camera that sets the image quality bar
Hasselblad X2D II 100C: two-minute review
If you've read any of my articles about Hasselblad's 'medium-format' mirrorless cameras, you'll know I have a soft spot for the premium Swedish camera maker's X-series.
They're stunning minimalist cameras with quality craftsmanship that are simple to operate and a joy to use. Naturally, it also helps that the recent models can shoot the best-looking photos this side of $10,000.
The latest addition to the series is the X2D II 100C, which is an update of my dream camera; it's refined in all the right ways, and it costs much less than its three-year-old predecessor, pushing it closer to reality for photographers on the edge of splashing out.
If I were to pick one camera for landscape photography, this would be it. You can expect highly-detailed 100MP resolution, gorgeous natural colors that need little to no editing, and 16-bit files with rich HDR, along with probably the best image stabilization performance for this full-frame-dwarfing format.
Usually cameras in this 44 x 33mm sensor format are largely confined to the studio for still life and static subjects, but the X2D II is way more versatile than that, especially since it gets an all-new autofocus system, equipped with subject-tracking continuous autofocus and LiDAR.
For the first time with a Hasselblad I felt confident using its autofocus for shooting portraits, given its largely reliable people-detection skills. There's no obvious gap in autofocus performance between Hasselblad and a Fujifilm GFX model now.
I also felt comfortable shooting without a tripod, getting sharp shots handheld with shutter speeds in excess of one second.
Don't get me wrong – I still needed to be more involved in the process to get the results I wanted than when shooting with my full-frame Nikon, but the X2D II has strong automatic chops too.
Otherwise, for the most part the shooting experience felt largely the same as with the original X2D 100C, which is fine by me.
The X-E5 can be purchased in a bundle with this nifty, space-saving 23mm pancake lens. (Image credit: Tim Coleman)The X2D II 100C has what for me is probably the best camera design bar none: a gloriously minimalist body with exotic curves, a high-quality build with a slight reduction in weight compared to its predecessor, a larger-than-average tilting touchscreen with gorgeous color and clarity, plus various refinements that include a new joystick for adjusting the autofocus point and more.
A built-in SSD provides 1TB of storage for those mammoth 200MB raw files, and a CFExpress Type B card slot offers another storage option.
Some downsides remain: it has middling battery life, there's still no video recording capabilities (which for some could be a plus, but for me would be a nice to have), while the quality of the 5.76m-dot viewfinder display feels only okay.
And while this is the best-performing Hasselblad yet, Fujifilm GFX rivals can shoot faster, while full-frame alternatives are faster still. The X2D II is a steady shooter, just not one for action.
But again, that's fine – a camera that can deliver such rich detail can't be expected to sustain high-speed burst sequences.
Improved autofocus performance was probably my top wish for a X2D 100C successor, and that wish has come true, alongside other design refinements which improve the overall user experience.
A pleasant additional surprise is the X2D II 100C's list price: $7,399 / £6,400 (AU$ pricing TBC). That's a good deal less than the X2D 100C, even if it's still a pricey premium snapper.
Hasselblad X2D II 100C: price and availability- Available now for $7,399 / £6,400 (Australia pricing TBC)
- Costs less than the original X2D 100C
- Launched alongside a new XCD 35-100mm f/2.8-4 zoom lens
Hasselblad products are pricey, and with good reason – the build quality is top-drawer, as is the medium-format sensor tech, plus there's a 1TB SSD built-in. Yet despite several refinements in this latest model, it actually costs much less than the original X2D 100C, which was launched in September 2022.
The price difference depends on the region, but in the UK the X2D II 100C costs £1,000 less than its predecessor. It's still pricey, as is the new 35-100mm zoom lens (28-80mm effective), which costs $4,599 / £4,100 (Australia pricing TBC), but this Hasselblad is edging closer to Fujifilm in terms of pricing.
- Price score 4/5
Sensor:
100MP 'medium-format' sized 43.8 × 32.9mm
Video:
None
Cont. shooting:
3.3fps (approx)
Viewfinder:
5.76m-dot OLED
LCD:
3.6-inch, 2.36m-dot tilting touchscreen
Battery (CIPA rating):
Up to 327 shots, extended to 466 shots with HDR off
Weight:
29.6oz / 840g (with battery)
Dimensions:
5.85 x 4.17 x 2.95 inches / 148.5 x 106 x 75mm
Hasselblad X2D II 100C: design and handling- Very similar design to its stunning, minimalist predecessor
- Slightly lighter than before, new joystick added
- Large tilting touchscreen with stunning display
- 1TB built-in SSD and CFExpress Type B card slot
Having tested the Hasselblad X2D 100C at length, the X2D II feels very familiar. At 840g with battery, the latest model is slightly lighter, but it retains the same form factor, with a wonderfully minimalist layout and an exaggerated grip. Given the sensor format, the X2D II is impressively compact.
The finish on the high-quality body is different, and I prefer the new version both in appearance and feel.
We have the same touchscreen as before, and it's delightful. At 3.6 inches it's larger than most, plus it's wonderfully bright, rich in color and contrast, and its touch response is spot on, which is something that can't be said for all cameras – touch response feels more smartphone-like than camera-like.
Initially, pulling out the tilt screen stills feels a little fiddler than it could be, and the tilt motion is stiff; but it feels durable, and the up and downward tilt range is handy, especially for shooting at low angles.
Image 1 of 10(Image credit: Tim Coleman)Image 2 of 10(Image credit: Tim Coleman)Image 3 of 10(Image credit: Tim Coleman)Image 4 of 10(Image credit: Tim Coleman)Image 5 of 10(Image credit: Tim Coleman)Image 6 of 10(Image credit: Tim Coleman)Image 7 of 10(Image credit: Tim Coleman)Image 8 of 10(Image credit: Tim Coleman)Image 9 of 10(Image credit: Tim Coleman)Image 10 of 10(Image credit: Tim Coleman)That tilt range also means the screen clears the viewfinder, which sticks out from the body, for unimpeded viewing from low angles. The large 5.76m-dot viewfinder display is lovely too, although it's far from the absolute best viewfinder I've used.
Once again we get a 1TB built-in SSD for storing images – and you'll need it, with each raw file coming in at a whopping 200MB. There's also the option to use removable media in the form of CFXepress Type B, which is one of the fastest card types today – I made use of both options during my review period.
Image 1 of 8(Image credit: Tim Coleman)Image 2 of 8(Image credit: Tim Coleman)Image 3 of 8(Image credit: Tim Coleman)Image 4 of 8(Image credit: Tim Coleman)Image 5 of 8(Image credit: Tim Coleman)Image 6 of 8(Image credit: Tim Coleman)Image 7 of 8(Image credit: Tim Coleman)Image 8 of 8(Image credit: Tim Coleman)One of the headline new features is an autofocus system that's totally new to Hasselblad, which I'll get onto in the next section, and in terms of the design this has prompted the addition of a joystick. This can be used to manually select the autofocus point – I find it a more intuitive method than the touchscreen. Despite the addition of the joystick, which is very welcome, the design still feels wonderfully minimal.
The same goes for the UI – menus are still super stripped-back and easily navigable, even with a new range of autofocus modes. The omission of video recording helps here, while there are no color profile options at all, and I really appreciate how quick and easy it is to make adjustments to settings.
I have only one niggle with design – the protective door for the USB-C port (the port which can be used to charge the camera), pops open all too easily, especially when using a camera strap.
- Design and handling score 5/5
- 5-axis sensor-shift IBIS with up to 10EV stabilization
- New subject-detection autofocus recognizing humans, animals and vehicles
- Continuous shooting up to 3.3fps
The original X2D's autofocus is poor by today's standards – I used it to shoot a wedding, and I quickly reverted to my old DSLR for moments when I needed autofocus with a quick response.
Hasselblad has sensibly focused its attention on various performance improvements for the X2D II, and chief among them is a completely new autofocus system. The X2D II's focusing is a different proposition altogether, almost matching Fujifilm GFX standards.
This is the first Hasselblad camera with continuous autofocus, plus the first with subject-detection autofocus, being able to recognize and track humans, animals and vehicles. It also utilizes LiDAR focusing, an improvement that comes courtesy of drone maker DJI (which bought Hasselblad some years ago, and which introduced the built-in SSD in previous models).
I tested the camera on all of the subject types it's able to recognize, and it performed well, but don't expect the same degree of autofocus sophistication you'll get from, say, recent Sony / Canon / Nikon models.
Image 1 of 2I shot this self portrait remotely using Hasselblad's Phocus software, triggering the camera with my Apple iPad (Image credit: Tim Coleman)Image 2 of 2Animal subject detection picked up this bird for sharp focusing, no problem (Image credit: Tim Coleman)Still, given it was my first time shooting portraits on location with a Hasselblad, I felt confident that the focus was going to be pin-sharp on my subject's eyes, and that's a big deal. The AF was also able to track my children's pet guinea pigs and recognize birds and horses.
Hasselblad says image stabilization performance has also been improved, and it's now rated up to 10EV, which would be a world-first for any camera in any format.
(Image credit: Tim Coleman)I was using the X2D II with the new 35-100mm lens, and put stabilization to the test. Based on 10EV of stabilization, at the wide-angle end of the lens zoom range I would expect the camera to be able to shoot sharp handheld shots with shutter speeds of 15 seconds.
Not a chance – that simply isn't the case. I was getting sharp shots like I was before with the X2D, down to around three seconds, which is more like 7.5EV. Nonetheless, it's still an incredible performance for such a high-resolution camera.
Despite its improved autofocus performance, the X2D II, like its predecessor, is not a camera for action photography. Its burst shooting performance is limited to around 3fps, which by today's standards is very slow. No, this is a camera for single shots really, like landscapes and portraits.
- Features and performance score: 4.5/5
- Stabilized 100MP 'medium-format' 44 x 33mm sensor
- 16-bit raw files and 'end to end' HDR capture
- No video recording whatsoever
Image quality for the most part is much the same as from the X2D, but Hasselblad didn't need to make any improvements here – the original model was already capable of taking the best-looking pictures I've ever made with a camera.
Not convinced? Check out this Hasselblad X2D vs Nikon Z6 II feature I wrote.
The X2D II utilizes the same 44 x 33mm sensor with 5-axis stabilization as before, shooting 100MP stills with 14-bit or 16-bit color-depth options. What is new, however, is what Hasselblad calls 'end to end' high dynamic range (HDR) capture – you simply check the box in image quality section of the menu to activate it.
HDR, as the name suggests, increases the range of tones in an image. Without it, the X2D II already has a wide dynamic range given the large sensor format and pixel density, but with it we get over 15EV of dynamic range. Check out some HDR landscape photos in the gallery, below.
Image 1 of 7(Image credit: Tim Coleman)Image 2 of 7(Image credit: Tim Coleman)Image 3 of 7(Image credit: Tim Coleman)Image 4 of 7(Image credit: Tim Coleman)Image 5 of 7(Image credit: Tim Coleman)Image 6 of 7(Image credit: Tim Coleman)Image 7 of 7(Image credit: Tim Coleman)I took photos with and without HDR active (in raw and JPEG simultaneously), and really I could take or leave HDR – the raw files are stunning either way. Yes, you get more visible detail in shadow and highlight areas, but you also lose some of the punch of the raw files as a result.
And there's plenty of latitude to brighten shadows and darken highlights of raw files for HDR-like results using editing software. Perhaps the main benefit to in-camera HDR is that you can skip the editing process for the times when you want more detail in the tonal extremes. It could also mean that shooting in JPEG-only format is a more realistic option. I still think HDR capture is an excellent feature.
Image 1 of 8(Image credit: Tim Coleman)Image 2 of 8(Image credit: Tim Coleman)Image 3 of 8(Image credit: Tim Coleman)Image 4 of 8(Image credit: Tim Coleman)Image 5 of 8(Image credit: Tim Coleman)Image 6 of 8(Image credit: Tim Coleman)Image 7 of 8(Image credit: Tim Coleman)Image 8 of 8(Image credit: Tim Coleman)If you're a camera owner who's used to a choice of in-camera color profiles, like you get with virtually all other cameras, such as Fujifilm's film simulations, then you'll quickly notice the absence of those here. There's not even a black-and-white mode.
It's another example of Hasselblad's minimalist approach which I appreciate, especially when the natural colors look this good – they're somehow vivid and natural at the same time – so unless you like to dial the saturation slider up to unnatural levels, stylize your images, or go monochrome, you really don't need to spend time tweaking colors in post. All the images in the gallery above are completely unedited.
The impressive image stabilization on board and improved autofocus performance really help too, meaning you can get sharp handheld shots more easily.
Hasselblad has left out video recording once again – the X2D II is purely for photographers. That will no doubt delight photography purists, but I can't see any harm in adding video recording, besides perhaps clogging up the menus.
One thing to note about all of the images included in my galleries – they are original unedited files. With 100MP to play with, there's plenty of cropping potential to focus in on certain details, like the distant person sat on a hillside, framed by the setting sun.
There's also various aspect ratios available in camera, such as Hasselblad's legendary X-Pan panoramic format.
- Image and video quality score: 5/5
Attributes
Notes
Rating
Price
A premium camera for a premium price, but it's surprisingly and significantly cheaper than it's predecessor
4 / 5
Design
Simply one of the best camera designs of all time
5 / 5
Feature and performance
Much improved autofocus, built-in SSD storage, but slow burst shooting speeds
4.5 / 5
Image quality
The best looking photos you can get, for the price. No video recording though.
5 / 5
Should I buy the Hasselblad X2D II 100C?(Image credit: Tim Coleman)Buy it if...You want natural-looking images from the off
Hasselblad's 100MP, 16-bit Raw files are packed with detail and the stunning colors look right from the off
You appreciate camera design
I dig Hasselblad's minimalist design philosophy – the X2D II not only looks the part, but it feels great in the hand and comes with a refreshingly simply UI.
You're a pro portrait and landscape photographer
If you want the absolute best image quality for portrait and landscape photography and don't often shoot action, then the X2D II sets the bar.
You shoot video
An obvious one, but the X2D II has no video capabilities – it's purely for photographers.
You shoot any kind of action photography
Yes, the X2D II has subject tracking autofocus which makes it more reliable, but it's no match for industry-leading systems, while continuous burst shooting is a slow 3fps approx.
You want supreme battery life
Up to 330 shots is a pretty poor battery life for such a camera. That said, it's a photography-only camera with slow continuous shooting performance, so you're unlikely to rinse the battery quickly.
Like the sound of the Hasselblad X2D II 100C but keen to know what else is out there? Here are a couple of solid alternatives…
Fujifilm GFX100 II
Fujifilm's flagship camera with the same 44x33mm sensor format is the GFX100 II. It also has a 100MP sensor, but it has superb video recording capabilities too. It's a little pricier than the X2D II.
Read our in-depth Fujifilm GFX100 II review
Sony A7R V
The best full-frame alternative to the X2D II is the high-resolution Sony A7R V. It has the same pixel density – 61MP on a stabilized full-frame sensor, together with a wide dynamic range and impressive autofocus skills. It costs around 40% less than the X2D II too.
Read our in-depth Sony A7R V review
How I tested the Hasselblad X2D II 100C- Hasselblad loaned me the X2D II 100C for three weeks ahead of its launch
- I had the new XCD 35-100mm f/2.8-4 lens to test it with
- I've taken camera and lens pairing on several outdoor photography shoots
I've had plenty of chances to use the X2D II with the new XCD 35-100mm f/2.8-4 lens ahead of their launches, taking the pairing on a few landscape photography trips, plus for candid portraits of humans and animals.
I've shot during daylight and nighttime, outdoors and in, and paired the camera with the latest (beta test) version of Hasselblad's Phocus app for remote control of the camera and image uploading.
My testing took place over the course of about one month.
First reviewed August 2025
Categories: Reviews
This quiet but powerful pedestal fan blew me away during testing – here’s why I’ve rated it 5 stars
Levoit CirculAir Oscillating Fan: two-minute reviewProduct info
For this review, I tested the UK version of the Levoit CirculAir. A version with the same product code is available in the US, but there are minor differences compared to the UK model, including fewer fan speeds and slightly different onboard controls.
The Levoit CirculAir Oscillating Fan, also known as the Levoit Pedestal Air Circulator Fan in the UK, might be the best fan I've tested. I’ve been seriously impressed with the strong performance, convenience, and quiet operation.
This fan can be configured in two ways: either at full height or shorter, by simply unscrewing a section of the stand. This lower height is a little bit tall for use on a tabletop, but perfect for circulating air from heaters or floor-standing air conditioners.
(Image credit: Future)It offers automatic horizontal and vertical oscillation, which makes for great air circulation, and also makes it really easy to fine-tune the position of the airflow just using the remote. The only thing it’s missing here is the option to select different oscillation ranges; instead, it's limited to 90 degrees horizontally and 120 degrees vertically.
On the front of the stand there’s a well-lit LED screen that displays the selected mode, and either the fan speed or the ambient temperature. Below this are the onboard touch controls (which vary slightly depending on region), and the CirculAir can also be controlled with the easy-to-use circular remote, which is magnetic for convenient storage on the back of the air circulator.
(Image credit: Future)The airflow proved impressively strong during testing, and I was very grateful for it during a recent heatwave. Even at its lowest speed, I could feel a good breeze from 8ft / 2.4m, and I ran out of space to back up any further at 18ft / 5.5m away when the fan was at its top speed of 12, so it’s clear it has super-strong airflow when running full blast.
Despite its strength, the CirculAir runs satisfyingly quietly. I measured a volume of just 29dB from around 2ft away on fan speed one, 37dB at speed five, and 51dB at speed 12. This means it can operate with whisper-quiet volume at its lowest speed, and only gets as loud as moderate rainfall.
All this for a not-too-painful price tag: this fan is available to purchase at Amazon at a list price of $89.99 / £119.99, but I've already spotted a few discounts, so you might be able to avoid full whack. That's the short version; read on for my full Levoit CirculAir Oscillating Fan review.
Levoit CirculAir Oscillating Fan review: price & availability- List price: $89.99 / £119.99
- Availability: US and UK
The Levoit CirculAir Oscillating Fan, AKA the Levoit Pedestal Air Circulator Fan in the UK, has a list price of $89.99 / £119.99, and is available at VeSync in the US, and at Amazon in both regions.
This is a good price considering the impressive performance the Levoit CirculAir delivered during testing, but I recommend keeping an eye out for offers, too, as there appear to be fairly regular deals available at Amazon. For example, at the time of writing, there’s a 10% limited-time deal knocking the price down to $80.99 in the US, and the price was regularly dropping to below £95 in the UK a couple of months ago.
I’ve tested the UK model, and while the model number is the same in the US, there are some slight differences, which I make note of in the following sections.
- Value for money score: 5 out of 5
Type:
Pedestal air circulator
Speeds:
9 (US) / 12 (UK)
Oscillation:
Automatic: 90 degrees horizontal, 120 degrees vertical
Dimensions:
43.7 x 12.5 x 14.5 in / 36.5 x 110.8 x 32 cm
Weight:
12.7lb / 5.8kg
Control:
Onboard buttons and remote control
Timer:
Yes
Additional modes:
Eco, Turbo, Sleep
Levoit CirculAir Oscillating Fan review: design & features- Automatic vertical and horizontal oscillation
- 2 height options and 4 fan modes to choose between
- Onboard touch controls and remote control
The Levoit CirculAir is a pedestal air circulator with two height options, so it can be placed on the floor or a tabletop. I personally found its shorter height to be a little taller than I’d prefer for a desktop fan, but this is a good option to have if you happen to be short on floor space. This shortened height could also prove useful if you wanted to, for example, position the fan in front of a heater or floor-standing AC unit, as it would be more efficient at circulating the heated or cooled air from that position.
I found it satisfyingly easy to get the Levoit CirculAir setup in either configuration – it was a simple case of screwing the poles together and into the base. The base is just the right weight: heavy enough that the fan felt sturdy on my medium-pile living room carpet, but not too heavy to move it around when required.
(Image credit: Future)There are two ways to control the Levoit CirculAir: by using the circular remote or the large touch panel on the front of the stand. The remote was just the right size; small enough to be easy for me to hold and reach all the buttons, but large enough that the buttons were well-spaced and the icons were easy to read.
The large LED panel has a generous screen that displays either the fan speed or ambient temperature, as well as which mode the CirculAir is currently set to. The controls vary slightly on the UK model from the one in the US, but all controls are accessible on the remote in both regions.
(Image credit: Future)The number of fan speeds also varies slightly between regions, curiously, with 12 fan speeds on offer on the UK model I tested, but only nine in the US. There are a few different modes that can be cycled through: Normal mode (where I could choose the fan speed), Turbo mode (which amps up the fan), Sleep mode (which silences the responsive beeps and dims the display), and Eco mode (which makes use of the CirculAir's internal temperature sensor and adjusts the fan speed to suit).
Unlike most desktop fans, the Levoit CirculAir boasts automatic vertical oscillation, along with the standard horizontal oscillation. There isn’t the option to choose the degree of oscillation, sadly, so it’s either 90-degree horizontal oscillation and 120-degree vertical oscillation, or nothing. I did have the choice to use just one or the other, or both, though. Not only does this range of oscillation equal better air circulation, but it also means that it could be set to just the right angle from the comfort of my couch using the remote, which I loved.
- Design score: 4.5 out of 5
- Easy to use, responsive controls
- Super strong airflow
- Satisfyingly quiet operation
Controlling the CirculAir was straightforward, as the touch buttons on the well-lit display were simple to understand and responsive, as were the controls on the remote. I really liked that the remote control could be magnetically clipped onto the back of the air circulator, as this made it really easy to store and retrieve.
The Levoit CirculAir has delightfully strong airflow, and I found it to be a real help cooling me down during a recent heatwave here in the UK. In fact, it has the strongest airflow out of the fans I’ve tested to date, to the point where I wasn't able to confirm how far the air travelled when it was running at its top speed, as I ran out of room at 18ft / 5.5 meters.
The airflow strength was great at lower speeds, too, as I could still feel a pleasantly cooling breeze from an impressive 8ft / 2.4m away at speed 1, and 15ft / 4.5m at speed 6, which means it reaches further at half power than the Dyson Purifier Cool Formaldehyde TP09 does at full blast.
(Image credit: Future)I love it when a fan has an automatic mode, and 'Eco mode' (as it's called in the CirculAir's case) came in particularly handy during the recent heatwave. The CirculAir adjusted the fan speed in response to the rising ambient temperature throughout the day, though I found it to be much more conservative in terms of the fan speeds it applied compared to my current favorite air circulator, the MeacoFan Sefte 8in. This is good news for energy saving, though, and doesn’t make it any less efficient, really, considering the concentration of air kicked out even at the lower fan speeds.
The volume levels were pleasingly quiet, especially when taking into account the CirculAir’s punchy airflow. I got a reading of just 29dB from about 2ft away on fan speed 1, 37dB at speed 5, and 51dB at speed 12, so it was whisper quiet at its lowest, and only as loud as moderate rainfall when running at top speed.
(Image credit: Future)Its low volume meant I had no problem at all sleeping with it toward the foot of my bed. I really appreciated the automatic vertical and horizontal oscillation at nighttime, too, as being able to control both with the remote meant I could get the angle of the airflow exactly where I wanted it without needing to get up and manually adjust it.
After testing, I have no complaints about the Levoit CirculAir. It was easy to use and responsive, and it operated at low volumes while delivering impressively strong airflow.
- Performance score: 5 out of 5
Section
Notes
Score
Value for money
This air circulator’s fantastic performance and versatility make it great value for money, but it’s always worth keeping an eye out for discounts.
5/5
Design
With 2 height options, automatic horizontal and vertical testing, plus responsive controls with clever remote storage, there’s plenty of versatility.
4.5/5
Performance
The airflow is seriously strong, and yet the CirculAir runs pleasingly quietly. The automatic oscillation proved particularly convenient.
5/5
Buy it if...You want strong airflow
This air circulator certainly packs a punch! With impressively strong airflow even at its lower speeds, verging on ridiculous when running at full blast.
You want automatic cooling
The CirculAir’s Eco mode is a handy feature to have when the ambient temperature fluctuates, as it’ll adjust the fan speed to suit.
You want a fan with adjustable height
Having two different height options is great, whether you want to move it from the floor to a table, or you want to get the most efficient air circulation, depending on the position of your heater or air conditioner.
You want something smart
If you love your smart tech and prefer to operate things from your phone, then this won’t be the air circulator for you.
You’re looking for a desk fan
Even at its shortened height, the CirculAir is a bit too tall, and the airflow is likely too strong to be a personal fan.
You want to fine-tune the oscillation
Unlike fans like the Dyson Cool CF1, which offers angles of 15 to 70 degrees, the Circulair doesn’t have the option to fine-tune the range of the oscillation.
Levoit CirculAir Oscillating Fan
Shark FlexBreeze
Meaco MeacoFan 1056P
Price
$89.99 / £119.99
$199.99 / £199.99
$189.99 / £149.99
Speed settings
9 US / 12 UK
5
12
Oscillation
Automatic: 90 degrees horizontal, 120 degrees vertical
Automatic:180 degrees horizontal
Manual: 55 degrees vertical
Automatic: 60 degrees horizontal, 80 degrees vertical
Timer
Yes
Yes
Yes
Controls
Touch buttons, remote control
Buttons, remote control
Buttons, remote control
Power
Corded
Corded or cordless
Corded
Additional modes
Eco, Turbo, Sleep
Boost, Mist
Sleep, Natural, Eco
Height adjustable
Yes
Yes
Yes
Dimensions
43.7 x 12.5 x 14.5 in / 36.5 x 110.8 x 32 cm
37 x 13.8 x 13.8in / 94 x 36 x 36cm
32.3-37.6 x 12.6 x 13.4 in / 82-95.5 x 32 x 33.9cm
Weight
12.7lb / 5.8kg
12.2 lb / 5.7kg
12lb / 5.4kg
Shark FlexBreeze
This is a great option if you like the idea of taking your fan outside and making use of its misting attachment on sunny days. It can be used as a pedestal or table fan, plus it can run cordless, and our reviewer was pleased with the battery life. It only has five fan speeds, but it still delivers airflow that can be felt up to 70 feet away. If you’d like to learn more, check out our full Shark FlexBreeze review.
Meaco MeacoFan 1056P
Another impressively quiet fan, this height-adjustable air circulator proved a hit with our reviewer. It delivered a great performance when tested during hot weather, and proved pleasingly quiet, even at higher speeds. This is another fan with clever fan storage, too, as the circular remote magnetically clips to the front. To find out more, have a read of our full Meaco MeacoFan 1056P review.
- I tested the Levoit CirculAir Oscillating Fan for a week
- I tried out the different modes and features
- I tested its volume and how strong the airflow was
I used the Levoit CirculAir Oscillating Fan in our photo studio, my home office, and my bedroom over the course of a week. I evaluated the assembly process and build quality closely before using it passively and in specific tests that allowed me to assess the available features.
I tried the CirculAir at both heights, oscillating, and static. I tested out the different modes, particularly Eco mode, to see how the CirculAir would respond to fluctuating temperatures.
I assessed the airflow by checking the distance I could still feel a cooling breeze on the top, middle, and lowest settings. I used a decibel meter on my iPhone to check the noise levels, taking the readings from around 2ft / 600mm away, ensuring the fan wasn’t blowing directly into the microphone.
- First reviewed: August 2025
- Read TechRadar's Reviews Guarantee
Categories: Reviews
I tested Cambridge's Evo 150 SE streaming amp and it is as high-performing a just-add-speakers system can possibly be, for this money
Cambridge Evo 150 SE: Two-minute review
A little over four years after it launched its well-regarded Evo 150 music streaming amplifier, Cambridge has given it the once-over and rechristened it Evo 150 SE. The differences are not numerous, but they are noteworthy nonetheless – and that’s even before you take into account the fact that this new model is actually less expensive than the model it replaces.
A neat form factor, with swappable side panels a particularly nice touch, a big, bright display and several very decent control options are all carried over. So is the expansive selection of digital and analogue, wired and wireless input options. Power, at 150 watts per channel into 8 ohms, is unchanged too – but now the Hypex NCOREx Class D amplification is ‘tuned by Cambridge’. This is by far the most significant differential between the 150 SE and the outgoing 150.
It makes its presence felt, too, in the weighty, punchy (and ultimately fractionally overstated) low frequency reproduction. But it hasn’t affected the machine’s ability to create a big soundstage, to extract and deliver lots of detail, to manage a rhythm confidently, or to generate a large and persuasive soundstage.
Add in great ergonomics, a fine standard of build and finish and the ability to drive a couple of pairs of speakers without alarms, and it’s apparent the Cambridge Evo 150 SE is a very worthwhile proposition indeed. Even if it doesn’t look all that different to the product it replaces.
Oh, it's red and no mistake (Image credit: Future)Cambridge Evo 150 SE review: Price and release date- Release date: July 2025
- Price: $3,299 / £1,999 / AU$5,999
The Cambridge Evo 150 SE launched in July 2025, and in the United Kingdom it sells for £1,999 – the same price as the outgoing Evo 150 had hit after launching at £2,249 back in 2021. In the United States you should expect to pay $3,299, while in Australia it’s currently listed at AU$5,999.
Of course, the market for streaming amplifiers is hotting up nicely – brands as venerable as NAD and as up-and-coming as Eversolo have products contesting this region of the market. So simply having a decent reputation for this sort of thing is only going to carry Cambridge (and the Evo 150 SE) so far…
Cambridge Evo 150 SE review: Features- 150 watts of Hypex NCOREx ‘Tuned by Cambridge’ Class D amplification
- Numerous wired and wireless, analogue and digital inputs
- Four-layer PCB
There was very little wrong with the feature-set of the original EVO 150, so Cambridge has (very sensibly) left well enough alone. Or, at least, it has in all but one very significant area.
So what’s carried over from the outgoing model? Well, there’s the remarkably generous selection of physical and wireless inputs and outputs, for starters. Where analogue stuff is concerned, the Evo 150 SE has a line-level unbalanced input on stereo RCAs, a balanced equivalent via XLRs, and a moving magnet phono stage for use with a turntable accessed by another pair of RCAs. Digital inputs run to a digital coaxial input, a digital optical socket, an HDMI ARC and a USB-B input.
Wireless stuff is handled by dual-band wifi and Bluetooth with aptX HD codec compatibility. Wi-fi, of course, means the Cambridge can deal with AirPlay 2, Chromecast, Spotify Connect and TIDAL Connect - and it also gives access to internet radio. The 150 SE is Roon Ready, too.
As far as outputs go, there are binding posts for two pairs of speakers and a 3.5mm headphone socket. In addition, there’s a pre-out for a subwoofer, corresponding pre-outs for use with a power amplifier. And the Cambridge is a Bluetooth transmitter as well as a receiver, so it can drive your wireless headphones.
Incoming digital signals are handled by an ESS Sabre ES9018K2M digital-to-analogue converter that can deal with resolutions of up to 32bit/384kHz and DSD256. The Cambridge is compatible with all popular file types, and quite a few unpopular ones too.
So far, so very-similar-indeed-to-the-old-model. But what makes this machine an ‘SE’ is the fact that Cambridge has worked in such close collaboration with Hypex on its NCOREx Class D amplification that here it’s branded as ‘Tuned by Cambridge’. And it is, at least according to the companies involved, ready and able to produce “warm, dynamic and controlled sound”.
Features score: 5 / 5
Note the 'wings' (Image credit: Future)Cambridge Evo 150 SE review: Design- 39 x 317 x 352mm (HxWxD)
- Large, bright, full-colour display
- Swappable side panels
Just as with ‘features’, not a lot has changed where the design of the Evo 150 SE is concerned - it demonstrably wasn’t broken, and so Cambridge has chosen not to fix it. Unlike the ‘features’ section, though, where there’s a difference here between the 150 and this 150 SE it is absolutely trifling.
So your £1999 buys you a nicely proportioned, beautifully made and flawlessly finished box with a bright, crisp full-colour display on the fascia that will display album artwork or virtual VU meters as well as providing menu and set-up options. The Evo 150 is supplied with two pairs of side-panels that attach magnetically and can easily be swapped - one is a real wood veneer, the other a dark grey slatted alternative.
So yes, the difference between the Evo 150 and this Evo 150 SE is - hold on to your hat - the knurling of the two-part volume dial/input selector. It’s less knurled than it was before.
Design score: 5 / 5
Everything in its right place… (Image credit: Future)Cambridge Evo 150 SE review: Sound quality- Detail and dynamism in equal measure
- Big, organised soundstage
- Slightly overconfident low-frequency reproduction
There are differences between the way the Evo 150 SE sounds when delivering a DSD64 file of Tears For Fears’ Head Over Heels via some network-attached storage compared to the same song streaming from the free tier of Spotify, of course – but one of the most admirable things about this Cambridge machine is how consistent it sounds. No matter which of its inputs you’re using, its fundamental character comes through loud and clear.
And broadly speaking, its character is a lovely balance between ‘detail’ and ‘energy’, and between ‘scale’ and ‘dynamism’. The Evo 150 SE is capable of revealing the finest, most minor details in a recording, and giving them the appropriate amount of emphasis relative to the overall performance. It invests music with the sort of vigour and momentum that can bring it to life, without ever threatening to lose control of proceedings. It creates a large and well-defined soundstage, and ensures that every element of recording (no matter how numerous the elements might be) gets the required elbow-room to express itself – though it delivers music as a unified and singular piece at the same time. It has the sort of dynamic headroom that allows it to track the shifts in intensity or volume during the course of a recording without sounding pressured or stressed.
At the top of the frequency range, the Evo 150 SE attacks with chunky determination. Treble sounds have brilliance and a fair amount of bite, but they’re substantial enough to prevent any hardness or edginess creeping in. It’s a similar story through the midrange: the Cambridge is forward and direct, but never pushy, and it reveals a big amount of information, both broad and fine, about what’s going on there. Voices, in particular, benefit no end from this eloquence and positivity.
The tonal balance up to this point, and down into the low frequencies too, is almost (but not quite) neutral – there’s just a hint of warmth that suits the overall character of the Evo 150 SE just fine. The frequency response, though, is slightly skewed. The Cambridge puts slightly more emphasis on the bottom end than is absolutely ideal, with the result that the overall presentation is slightly tiled towards bass. It’s not that the low end here lacks detail or is in any way ponderous – the Evo 150 SE controls the low frequencies carefully at their attack and decay, and expresses rhythms confidently as a result. But while there are doubtless plenty of listeners who will interpret this slight bottom-heaviness as ‘exciting’, it serves to make the Evo 150 SE sound less than neutral. And to demand you take some care with partnering equipment, especially loudspeakers.
Having praised the Cambridge for the consistency of its sound through its numerous inputs, it’s nevertheless worth pointing out just what a gem the Evo 150 SE’s phono stage is. A vinyl copy of The Cinematic Orchestra’s Every Day sounds full, dynamic to almost comical degree, lavishly detailed and is delivered with complete positivity. Yes, that tilt towards the bottom end is still in evidence – but the way the Cambridge handles the various rhythms and tempos goes an awfully long way towards making up for it.
Sound quality score: 4.5 / 5
The bulk of my testing was done with the Sennheiser IE900 or the Austrian Audio 'The Composer' (Image credit: Future)Cambridge Evo 150 SE review: Usability & setup- Remote handset or app control
- Simple to get attach to your local network
- Big-print on-screen menus are nicely realised
Control is available via the on-screen menus and the input dial, or via the perfectly adequate yet entirely unremarkable remote control handset. Or you can do what all sensible people will do, and use the fourth (and current) version of the StreamMagic control app. This is a comprehensive, logical, stable and usable app, which offers a lot of options – I’m particularly keen on the ability to include only those inputs you’re using on the home screen. It’s good for integrating your favourite music streaming services, saving half a dozen internet radio stations as presets, and plenty more besides.
As far as ‘setup’ goes, it’s simply a question of making the physical connections you want to make, and then getting the 150 SE on to your local network. It behaves as an AirPlay speaker when fresh out of the box, so finding it and hooking it to your network couldn’t be easier (unless you’re using an Ethernet connection to your router, which makes it easier still). Then load up your streaming services and internet radio stations, nominate the inputs you’re using to the front of the app, and away you go.
Usability & setup score: 5 / 5
This white light (for aptX Lossless) was oddly hard to come by when using sources able to handle it… (Image credit: Future)Cambridge Evo 150 SE review: ValueWhen the original Evo 150 launched back in 2021, it cost £2249 – and everyone seemed to think that was fair enough. Somehow Cambridge has managed to retain everything that was great about the original, dial in some upgraded amplification and lower the asking price to an extremely eye-catching £1999. So yes, there’s splendid value for money here.
Value score: 5 / 5
Note the new 'rails' on the casework to help with cooling (Image credit: Future)Should you buy Cambridge Audio Evo 150 SE?Buy it if...You admire well-realised industrial design
The Evo 150 SE is an understatedly swish looker, and those magnetically attached side panel options are never less than gratifying.
The description of sound as ‘thumping’ strikes you as a positive
You’ll never find yourself craving greater low-end heft or substance.
You own (or will own) some capable loudspeakers
The Cambridge is an adept performer in so many ways - and it deserves the speakers that can do that fact some justice.
Your speakers or source equipment aren’t of a similar standard
See above, really - if you want the Evo 150 SE to sound like the money’s-worth (which it most definitely can) your sources and speakers need to step up.
You crave perfect sonic balance
There’s a definite flavour to the way the Cambridge sounds - and as with all flavours, it’s very much a matter of taste.
In 2025 the Naim Uniti Atom is an old stager – but that just means it’s matured, rather than being in any way past it. The audio balance is more neutral than the Evo 150 SE, and what the Naim lacks in inputs (there’s no phono stage, for instance) it more than makes up for in both tangibles and intangibles.
iFi makes strong design choices and you love to see it (Image credit: Future)How I tested the Cambridge Audio Evo 150 SE- Two-week testing period
- Bowers & Wilkins speakers
- Rega P1 turntable; network storage; Tidal Connect, internet radio
With a pair of Bowers & Wilkins 702 S3 Signature at the business end, with a Rega Planar 1 turntable as a physical source and a mixture of Tidal Connect, network-attached storage, internet radio and various devices attached via Bluetooth at the other end, the Cambridge Evo 150 SE always held its own.
No genre of music seemed to be off-limits, and it wasn’t as ruthless with lower quality content as it might have been - try as I might, I couldn’t make it insist on hi-res stuff. Which means it was a pleasure to listen to in pretty much every circumstance.
First reviewed August 2025
Categories: Reviews
The Onyx Boox Go Color 7 Gen II is a versatile ereader with potential – so it's a shame it fumbles its key feature
Onyx Boox Go Color 7 Gen II: Two-minute review
As you can probably tell from my Onyx Boox Go Color 7 review, I didn’t take a shine to the original model released in 2024, which meant I had higher expectations from its successor.
The Boox Go Color 7 Gen II launched in April 2025 alongside a monochrome edition called the Boox Go 7, both sharing the same design and and feature set – the only difference being the screen: the former uses the color E Ink Kaleido 3 display while the latter is the grayscale E Ink Carta 1300.
Physically, both the 2025 Go Series siblings are nearly identical to the Go Color 7 from 2024, with one tiny design change that I’m pleased with – the page-turn buttons on the new models are smaller, rounded and separated a little to improve ergonomics.
On paper, the Go Color 7 Gen II is the better device compared to its predecessor, running Android 13 (rather than Android 12), getting a generation newer processor and adding writing capabilities that the previous model lacked. Like many smaller-screen epaper tablets like it, you will need to purchase the stylus separately, although at the time of writing, the only pen that works with the Go Color 7 II – the Boox InkSense – has been discontinued and no official replacement has been made available.
According to Boox, it’s preparing a new stylus after taking on user feedback, and the new pen “is expected to be available in the third quarter” of this year. Reimagining a stylus is admirable, but it still begs the question: why release ereaders with stylus support (this affects the monochrome Boox Go 7 as well) if their only pen isn’t available to buy?
When I started testing the device about 11 weeks ago, third-party retailers still had stock of the InkSense, which is how I was able to source one for this review, but even those are no longer available. That said, I’m glad the pen is being replaced as I didn’t enjoy the writing experience with a hard nib on a very smooth screen. I’ll update this review when the promised stylus is released.
The 2025 Boox Go series ereaders get writing capabilities but, at the time of publication, the compatible stylus has been discontinued (Image credit: Sharmishta Sarkar / TechRadar)While I’m not docking any points for the lack of a supported stylus at the time of publication, I’m disappointed to see that the 7-inch color screen on the Gen II isn’t as nice to read on as its predecessor. Text on the Gen II is 'fuzzy', for the lack of a better word. Compared to its predecessor, its monochrome Go 7 sibling and the Kobo Libra Colour, text within ebooks and speech bubbles clearly lacks crispness. You can still read, that's not the issue, but it's hard to recommend an ereader when others do a better job.
And while some colors are more saturated here than on the older model and the Kobo Libra Colour, the additional contrast means small details are lost in the darker areas. Strangely, though, the color 'inks' when writing lack this same saturation and look washed out compared to what I've experienced on older color Boox models like the Onyx Boox Tab Mini C.
Boox has somehow managed to make the display yellower (or warmer) than on any of its other tablets, and it's a stark difference between the Gen II's monochrome sibling as well. This warmth sadly affects the displayed colors as well. The yellowness is exacerbated when the frontlight is switched on, giving comics and graphics novels what I call the 'jaundiced look'. In fact, the frontlight isn't even as bright on the Gen II as other Boox ereaders (or even Kobos and Kindles).
The overall user experience is also marred by constant ghosting. It’s not as obvious as I’ve seen in older Boox devices, but it is distracting enough to be an issue. Setting the device to higher refresh rates, however, eats into the battery life, which also drains at a faster rate than other ereaders. Even the preset refresh modes that can be set on a per-app basis weren’t well optimized here, causing excessive stuttering while scrolling on the native web browser.
The good news is that the software issues I’ve had with the previous generation have been fixed and I was thrilled to see that wired transfer via OTG (directly plugging an external hard drive or portable SSD to the USB-C port) works smoothly – something I’ve had problems with in previous Boox tablets I’ve tested. Even the fonts folder within Storage is correctly bound, so things work a little more smoothly now, although the user interface continues to be slightly complicated.
Better implementation of the software doesn’t make up for the subpar reading experience, and neither does selling it at the same price as its predecessor – in fact, I'd say it’s hard to recommend at any price.
The magnetic case made specifically for the 2025 Boox Go series comes with a loop to secure the supported stylus (Image credit: Sharmishta Sarkar / TechRadar)Onyx Boox Go Color 7 Gen II review: Price & availability- Announced end April 2025 for US, Europe and Australia
- List price: $299.99 / €279.99 / AU$439
- Available directly from the Boox Shop and select retailers, including Amazon
As alluded to earlier, the Boox Go Color 7 Gen II was announced alongside the monochrome Boox Go 7, both becoming available at the end of April 2025.
Despite the added note-taking functionality, the Boox Go Color 7 Gen II carries a similar price tag to its predecessor (which is already listed as out of stock on the Boox Shop, indicating it might get discontinued soon). Where the older model had a launch price of $249.99 / €279.99 (about £245) / AU$459, the Gen II is listed for $279.99 / €279.99 / AU$439 at the time of writing. As you can see, only US customers face a slightly higher charge likely due to tariffs on several imports. This price includes a magnetic case that features a loop to secure a stylus.
In comparison, the Kobo Libra Colour is cheaper at $229.99 / £209.99 / AU$379.95 for the standalone ereader, but you will need to add on the $69.99 / £69.99 / AU$119.95 for the Kobo Stylus 2 if you want to use it for writing notes, and you’ll need to purchase a case separately if you want one.
The only compatible stylus for the 2025 Go series was the Boox InkSense, which has been listed as “out of stock” since the release of the Go Color 7 II (and its monochrome sibling), and at the time of writing is no longer available from third-party retailers either. I have official confirmation that the pen has been discontinued, and while the Boox Shop lists a bundle that includes the stylus, I’d recommend holding off purchasing the full package until the replacement pen has been released. There’s no confirmed release date at the time of publishing this review, and neither is there any indication of how much the stylus would cost. I’ll update this article as soon as I know more.
Given my subpar experience with the Go Color 7 Gen II, I think the monochrome Boox Go 7 would be the better buy and it retails for $249.99 / €249.99 / AU$399, a price that includes an identical magnetic case as well.
• Value score: 3 / 5
The Boox Go Color 7 Gen II is a very compact size for a 7-inch ereader, and it's lightweight too (Image credit: Sharmishta Sarkar / TechRadar)Onyx Boox Go Color 7 Gen II review: SpecsDisplay type:
E Ink Kaleido 3
Screen size:
7 inches
Resolution:
300ppi in B&W; 150ppi in color
CPU:
Qualcomm Snapdragon 690
Frontlight:
Warm and cold
Storage:
64GB (expandable)
Battery:
2,300mAh
Speaker:
Stereo/dual
Water protection:
None
Software:
Android 13
Connectivity:
Wi-Fi (2.4GHz + 5GHz); Bluetooth 5.1
File support:
20 document; 4 image; 2 audio
Dimensions:
156 x 137 x 6.4 mm (6.1 x 5.4 x 0.25 inches)
Weight:
195g (6.9oz)
Onyx Boox Go Color 7 Gen II review: Design & display- Exact same dimensions and weight as Gen I model, but design tweaks to buttons
- Compact and lightweight, lacks waterproofing
- 7-inch E Ink Kaleido 3 screen lacks contrast and sharpness
As the old adage goes: if it ain’t broke… The original Go Color 7 was a lovely compact ereader that I liked the design of, except for the closely placed page-turn buttons. That's been changed on the Gen II model, which now sports smaller, rounded buttons with some space in between.
This tiny change, in my opinion, makes the Gen II a touch more ergonomic in use, but there’s a case to be made for the asymmetric design of the Kobo Libra series (and the Kindle Oasis models) – it provides a nice resting place for the thumb along the edge of the broader bezel. The slim and flat form factor of the Go Color 7 II can be harder on the fingers and wrists in comparison, although the added thickness from its magnetic case helps a alleviate the soreness a little.
As before, the page-turn buttons automatically become volume controls for apps that don’t require scrolling or page turning, and this functionality can be set on a per-app basis in the Settings menu.
Image 1 of 3The page-turn buttons have been redesigned to being separated and rounded... (Image credit: Sharmishta Sarkar / TechRadar)Image 2 of 3..compared to the straight-edged, closely packed ones on the 2024 Go Color 7 (left) (Image credit: Sharmishta Sarkar / TechRadar)Image 3 of 3The rounded and separated buttons are nicer to use on the Gen II (Image credit: Sharmishta Sarkar / TechRadar)Where the buttons on the older model were a different color to the rest of the chassis (silver on the white colorway and dark grey on the black), the Gen II – and its monochrome sibling – are a single color, available in black (as reviewed here) or white. The one-color look without any trimmings or accents makes the device look a little dated, but that’s not a complaint, merely an observation made in comparison to the older model.
All other physical attributes are identical to the Gen I model, including the textured rear panel which, to me now seems just a smidge rougher that makes the Gen II a little grippier if you prefer not to use its magnetic case. In terms of dimensions and weight, nothing has changed since 2024 and that’s not a bad thing as the Go Color 7 II is compact and lightweight, making it quite portable.
There’s a tiny power button on the bottom right corner of the device, while the right edge is home to the USB-C port, the speaker grilles and a microSD card tray. Only the mic has moved, now housed on the opposite edge.
Image 1 of 2On paper, the Go Color 7 Gen II (top) is the better ereader than its predecessor (bottom) (Image credit: Sharmishta Sarkar / TechRadar)Image 2 of 2The page-turn buttons are the most obvious design change, but the mic is gone from beside the speaker grille to the opposite edge (Image credit: Sharmishta Sarkar / TechRadar)What it lacks is waterproofing; there’s no IP rating for it listed on the official website, so if you plan to travel with it – it's the perfect compact size for doing so – steer clear of the pool.
As I mentioned earlier in this review, the Go Color 7 II uses a 7-inch E Ink Kaleido 3 display, the same as the previous generation, although Onyx has made the newer model more naturally yellow in comparison. This has the unfortunate effect of adding a yellow hue to all the colors on screen, giving them what I call the 'jaundiced look'.
This is exacerbated by the frontlight on the Gen II as it enhances the yellowness of the display. It’s also, rather strangely, not as bright as the Gen I model which, at the time of testing it in 2024, I said wasn’t bright compared to the even older Onyx Boox Page. In fact, the light on the Go Color 7 Gen II is dimmer than its own 2025 sibling, the Boox Go 7.
I had complained about the lack of sharpness on the Go Color 7 (Gen I) when compared to the Kobo Libra Colour, but Boox has managed to make that a lot worse on the Gen II, and that is its biggest failing – a subpar display (more on this below in the User Experience section).
• Design & display score: 3 / 5
The Boox InkSense stylus still works with the Boox Go Color 7 II, but there's no word on what its replacement will be like (Image credit: Sharmishta Sarkar / TechRadar)Onyx Boox Go Color 7 Gen II review: Android software & apps- Runs a custom version of Android 13
- User interface takes time to get used to
- Access to the Google Play Store; AI Assistant app available on board
Where the older model from 2024 was running Android 12, the Go Color 7 II has been upgraded to a custom version of Android 13. There’s usually no need to worry about a device like an ereader running an older version of Google’s OS as there typically aren’t any security issues here, and I doubt anyone would save sensitive information on a device like this.
The trimmed-down version of Android on the Go Color 7 Gen II caters specifically to reading and writing, and should be familiar to anyone who has used a Boox tablet before. If not, the user interface will take some getting used to as it’s not the most streamlined UX I’ve come across. For a simpler setup, you’ll need to turn to a Kindle or a Kobo ereader.
Image 1 of 3The navigation menu doesn't have the Notes tab by default and finding it requires some online research (Image credit: Sharmishta Sarkar / TechRadar)Image 2 of 3Third-party app downloads via the Google Play Store are quick and easy (Image credit: Sharmishta Sarkar / TechRadar)Image 3 of 3The Boox user interface has evolved a little, but it still takes a while to get a handle on as a first-time user (Image credit: Sharmishta Sarkar / TechRadar)The home screen, once you’ve connected to Wi-Fi, is easy to get around, with a navigation menu at the bottom of the display. This gives you quick access to your library, the storage menu and your apps, plus it’s customizable via the device’s Settings menu. There’s space here for five options and, strangely for an ereader with writing capabilities, the native Notes app is not one of them.
Finding it wasn’t easy, but Boox at least has a quick guide online on how to access it: you’ll need to navigate to Settings > System Display > Homescreen Navigation Bar where It’s listed as one of the options for the aforementioned customization. This may not seem like a big issue, but my expectation from a device like this is to highlight its main features up front rather than tuck them away, highlighting the unintuitive UX. In my case, I swapped out the Bookstore as it’s not as enticing a source of content as the Kindle or Kobo stores.
Preset refresh modes are nice to have, but they didn't work as well I had hoped on the Go Color 7 II (Image credit: Sharmishta Sarkar / TechRadar)Given its open Android ecosystem, the interface on the Boox Go 7 II includes a lot of advanced settings that help you use third-party apps as smoothly as possible, but submenus for native applications are difficult to find. For example, you need to open an ebook in the NeoReader app (the native library), tap onscreen to open the top menu bar, click on More, then select Settings from there – another example of a convoluted interface.
Thankfully adjusting fonts and overall styling for individual books is easier to do, but there’s a lot going on here compared to what you’d see on a Kindle or Kobo. The setup for styling, however, is now improved, which makes it easier to understand than previous iterations of Boox’s interface.
In fact, there’s another improvement to the software that I’ve previously had trouble with on Boox devices – taking advantage of the USB-C port’s OTG support for wired file transfer. Previously, the menu required to copy files across from an external hard drive to a Boox tablet would disappear as soon as I tried to navigate back to the Storage pane, thus not letting me add files to the default Books folder. Now that is no longer an issue and I was able to select multiple ebooks saved on my Samsung T7 portable SSD and save into the Go Color 7 II without any issues.
I was thrilled to see that OTG transfer worked a charm on the Boox Go Color 7 Gen II (Image credit: Sharmishta Sarkar / TechRadar)I had no trouble downloading third-party Android apps to the Go Color 7 II. These included the Kindle and Kobo apps as the bulk of my library is on these two platforms, plus an app called CPU X that detects the exact chipset a device is using. I didn’t try any third-party note-taking applications as I’ve always found Boox’s native Notes app to be full featured and more than enough for my needs.
• Software score: 3.5 / 5
Onyx Boox Go Color 7 Gen II review: User experience- Excessive yellow hue on screen affects colors
- Subpar reading experience due to lack of text sharpness
- Writing experience could change depending on the new stylus
An unintuitive user interface aside, the Go Color 7 Gen II is quite usable. It’s when you compare it to other models, including its own predecessor and its 2025 monochrome sibling that you begin to realize there are better color ereaders to spend your money on. And that’s exactly what my job, as the reviewer, entails – doing the side-by-side comparisons so you, dear reader, can make the most informed buying decision.
As you will see in the comparison photos below, the Go Color 7 Gen II doesn’t hold up well as an ereader. As for writing, it’s hard to rate the experience when you can’t purchase a compatible stylus yet.
There are quite a few submenus to explore on a Boox device (Image credit: Sharmishta Sarkar / TechRadar)ReadingI’ve tested several ereaders in the last eight years and I don’t think I’ve ever been as disappointed with the reading experience as I was with the Go Color 7 Gen II. Admittedly that’s because I’m comparing it directly to a few of its contemporaries, but even if you didn’t do a side-by-side comparison, it’s easy for anyone who’s used an ereader before to say the display looks hazy. I suspect that’s because of the anti-glare layer on the screen, and it’s just a lot more pronounced here when compared to other brands and Boox models.
Colors appear saturated on the Boox Go Color 7 Gen II, but the higher contrast hides details (Image credit: Sharmishta Sarkar / TechRadar)The 7-inch E Ink Kaleido 3 display used here is naturally more yellow than other ereader I’ve previously tested and found this affected how colors appear on screen. I compared it to its predecessor and the Kobo Libra Colour, both of which have paler backgrounds in light mode and made the displayed colors appear as close to natural as is possible on an epaper screen. While I can't say this alone affects the reading experience, I found the monochrome Boox Go 7 was nicer to read on in light mode because of the whiter background – it added a touch more contrast to the page.
The frontlight, which isn’t as bright as I’ve seen previously on other Boox tablets (even the Go 7 that released alongside this ereader is brighter), exacerbates the ‘jaundiced look’. Boox doesn't list how many amber LEDs are used on the Go Color 7 II, but the frontlight is warmer compared to five other ereaders I had with me at the time of this review (two other Boox tablets, two Kindles and a Kobo), which makes the screen look yellower when switched on. The only other E Ink tablet that surpasses the Gen II's warm display and light is the Kobo Elipsa 2E, but here it's not a problem as the epaper tablet doesn't display color.
Image 1 of 2The frontlight of the Boox Go 7 Gen II (left) makes the screen yellower than on the Gen I model (right) (Image credit: Sharmishta Sarkar / TechRadar)Image 2 of 2Even the Boox Go 7 (right) that launched alongside the Go Color 7 Gen II (left) is clearer and brighter with the frontlight at full bore (Image credit: Sharmishta Sarkar / TechRadar)As with every color ereader using the E Ink Kaleido 3 screen technology, the Go Color 7 II has a screen resolution of 150ppi for color and 300ppi in grayscale. Colors appear more washed out when compared to its own predecessor which, at the time of writing the Boox Go Color 7 review, I said was pale beside the Kobo Libra Colour. And while I don’t expect the Gen II to match what I would see on an LCD display, I did expect it to be similar to its older sibling, if not better.
Image 1 of 3The warmer light affects colors on screen, giving them a 'jaundiced look' on the Boox Go Color 7 Gen II (left) compared to the Gen I (right) (Image credit: Sharmishta Sarkar / TechRadar)Image 2 of 3Colors might appear darker on the Go Color 7 Gen II (right), but the text is sharper on the Gen I (left) (Image credit: Sharmishta Sarkar / TechRadar)Image 3 of 3A closer comparison between the Go Color 7 II (left) and the Gen I (right) shows text just isn't as nice to read on the newer device (Image credit: Sharmishta Sarkar / TechRadar)The flip side to that is colors on the Gen II look more saturated compared to the Kobo Libra Colour. Newer firmware may have made the Gen I better at displaying colors, but the release notes for v4.1 on the Boox website make no mention of changes that would account for this improvement. The more saturated hues, however, do come at the cost of some details in darker areas being diminished, but this may not be a deal breaker for many readers of comics and graphics novels.
Image 1 of 2Compared to the Kobo Libra Colour (left), the Go Color 7 II (right) is yellower and text paler (Image credit: Sharmishta Sarkar / TechRadar)Image 2 of 2The lack of contrast is clear when seen closely (Image credit: Sharmishta Sarkar / TechRadar)What is truly disappointing is how the text is displayed, whether in ebooks or in speech bubbles – letters are fuzzy on the Go Color 7 II compared to the Gen I and the Go 7. Even the Kobo is better at displaying text.
The new Boox interface allows you to have custom styling for individual titles you’re reading, but enhancing text weight (or boldness) didn’t help, although setting the Dark Color Enhancement to its maximum improved the text a tiny bit, but note that you will lose further details in darker areas when reading in color. Switching to dark mode also made no difference as overall contrast is lacking.
Long story short, it’s hard to recommend the Boox Go Color 7 Gen II as an ereader.
Even compared to the Boox Go 7 (top), the Go Color 7 Gen II (bottom) is a lackluster ereader (Image credit: Sharmishta Sarkar / TechRadar)WritingIt’s hard to rate the Go Color 7 Gen II’s writing experience objectively as the Boox InkSense is no longer available (although it still works if you can find stock at a retailer) and will be replaced by a new stylus that I hope will add a touch of friction.
The hard plastic nib of the InkSense just slides across the screen of the Go Color 7 II, and I often felt like I was losing control over my writing because of that. I think a softer nib would be ideal, but we’ll just have to wait and see what Boox releases for its 2025 Go series 7-inch ereaders.
However, as with reading, the color ‘inks’ available for writing look washed out compared to what I’ve experienced on older Boox tablets like the Onyx Boox Tab Mini C, and black is the only option that stands out clearly.
Image 1 of 3There's no friction between the screen and the Boox InkSense, so writing isn't very paper-like (Image credit: Sharmishta Sarkar / TechRadar)Image 2 of 3There's a good color palette to choose from for writing and drawing... (Image credit: Sharmishta Sarkar / TechRadar)Image 3 of 3..but results appear paler than expected (Image credit: Sharmishta Sarkar / TechRadar)The native Notes app, though, is the same as you’d find on the brand’s more high-end epaper tablets like the Onyx Boox Go 10.3 and is more than enough for the average user who needs to jot down some thoughts or doodle. Power users would appreciate the Notes app better, thanks to several tools that could prove handy for productivity. For example, the Insert option allows you to add images and audio files to your notes, and the same tool lets you hyperlink selected text to an external URL or to a different page within the same notebook.
The adjustable Lasso tool gives you a lot of flexibility for text selections, and promptly adds the AI tool for instant handwriting-to-text conversion. Handwriting recognition is not always accurate, but then it’s very simple to make edits manually.
• User experience score: 2.5 / 5
Hopefully the redesigned stylus for the Boox Go 2025 series will be better than the InkSense (Image credit: Sharmishta Sarkar / TechRadar)Onyx Boox Go Color 7 Gen II review: Performance- Not the fastest ereader I’ve tested
- Lots of light ghosting that quickly becomes annoying
- Battery drain is higher compared to other similar models
The Boox Go Color 7 Gen II uses the Qualcomm Snapdragon 690 chipset paired with 4GB of RAM to keep things running as smoothly as possible. The CPU is a small improvement over the Snapdragon 680 used in the older Go Color 7, but it doesn’t seem to have made much of a difference in overall performance.
Boox tablets aren’t known for being speedy loaders, and the latest Kindle and Kobo ereaders boot up faster from sleep mode than the Go Color 7 Gen II. Even the native Library app takes its time to open a chosen title, even if it’s been saved locally to the device. It’s not a deal breaker in terms of overall usability, although it’s undeniably slower than the 2024 Kindles and Kobo devices when opening up a book to read.
Even wired file transfer via USB-OTG was very quick. Wireless transfer of files has always been easy using the BooxDrop platform, but I had no trouble signing into my Google Drive account either, with cloud transfer also working quite well.
Third-party apps, however, load quickly and, during my testing, worked smoothly, with no app crashes experienced with the few that I downloaded for this review. That said, reading on the Kindle or Kobo app also suffered from the same screen issues as when using the native NeoReader application.
Image 1 of 2There are options to tweak the text style on the Go Color 7 Gen II, both for comics/graphics novels... (Image credit: Sharmishta Sarkar / TechRadar)Image 2 of 2..and text-heavy ebooks, but they don't help the Go Color 7 Gen II very much (Image credit: Sharmishta Sarkar / TechRadar)My biggest performance issue with the Go Color 7 II was ghosting. Adjusting refresh rates using the presets available for individual apps didn’t help at all and the only way I found to counter this was to set system refresh rate to a faster option. I tested a full-refresh frequency set at 10 taps and 5 taps, with the latter working fine for the most part, although it came at the cost of battery life. There was still some ghosting on the display between the 5 taps, and the only way to eliminate this was setting full-refresh frequency to 1 tap. This drains the battery even more significantly, but was the best solution for me.
In fact, the preset refresh rates that can be set on a per-app basis didn’t even help smoothen stuttering while scrolling web pages on the native browser. I wasn’t expecting seamless scrolling like on a phone, but I’ve experienced better refresh-rate presets on other E Ink devices: case in point, I had no such problems in my ViWoods AiPaper review which also runs a custom version of Android 13 like the Go Color 7 II.
Image 1 of 3Dark mode doesn't improve readability very much, but it has its own quirks. It's fine when first switched on... (Image credit: Sharmishta Sarkar / TechRadar)Image 2 of 3..but the white floating bar gets distracting. (Image credit: Sharmishta Sarkar / TechRadar)Image 3 of 3Turn a page, though, and the bottom information bar becomes white, which is just as distracting as the floating toolbar (Image credit: Sharmishta Sarkar / TechRadar)As I’ve already mentioned, battery drain for me on this ereader was quite significant after I changed the system refresh rate to a quicker option, but even on default settings, the Go Color 7 II chews through its 2,300mAh battery quite quickly.
I had the ereader set to powering off after 48 hours of no activity, but upon switching the Go Color 7 II on again I found the battery life would be significantly lower than when I put it into sleep mode. I expect about 5% to 10% drain for ereaders in scenarios like this, but the Go Color 7 II would drop by 25% on average – in one instance where it was in sleep mode for 48 hours and powered down for a further 36 hours, battery life dropped from 81% to 56%.
This isn’t behavior I’ve experienced with any other Boox tablet, so I suspect there’s a bug that’s affecting battery efficiency and a future firmware might be able to fix it. In the meantime, you’ll still get about a week of reading from every top-up with the system refresh rate set to 15 taps. This will reduce if you use faster refresh rates and will also be affected by how bright you set the frontlight to and how often you use Bluetooth connectivity.
Recharging, thankfully, isn't slow and it went from 12% to full in 1 hour and 57 minutes plugged into a wall adapter during my testing. Connected to a dock slowed down the charging rate only marginally, going from 17% to full in 2 hours and 10 minutes.
• Performance score: 3 / 5
I wish submenus were easier to find on Boox devices – for example, you can't tell there's a library settings option under the More in the above image (Image credit: Sharmishta Sarkar / TechRadar)Should I buy the Onyx Boox Go Color 7 Gen II?Onyx Boox Go Color 7 Gen II
Kobo Libra Colour
Kobo Clara Colour
Amazon Kindle Paperwhite (2024)
Price
$279.99 / €279.99 (about £245) / AU$439
$229.99 / £209.99 / AU$379.95
$159.99 / £149.99 / AU$249.95
from $159.99 / £134.99 / AU$299
Screen
7-inch E Ink Kaleido 3
7-inch E Ink Kaleido 3
6-inch E Ink Carta 1300
7-inch E Ink Carta 1300
Resolution
300ppi in B&W; 150ppi in color
300ppi in B&W; 150ppi in color
300ppi in B&W
300ppi in B&W
Operating system
Android 13
Linux-based
Linux-based
Linux-based
Storage
64GB (expandable)
32GB
16GB
16GB
CPU
Qualcomm Snapdragon 690
Undisclosed 2GHz dual-core chipset
Undisclosed 2GHz dual-core chipset
Undisclosed 1GHz dual-core chipset
Battery
2,300mAh
2,050mAh
1,500mAh
Undisclosed
Connectivity
Wi-Fi, Bluetooth, USB-C
Wi-Fi, Bluetooth, USB-C
Wi-Fi, Bluetooth, USB-C
Wi-Fi, Bluetooth (in select regions), USB-C
Waterproofing
None
IPX8
IPX8
IPX8
File support (including images and audio)
25
16
16
17
Speakers
Yes
No
No
No
Dimensions
156 x 137 x 6.4 mm
161 x 144.6 x 8.3 mm
112 x 160 x 9.2 mm
176.7 x 127.6 x 7.8 mm
Weight
195g
199.5g
174g
211g
Buy it if...You want a compact color ereader with writing capabilities
With a 7-inch color display, the Go Color 7 II is quite compact and very light too. And given it’s also got writing features built in, it’s versatile. Unfortunately, its many usability and performance issues makes it hard to recommend over similar devices.
Don't buy it if...Readability and performance are important to you in an ereader
The Go Color 7 II has potential, but its subpar screen and above-average battery drain leaves it trailing behind many of its contemporaries. If the color display isn’t important, you’ll be better off opting for the grayscale Go Color 7.
Value for money is important
Compared to its predecessor, the Go Color 7 is well priced as it adds writing features for the same cost. However, its lackluster user experience and lack of performance makes it hard to recommend at any price point.
You want a compatible stylus at the time you buy a device
It’s very strange for a brand to release devices that require an optional add-on that gets discontinued soon after their launch. Stranger still is that no replacement was made available at the time. So until Boox releases a replacement for the InkSense stylus, it’s hard to recommend the 2025 Go series ereaders.
Onyx Boox Go Color 7 Gen II review: AlternativesKobo Libra Colour
It's displayed colors might look washed out in comparison to the Go Color 7 II, but that means you can see a few more details in darker areas. It, too, allows you to read and write and Kobo's Advanced Notebooks are quite full featured. You will, of course, need to purchase the Kobo Stylus 2 separately if you want to use jot notes, but I think it's worth the additional ask. Compared to the Go Color 7 II, though, it's the better ereader and has a more streamlined interface.
Read my in-depth Kobo Libra Colour review
Kobo Clara Colour
If you don't want the writing features, but the color screen is important to you, you can save quite a bit of cash opting for a 6-inch color ereader and I think the Kobo Clara Colour is the best option in that regard. Seamless performance and a compact form factor are just some of its attributes.
Read my in-depth Kobo Clara Colour review
Amazon Kindle Paperwhite (2024)
The 12th generation Kindle Paperwhite is a fantastic 7-inch ereader with a black-and-white screen that I'd recommend if you're already part of the Amazon ecosystem. With direct access to the Kindle Store and a smoother interface than Boox, its E Ink Carta 1300 is one of the best optimized in the business.
Read our in-depth Amazon Kindle Paperwhite (2024) review
- Used as main ereader for approximately 11 weeks
- Used wireless and wired file transfer methods for books and audio files
- Separately purchased the Boox InkSense to test writing
When Boox sent the Go Color 7 Gen II for review without a stylus, I was a little surprised. On enquiring, I was told that the Boox InkSense – the supported pen – had been discontinued and I would be sent its replacement as soon as it was released. However, that meant delaying this review until later this year, so I purchased the InkSense myself from a third-party retailer in Australia (where the the testing was done) who still had stock. The stylus is now no longer available anywhere.
It was fantastic to see that I didn't need to manually pair the stylus to the Go Color 7 II – it just worked. To test the writing features, I wrote some notes and tried doodling a little (I can't draw to save my life).
To test the Go Color 7 II as an ereader, I used USB-OTG to transfer a few ebooks, but also signed into my Google Drive account for cloud transfer of other files, including the Bookerly font family I'm partial to and some MP3s. I also 'pushed' a couple of existing files I had in the cloud via the BooxDrop platform as well.
I compared the Go Color 7 II to two other color ereaders: the older Boox Go Color 7 and the Kobo Libra Colour. I also compared it to its 2025 sibling, the Onyx Boox Go 7, as well as the 2024 Amazon Kindle and Kindle Paperwhite for direct text comparisons.
I listened to some audio files using the native music player. I downloaded a couple of other reading apps (Kindle and Kobo) and used the native web browser to see what the experience is like on an E Ink tablet.
I've tested more than 30 ereaders in the last eight years, giving me the knowledge and expertise to comment on the Boox Go Color 7 Gen II's usability and performance.
Read more about how we test
[First published August 2025]
Categories: Reviews
Pages
Custom Search